How To: Import Images for Products
There are two ways to import images in the Administration panel:
- Administration → Import data → Products: import products along with main images.
- Administration → Import data → Products → Images: import main AND additional images for existing products.
Important
Both ways require a properly formatted CSV file. In most cases, images must be uploaded to the server of your store before you can import them.
Ways to Upload Images
Before you can import the images, you need to upload them. You can do it via:
- any FTP client of your choice;
- the built-in File editor.
File Editor
Let’s assume that we want to upload some images for products. These images will be used during the import, so we decide to store them in the Private files section, in a separate folder called images. Here’s what we do:
Create an archive called images.zip. That way we’ll have the images folder when we unpack the archive on our server.
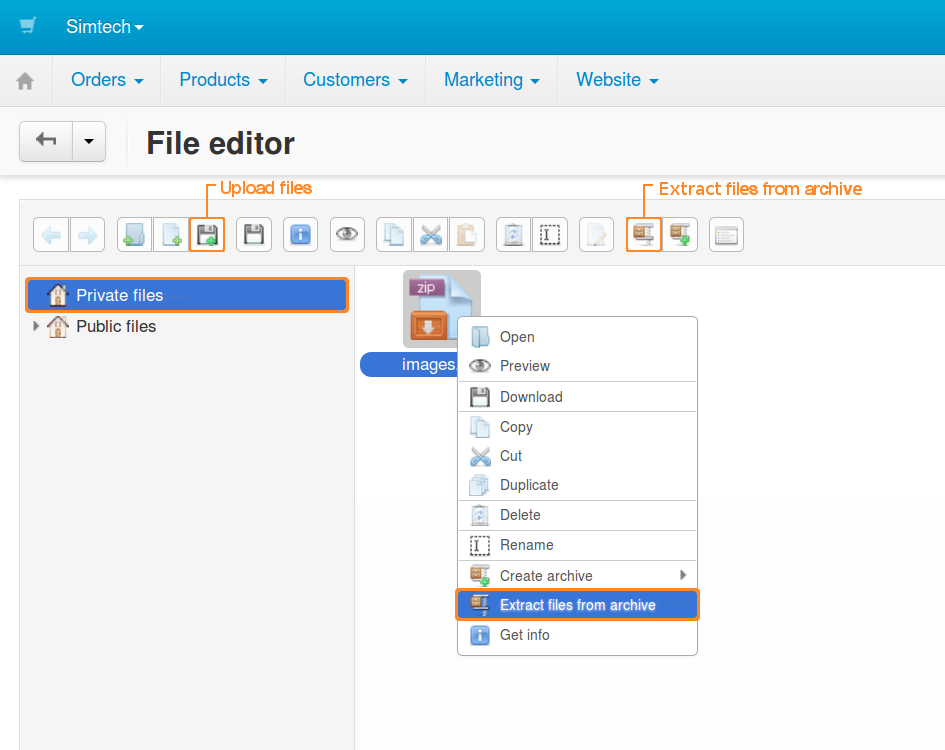
Go to Administration → Files in the Administration panel of your store.
Click Private files, then drag and drop your archive with images to the file area.
Right-click on the archive and choose Extract files from archive.
Congratulations! We now have a folder called images, and we can refer to those images in a CSV file.
FTP Client
If you use an FTP client, upload the images to var/files/[number]. That’s where the Private files are stored.
Note
The [number] is determined by the ID of the store or vendor. So, if you want to add a private file for the first storefront (or if you have only one storefront), the path will be var/files/1.
Hint
Public files are located in images/companies/[number].
Ways to Specify Images in CSV Files
There are multiple ways to specify where CS-Cart or Multi-Vendor should look for images.
Way 1. An image URL like
http://www.example.com/test_image.jpg.The URL doesn’t have to lead to your store—you can upload images to an image hosting service and use those URLs. Then the images will be downloaded to your server from there.
Way 2. An absolute path from the root directory of your server to the image file. For example:
/path/to/cs-cart/var/files/1/test_image.jpg.
Important
Ways 3 and 4 require you to upload the images to the Private files section or its subdirectories as described above.
Way 3. A relative path to the image file from the Private files section. For example:
images/test_image.jpg.Way 4. Only the name of the image file:
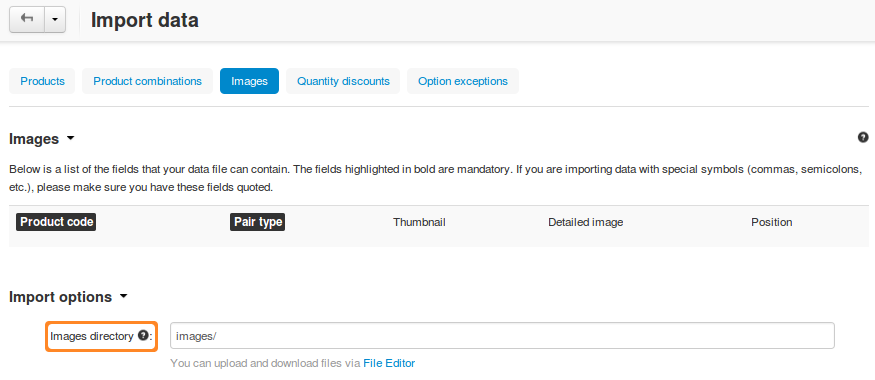
test_image.jpg.In this case you’ll also need to specify a relative path to the image files from the Private files section. But unlike Way 3, you’ll need to do it in the CS-Cart Administration panel: there is a special field called Images directory.
If your image files lie directly in the Private files section, then leave Images directory empty.
Note
The value of the Images directory is ignored for Ways 1 - 3.
Hint
You can also specify alternative text for images. Do it after the path or name of the image file, like test_image.jpg#{[de]:ALT TEXT;[en]:ALT TEXT;}.
Examples of Importing Images
Example 1: Import Products along with Main Images
Important
Additional product images will have to be imported separately.
Prepare the images for import and upload them where necessary.
In this example we’ll upload the images to the to the images directory in the Private files section as described above.
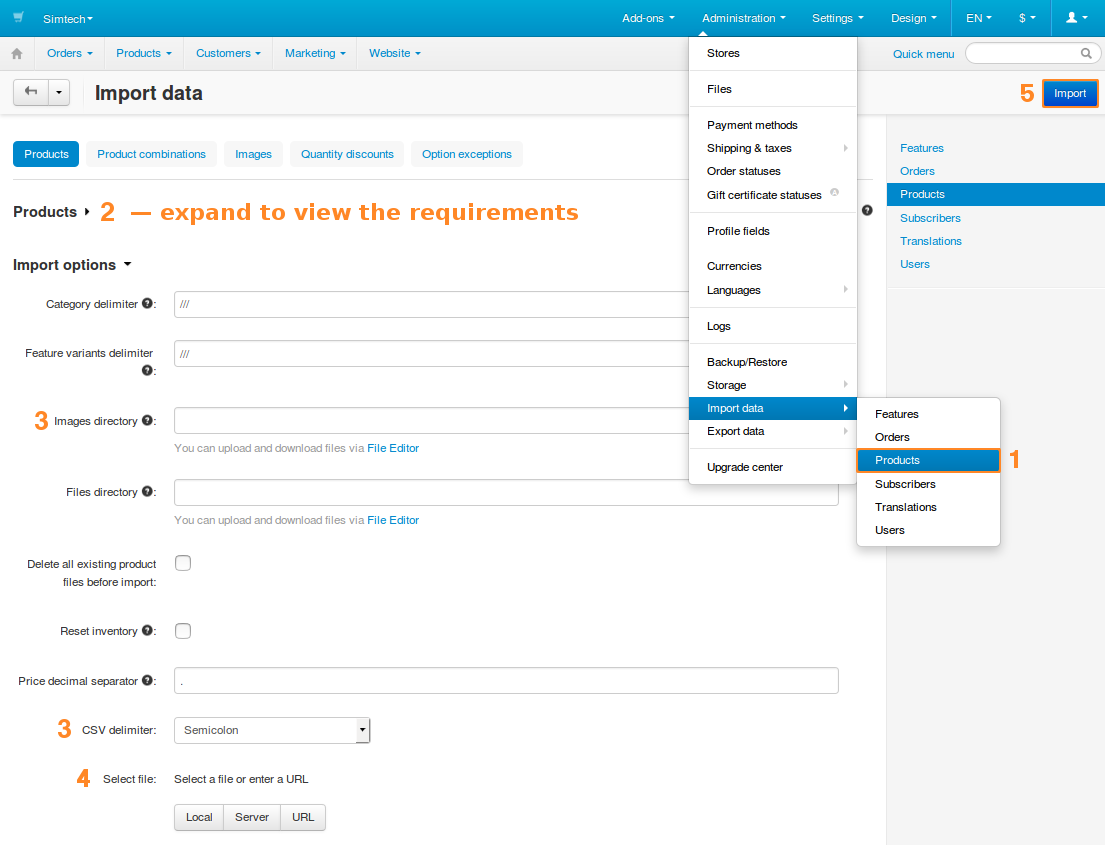
Go to Administration → Import data → Products [1] in the Administration panel of your store.
Make sure that your CSV file meets the requirements [2]. Here’s an extract from our CSV file:
Product code;Language;Product name;Detailed image
"D00014MK1P";"en";"My New Product";"images/test_image.jpg"
You can copy this extract to an empty .txt file, change the file’s extension to .csv, and open it in a spreadsheet editor, for example LibreOffice Calc.
Product code—determines the product to which an image belongs. If you enter a non-existing product code in the CSV file, a new product with the specified image will be created.
Hint
To get the codes of existing products in a CSV file, go to Administration → Export data → Products and export your products.
Language—a two-letter language code, for example,
en. This is a required field for importing products.Detailed image—the name (and sometimes location) of the image. In this example we specify a relative path to the image file from the Private files section.
Specify the import options [3]. Not all of them are required, since we’re not importing product categories, prices, etc. Here are the options that pose interest:
- Images directory—since we specified the locations of the images in the CSV file, this setting will be ignored.
- CSV delimiter—select how the columns are separated from each other in your CSV file. The extract above uses semicolon (
;) as a delimiter.
Select a CSV file to import [4]:
- Local—upload a file from your computer.
- Server—choose one of the files from the server of your store.
- URL—enter the direct link to the CSV file.
Click Import [5].
You’ll see a bar indicating the import progress. Once it is full, the images of the specified products will be updated. Products with non-existent product codes will be created.
Example 2: Import Main and Additional Images for Existing Products
Prepare the images for import and upload them where necessary.
In this example we’ll upload the images to the to the images directory in the Private files section as described above.
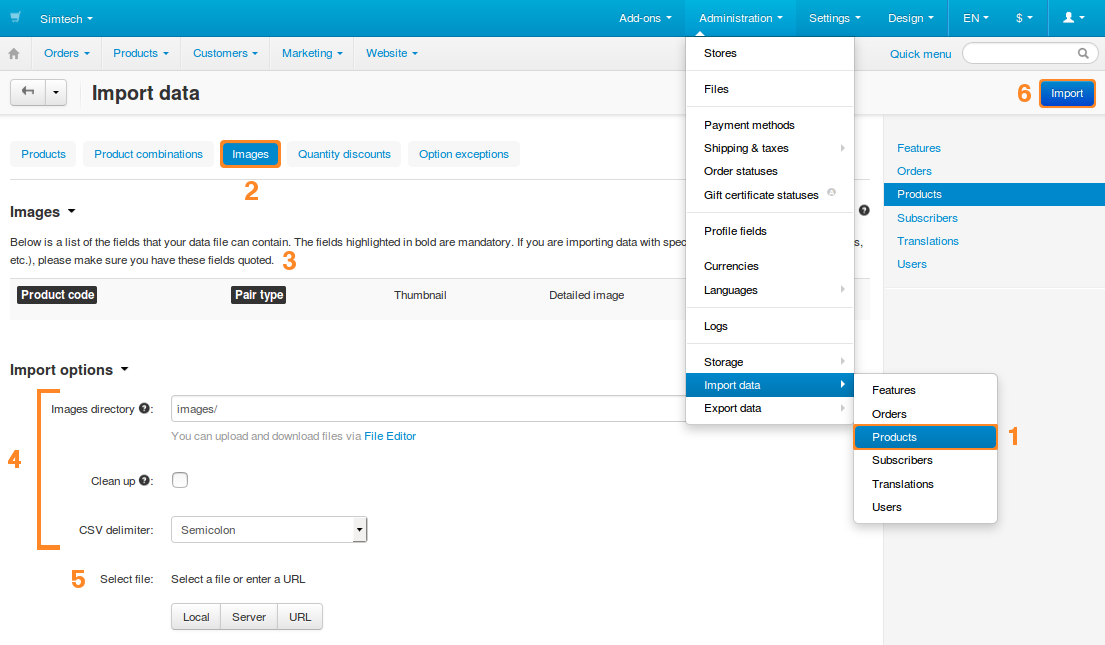
Go to Administration → Import data → Products [1] in the Administration panel of your store.
Switch to the Images tab [2]. Make sure that your CSV file meets the requirements described there [3].
Here’s an extract from our CSV file:
Product code;Pair type;Thumbnail;Detailed image
"G0017";"M";"";"test_image.jpg"
You can copy this extract to an empty .txt file, change the file’s extension to .csv, and open it in a spreadsheet editor, for example LibreOffice Calc.
Product code—determines the product to which an image belongs. If you enter a code that doesn’t exist, the entry will be skipped.
Hint
To get the codes of existing products in a CSV file, go to Administration → Export data → Products and export your products.
Pair type—determines the type of the image:
- M—main.
- A—additional.
Thumbnail—a smaller version of the image. We left the field empty, so that the thumbnail would be generated automatically from the detailed image.
Detailed image—the name (and sometimes location) of the image. In this example we only specify the name of the file with its extension.
Specify the import options [4]:
- Images directory—since in this example we don’t specify the location of the images in the CSV file, we’ll need to specify the relative path to the directory with images from the Private files section. In this example we type
images/in this field. - Clean up—tick this checkbox to delete the existing images of a product before importing new additional images for it.
- CSV delimiter—select how the columns are separated from each other in your CSV file. The extract above uses semicolon (
;) as a delimiter.
- Images directory—since in this example we don’t specify the location of the images in the CSV file, we’ll need to specify the relative path to the directory with images from the Private files section. In this example we type
Select a CSV file to import [5]:
- Local—upload a file from your computer.
- Server—choose one of the files from the server of your store.
- URL—enter the direct link to the CSV file.
Click Import [6].
You’ll see a bar indicating the import progress. Once it is full, the images of the products should be updated. Entries with non-existing product code will be skipped.
Questions & Feedback
Have any questions that weren't answered here? Need help with solving a problem in your online store? Want to report a bug in our software? Find out how to contact us.