How To: Add Custom Code or Script to Page in CS-Cart and Multi-Vendor
Sometimes you need to add JavaScript or some other code from a third-party service (for example, to add an online chat to the site). CS-Cart and Multi-Vendor allow you to do it without modifying files, via blocks.
This article will explain how to add some code to a page of your store. We’ll cover one example and explain what to do in other cases.
For example, we need to add the following code to ALL pages of the site:
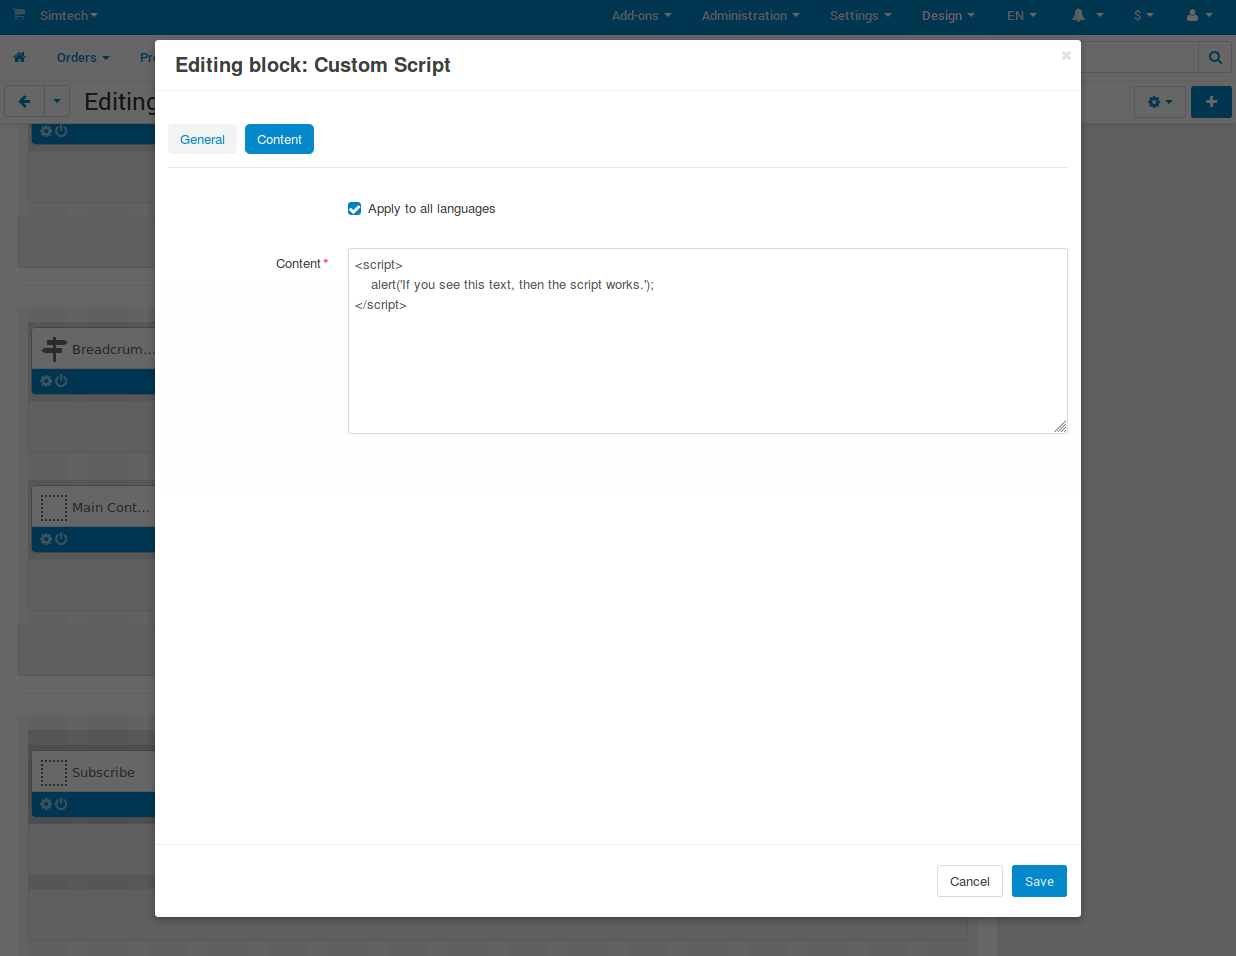
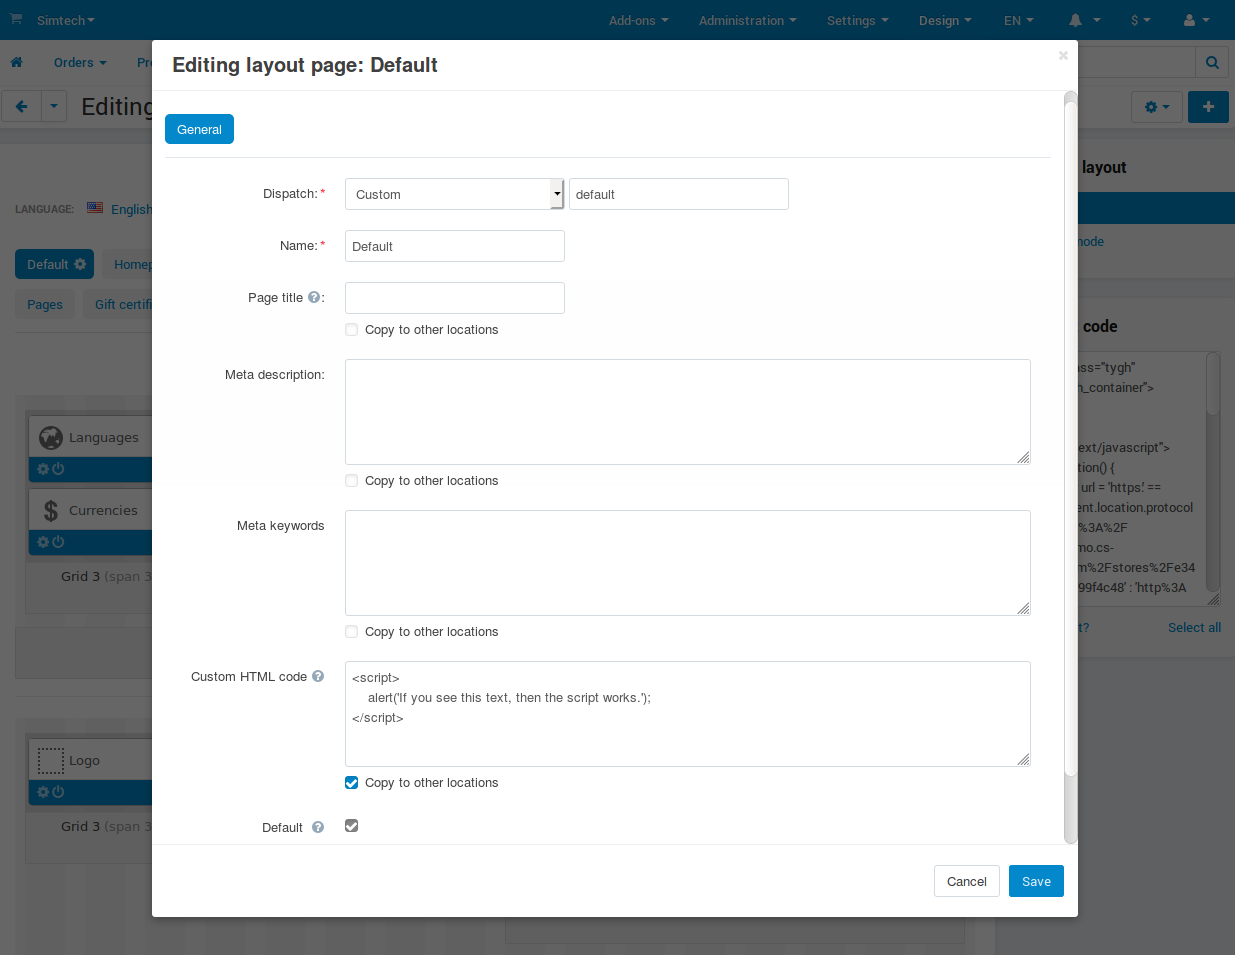
<script>
    alert('If you see this text, then the script works.');
</script>
This code is perfect for for experiments—when you come to the page, you’ll immediately see if the code works. That way you can check which pages have the code, and which don’t. However, it’s best to try this particular script at the demo site or a test installation—a pop-up at every page distracts people from making purchases.
Adding Code to <Body> or Particular Place of the Page
Disable WYSIWYG editors. They are convenient for writing blog articles or product descriptions, but can remove the “unnecessary bits” of the code and break it. Even if you switch to the source code editing mode (usually it’s the <> button in the editor), the code can get broken next time you edit and save the block.
Note
Go to Settings → Appearance, set Default WYSIWYG editor to Do not use, and save your changes.
Create a new block. You can place blocks on different layout pages (home page, product pages, blog articles, etc.). The choice depends on where you need to add the code.
In our case we need to add the code to all pages. The easiest way is to do it on the default layout page. If you add a block to Top panel, Header, or better yet, to Footer (because it doesn’t have any blocks by default), the code will be added everywhere.
But not all layout pages use Top panel, Header, and Footer from the default layout page. For example, the checkout page has only Content, and all other blocks are removed by default. Your store might have other layout pages like this. Add the block to these layout pages as well.
There are other cases, when you need the code on all product pages or blog articles. Then you need to select the corresponding layout page (for example, “Products”) and add the block there. If you only need the block for a particular product, it’s best to disable it by default. You’ll enable it for a product on the Layout tab of the product editing page.
When you create a new block, you have to select its type. There are two types of blocks for adding code:
HTML block is enough in most cases. It supports texts or the scripts like JavaScript from the beginning of this article. That’s the block we recommend, and it’s the only option available to vendors in Multi-Vendor (assuming they can edit layouts).
HTML block with Smarty support comes in handy when you need to receive some data from CS-Cart or Multi-Vendor with functions.
Important
If you add the code into the block with Smarty support, and the code includes
{or}, then surround the code with the following tags:{literal}...{/literal}.
Add your code to the Content tab and save your changes. Note that the content is language-dependent:
When you create block, its content will be copied to all the languages you have.
If you edit the existing block later to change the code, make sure to tick the Apply to all languages checkbox on the Content tab. Otherwise the content will depend on the language selected by the customer.
(optional) CS-Cart and Multi-Vendor move scripts to the end of the page code. The script from this article triggers a browser pop-up which doesn’t depend on the position of the script in the page code. However, if you’re adding an object (such as map or banner), you may find it at the bottom of the page, and not where the block is.
To show everything where it’s meant to appear, and to prevent the script from being moved to the end of the page, add the
data-no-defermicroformat. Here is how it looks with our code:<script data-no-defer> alert('If you see this text, then the script works.'); </script>
Adding Code to <Head>
Sometimes the code needs to be added to <head>...</head>. This is done in the settings of layout pages, in the Custom HTML code field. The layout pages where you add the code determine which pages of your store will have that code.
If you’re adding the code to the default layout page, you’ll see the Copy to other locations checkbox. If you tick it, you’ll be able to add the code to all the pages of your site quickly, without going through every layout page.
Note
The code in <head>...</head> doesn’t depend on the language selected by the customer.
Questions & Feedback
Have any questions that weren't answered here? Need help with solving a problem in your online store? Want to report a bug in our software? Find out how to contact us.