Configuring CS-Cart
Development Configuration File
CS-Cart allows you to create a separate configuration file where you can specify settings without modifying config.local.php. This file is called local_conf.php.
Note
The settings specified in local_conf.php take priority over config.local.php.
To configure CS-Cart for development, complete the steps below:
Create local_conf.php in the root directory of your installation.
Open local_conf.php and add the following code to it:
 <?php

// If you need to work on a live store, you can make the settings below apply to a certain IP only, so that the customers won't be affected. Specify your IP address instead of 127.0.0.1.
if ($_SERVER['REMOTE_ADDR'] == '127.0.0.1') {

    // Turn on the Debug mode for the admin panel and the storefront
    // define('DEBUG_MODE', true);

    // Use the Development mode to display errors
    define('DEVELOPMENT', true);

    // Display SMARTY and PHP errors on the screen.
    error_reporting(E_ALL);
    ini_set('display_errors', 'on');
    ini_set('display_startup_errors', true);

    // Disable PHP block caching
    $config['tweaks']['disable_block_cache'] = true;

}

// You can change configuration without changing config.local.php.

/*
$config['db_host'] = '%DB_HOST%';
$config['db_name'] = '%DB_NAME%';
$config['db_user'] = '%DB_USER%';
$config['db_password'] = '%DB_PASSWORD%';

$config['http_host'] = '%HTTP_HOST%';
$config['http_path'] = '%HOST_DIR%';

$config['https_host'] = '%HTTPS_HOST%';
$config['https_path'] = '%HOST_DIR%';
*/

// You can also configure cache and storage backend

/*
// Cache backend
// Available backends: file, sqlite, database, redis, xcache, apc
// To use sqlite cache the "sqlite3" PHP module should be installed
// To use xcache cache the "xcache" PHP module should be installed
// To use apc cache the "apc" PHP module should be installed
$config['cache_backend'] = 'file';
$config['cache_redis_server'] = 'localhost';
$config['cache_redis_global_ttl'] = 0; // set this if your cache size reaches Redis server memory size

// Storage backend for sessions. Available backends: database, redis
$config['session_backend'] = 'database';
$config['session_redis_server'] = 'localhost';
$config['cache_apc_global_ttl'] = 0;
$config['cache_xcache_global_ttl'] = 0;
*/
Configuration Explained
IP Restrictions
You can limit the settings you specify in local_conf.php to a certain IP. That is useful if you work on a live store: that way only you would see the error messages and the debugger.
The IP restrictions are added with the following part of the code:
if ($_SERVER['REMOTE_ADDR'] == '127.0.0.1')
Hint
If you work on a live store, replace 127.0.0.1 with your IP address. If the store isn’t available to public yet, you can remove the condition.
Debug Mode
CS-Cart has a built-in debugger that shows:
- Server and PHP settings.
- The list of SQL queries during the opening of the current page.
- The templates that were used for building the page.
- Request parameters.
- The time and memory used for opening the page.
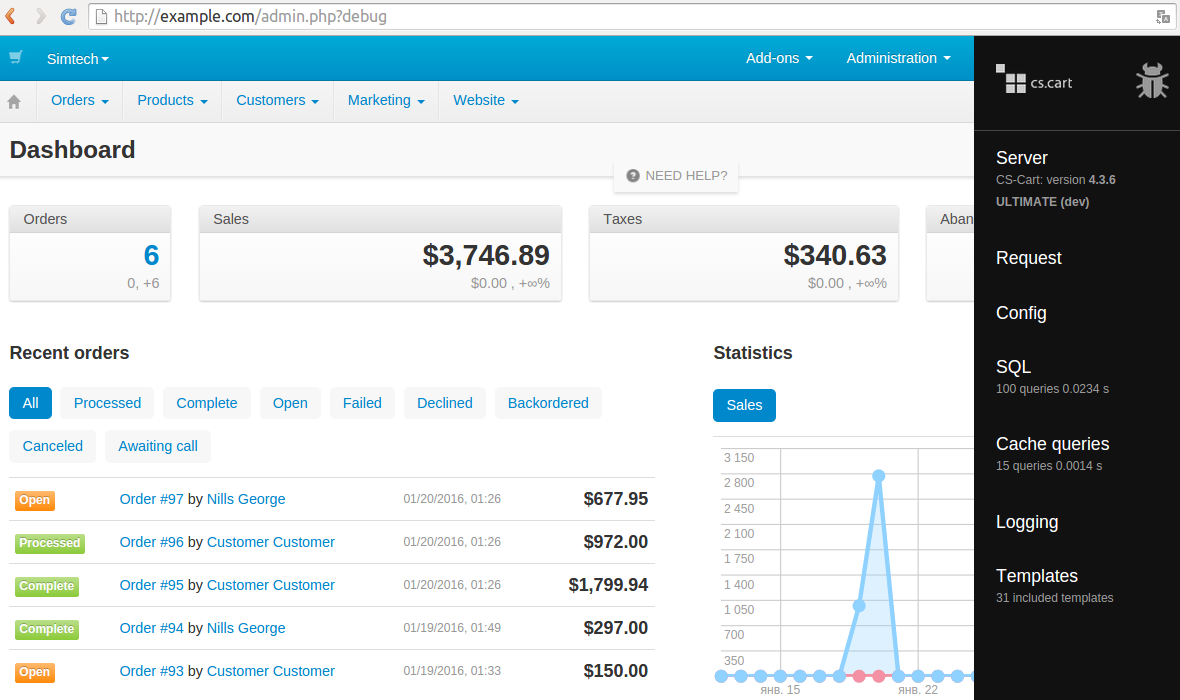
To access the debugger, go to the Administration panel and add the debug parameter to the URL, so that it would look like this:
http://example.com/admin.php?debug
The bug icon will appear in the top right corner of the page. Click it to open and close the debugger sidebar. Alternatively, you can hit Ctrl + Alt + D.
Note
Using debug will also make the debugger available in the customer area for the current browser session.
To keep the debugger enabled both on the storefront and in the administration panel at all times, uncomment the following line in local_conf.php:
define('DEBUG_MODE', true);
Warning
Do not use define('DEBUG_MODE', true); on a live store. That way your store visitors may get access to your debug data, which is bad.
Development Mode
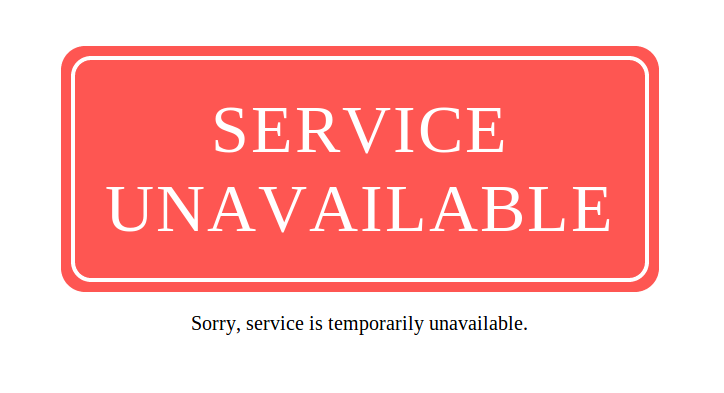
When you write PHP code, a Smarty template or an SQL query, mistakes might happen. Usually Smarty and PHP errors result in a blank page. A database error caused by a wrong SQL query will result in the following message: SERVICE UNAVAILABLE. Sorry, service is temporarily unavailable.
To see the actual error messages, use Development Mode. You can enable it in local_conf.php with the following line:
define('DEVELOPMENT', true);
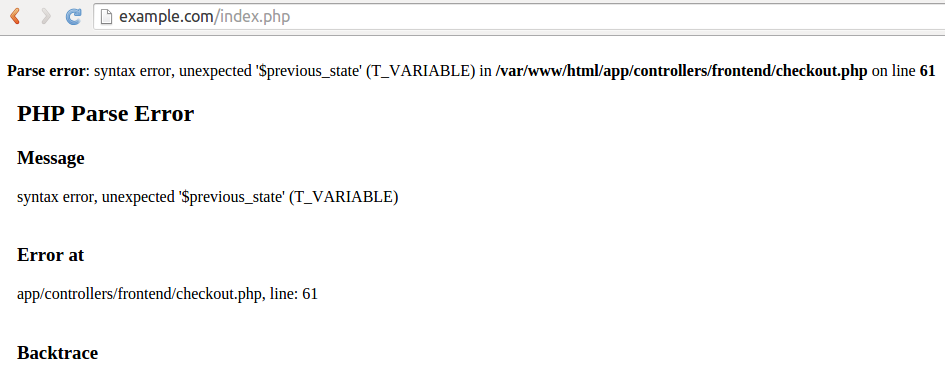
Now, if something goes wrong, you should see an error message with the path to the file that caused the error.
Development Mode has another useful feature for add-on developers.
CS-Cart stores the CSS and TPL files of the installed add-ons in the design/themes directory. Normally CS-Cart deletes these files when the add-on is uninstalled. If the add-on is installed again, these files are taken from var/themes_repository.
That way you may lose your changes if you modify the .css and .tpl files of an add-on in the design/themes directory and then uninstall that add-on in the Administration panel.
However, if you enable Development Mode, the files of the add-on in the design/themes directory won’t be deleted when you uninstall the add-on.
Warning
If var/themes_repository has the .css or .tpl files of the add-on, they will still overwrite the files in design/themes when you install the add-on.
Display Smarty and PHP Errors on Screen
Sometimes you also need to redefine PHP and/or web server settings for the error messages to appear. That’s why we added the following code to local_conf.php:
error_reporting(E_ALL);
ini_set('display_errors', 'on');
ini_set('display_startup_errors', true);
Disable PHP Block Caching
CS-Cart caches blocks to reduce page loading times. However, when you work on a project, you want to see the latest changes you’ve made. That’s why you may want to disable PHP block caching by adding the following code to local_conf.php:
$config['tweaks']['disable_block_cache'] = true;
Database and Host Settings
You can redefine the database credentials and the HTTP host of your store. It is useful when you work on a local copy of an existing store and don’t want to change config.local.php.
Uncomment and specify these settings in local_conf.php:
$config['db_host'] = '%DB_HOST%';
$config['db_name'] = '%DB_NAME%';
$config['db_user'] = '%DB_USER%';
$config['db_password'] = '%DB_PASSWORD%';

$config['http_host'] = '%HTTP_HOST%';
$config['http_path'] = '%HOST_DIR%';

$config['https_host'] = '%HTTPS_HOST%';
$config['https_path'] = '%HOST_DIR%';
Hint
Learn more about these settings in Step 3 of the instruction about moving the store to a new server.
Cache and Session Backend
You can use local_conf.php to redefine storage the cache backend. Uncomment the following code and specify the desired settings:
$config['cache_backend'] = 'file';
$config['cache_redis_server'] = 'localhost';
$config['cache_redis_global_ttl'] = 0; // set this if your cache size reaches Redis server memory size
Note
The file, sqlite, database, redis, xcache, and apc backends are available. Sqlite, apc and xcache require the corresponding PHP modules to be installed on your server.
You can also change the storage backend for sessions. Uncomment the following code and specify the desired settings:
$config['session_backend'] = 'database';
$config['session_redis_server'] = 'localhost';
$config['cache_apc_global_ttl'] = 0;
$config['cache_xcache_global_ttl'] = 0;
Note
The database and redis backends are available for sessions.
Questions & Feedback
Have any questions that weren't answered here? Need help with solving a problem in your online store? Want to report a bug in our software? Find out how to contact us.