FAQ: How to Offer Upgrades for My Add-on via Upgrade Center
This is an article for developers who offer add-ons for CS-Cart and Multi-Vendor and would like to make upgrades easier for their customers. Instead of developing your own mechanism or asking your clients to change files manually on the server, you can just offer them to go to Administration → Upgrade center to get upgrades for your add-ons.
When Should I Release Add-on Upgrades?
There are two main reasons for releasing an upgrade:
You have developed some new functionality that you’re ready to give to your clients.
There have been some changes to CS-Cart/Multi-Vendor core API:
Some constants, classes, functions, or hooks used by your add-on have been removed.
The arguments of functions or hooks used by your add-on have been changed.
The constants, classes, functions, or hooks used by the add-on have been marked as deprecated. We don’t delete deprecated code immediately, but it’s best to switch to new functionality before we do that.
The structure of the database tables used by the add-on has changed.
This change doesn’t necessarily result in issues with your add-on—we maintain backward compatibility between CS-Cart releases. However, if your add-on makes direct requests to the tables instead of using core functions, the add-on might stop working properly.
Note
Around the time when we release a new version of CS-Cart/Multi-Vendor, we also announce changes to core API in the special section of developer documentation.
Where Should I Upload Upgrade Packages?
If you want your customers to use the Upgrade Center for upgrading their add-ons, then there are two ways:
- CS-Cart Marketplace. The Marketplace has all the necessary tools for building and distributing upgrades. That functionality is in closed beta; if you’d like to use it, please send a message to marketplace@cs-cart.com.
- Your own upgrade server. The server is necessary if you use your own mechanism of licensing and upgrade package distribution. This approach requires that you adjust your add-on accordingly and build upgrade packages yourself. You’ll find the instructions further in this article.
How Do I Make My Add-on Compatible Only With Specific CS-Cart Versions?
You can set all the requirements of your add-on in its addon.xml file: versions of CS-Cart and/or Multi-Vendor, PHP and its extensions, required and conflicting add-ons.
Important
The requirements of the addon.xml file are only checked during add-on installation. They ARE NOT checked during the upgrade.
If the requirements of the add-on change after the upgrade, it’s not enough to change addon.xml. To make sure that clients don’t install an upgrade that won’t work with their version, you have two options:
- Pass the customer’s CS-Cart/Multi-Vendor version number to your upgrade server and have the server determine whether to offer an upgrade or not.
- Add a validator to your upgrade package; have that validator prevent the installation of the upgrade package if the requirements aren’t met.
How Do I Adjust My Add-on for Working with the Upgrade Center?
CS-Cart and Multi-Vendor check for upgrades in 2 cases:
- When someone enters the administration panel (but only if the Check for updates automatically setting is enabled under Settings → General).
- Whenever someone goes to Administration → Upgrade center.
Here are some things to take into account when you make the add-on work with the Upgrade Center:
- To check for upgrades and download them, an add-on must have an Upgrade Center connector. This connector is a class that must be located in app/addons/[sample_addon]/Tygh/UpgradeCenter/Connectors/[SampleAddon]/Connector.php.
[sample_addon]— the identifier of the add-on.[SampleAddon]— the identifier of the add-on in camel case.
- The connector must extend the
\Tygh\UpgradeCenter\Connectors\BaseAddonConnectorclass and implement the\Tygh\UpgradeCenter\Connectors\IConnectorinterface. - The address of the upgrade server must be specified in the
urlfield in the result of calling theConnector::getConnectionDatamethod. - The data passed to the upgrade server for checking upgrade availability is specified in the
datafield in the results of calling theConnector::getConnectionDatamethod. Thedatafield is an array of entries likeparameter_name => parameter_value. - The download of the upgrade package is implemented in the
Connector::downloadPackagemethod.
Here is an example of connector with comments:
Download Connector.php example
<?php

namespace Tygh\UpgradeCenter\Connectors\SampleAddon;

use Tygh\Addons\SchemesManager;
use Tygh\Http;
use Tygh\Registry;
use Tygh\Settings;
use Tygh\Tools\Url;
use Tygh\UpgradeCenter\Connectors\BaseAddonConnector;
use Tygh\UpgradeCenter\Connectors\IConnector;

/**
 * Class Connector implements Upgrade center connector for the sample add-on.
 *
 * @package Tygh\UpgradeCenter\Connectors\SampleAddon
 */
class Connector extends BaseAddonConnector implements IConnector
{
    /**
     * @var string The name of the HTTP request parameter that indicates what action is requested from the upgrade server
     */
    const ACTION_PARAM = 'dispatch';

    /**
     * @var string The value of ACTION_PARAM that informs the upgrade server that CS-Cart has requested a check for available upgrades
     */
    const ACTION_CHECK_UPDATES = 'updates.check';

    /**
     * @var string The value of ACTION_PARAM that informs the upgrade server that CS-Cart has requested a download of the upgrade package
     */
    const ACTION_DOWNLOAD_PACKAGE = 'updates.download_package';

    /**
     * @var string Unique identifier of the add-on
     */
    protected $addon_id = 'sample_addon';

    /**
     * @var string Current add-on version
     */
    protected $addon_version;

    /**
     * @var string Store URL
     */
    protected $product_url;

    public function __construct()
    {
        parent::__construct();

        // upgrade server address must be specified in the Connector constructor
        $this->updates_server = 'https://updates.example.com';

        // add-on data
        $addon = SchemesManager::getScheme($this->addon_id);

        $this->addon_version = $addon->getVersion() ? $addon->getVersion() : '1.0';
        // value of the 'license_number' of the add-on
        $this->license_number = (string) Settings::instance()->getValue('license_number', $this->addon_id);

        // store data
        $this->product_name = PRODUCT_NAME;
        $this->product_version = PRODUCT_VERSION;
        $this->product_build = PRODUCT_BUILD;
        $this->product_edition = PRODUCT_EDITION;
        $this->product_url = Registry::get('config.current_location');
    }

    /**
     * Provides data to connect to the upgrade server of the add-on.
     * Called when checking for available updates.
     *
     * @return array
     */
    public function getConnectionData()
    {
        // store license can be accessed via $this->uc_settings['license_number']

        $data = [
            self::ACTION_PARAM => self::ACTION_CHECK_UPDATES,
            'addon_id'         => $this->addon_id,
            'addon_version'    => $this->addon_version,
            'license_number'   => $this->license_number,
            'product_name'     => $this->product_name,
            'product_version'  => $this->product_version,
            'product_build'    => $this->product_build,
            'product_edition'  => $this->product_edition,
            'product_url'      => $this->product_url,
        ];

        $headers = [];

        return [
            'method'  => 'get',
            'url'     => $this->updates_server,
            'data'    => $data,
            'headers' => $headers,
        ];
    }

    /**
     * Downloads an add-on upgrade package.
     *
     * @param array  $schema       Update package schema
     * @param string $package_path Absolute path on the server to put the update package to
     *
     * @return array
     */
    public function downloadPackage($schema, $package_path)
    {
        $download_url = new Url($this->updates_server);

        $download_url->setQueryParams(array_merge($download_url->getQueryParams(), [
            self::ACTION_PARAM => self::ACTION_DOWNLOAD_PACKAGE,
            'package_id'       => $schema['package_id'],
            'addon_id'         => $this->addon_id,
            'license_number'   => $this->license_number,
        ]));

        $download_url = $download_url->build();

        $request_result = Http::get($download_url, [], [
            'write_to_file' => $package_path,
        ]);

        if (!$request_result || strlen($error = Http::getError())) {
            $download_result = [false, __('text_uc_cant_download_package')];

            fn_rm($package_path);
        } else {
            $download_result = [true, ''];
        }

        return $download_result;
    }
}
How Do I Prepare an Upgrade Package?
Basic Information
To build an upgrade package, you’ll need archives with the old an the new versions of the add-on. Use our SDK and the following commands:
cscart-sdk addon:export   #export an archive with the current version of the add-on

cscart-sdk addon:build_upgrade   #build an upgrade package
Important
For the SDK to work, your add-on must have the following structure of files and folders:
├── app
│   └── addons
│       └── [sample_addon]
│           ├── addon.xml
│           ├── config.php
│           ├── func.php
│           ├── Tygh
│           │   └── UpgradeCenter
│           │       └── Connectors
│           │           └── [SampleAddon]
│           │               └── Connector.php
│           └── upgrades
│               ├── [version1]
│               │   ├── migrations
│               │   │   ├── 467676233_migration1.php
│               │   │   └── 467676233_migration2.php
│               │   │
│               │   ├── validators
│               │   │   ├── validator1.php
│               │   │   └── validator2.php
│               │   │
│               │   ├── scripts
│               │   │   ├── pre_script.php
│               │   │   └── post_script.php
│               │   │
│               │   ├── extra_files
│               │   │   ├── extra_file1.php
│               │   │   └── extra_file2.php
│               │   │
│               │   └── extra
│               │       └── extra.php
│               │
│               ├── [version2]
│                   │   ├── migrations
│                   │   │   ├── 467676233_migration1.php
│                   │   │   └── 467676233_migration2.php
│                   │   │
│                   │   ├── validators
│                   │   │   ├── validator1.php
│                   │   │   └── validator2.php
│                   │   │
│                   │   ├── scripts
│                   │   │   ├── pre_script.php
│                   │   │   └── post_script.php
│                   │   │
│                   │   ├── extra_files
│                   │   │   ├── extra_file1.php
│                   │   │   └── extra_file2.php
│                   │   │
│                   │   ├── extra
│                   │   │   └── extra.php
...
[sample_addon]—the identifier of the add-on.[SampleAddon]—the CamelCased identifier of the add-on.[version1]—a version, for example 1.1.0.[version2]—a version, for example 1.1.1.app/addons/[sample_addon]/upgrades/[version]/migrations—a folder with the migrations to be performed when upgrading to this [version].app/addons/[sample_addon]/upgrades/[version]/validators—a folder with the validators which must run their checks before upgrading to this [version].app/addons/[sample_addon]/upgrades/[version]/scripts—a folder with pre/post scripts to be executed before and after upgrading to this [version].app/addons/[sample_addon]/upgrades/[version]/extra_files—a folder with the extra files that are used only during the upgrade and aren’t added to CS-Cart/Multi-Vendor.app/addons/[sample_addon]/upgrades/[version]/extra/extra.php—a file for extending package.json of the upgrade package.Note
Files and folders in app/addons/[sample_addon]/upgrades/[version] aren’t required. For example, if the new version has no changes in the database, there’s no need to create a folder with migrations.
Migrations
Migrations apply during upgrade installation. They change the structure of tables of the store’s database or modify data in those tables.
To write a migration, use Phinx. Please note that CS-Cart uses an old version of Phinx (0.4.3), so not all instructions from the latest Phinx documentation may apply. Here are the old Phinx 0.4.3 docs about:
The migration class must contain the up method that will be executed during the upgrade process.
For example:
use Phinx\Migration\AbstractMigration;

class AddonsSampleAddonUpdateVersion extends AbstractMigration
{
    public function up()
    {
        $options = $this->adapter->getOptions();
        $pr = $options['prefix'];

        $this->execute("UPDATE {$pr}addons SET version = '1.1' WHERE addon = 'sample_addon'");
    }
}
Separate your changes between migrations: each migration should implement a single logically complete action.
Don’t change the migration names generated in the YYYYMMDDHHMMSS_my_new_migration.php format. If you write migrations manually, name them according to Phinx rules.
Don’t use raw SQL in migrations to change table structure; use only Phinx methods.
Don’t use CS-Cart core functions in the migrations: there is no guarantee that they will be available when an add-on upgrade is being installed. This will lead to the crash of the upgrade process and may result in a broken store.
Validators
Validators check if the store meets specific conditions before installing the upgrade package. Every validator is a separate class in the Tygh\UpgradeCenter\Validators namespace.
A validator must implement the IValidator interface and have 2 mandatory methods:
getName()must return a string with the displayed name of the validator.check($schema, $request)must return an array that contains two values:- a boolean flag that indicates that check has been passed successfully;
- a string message that will be displayed if the check is failed.
For example:
<?php

namespace Tygh\UpgradeCenter\Validators;

/**
 * Checks the minimum PHP version
 */
class PhpVersionValidator implements IValidator
{
    protected $minimal_php_version = '5.6.0';

    /** @inheritdoc */
    public function check($schema, $request)
    {
        if (version_compare(PHP_VERSION, $this->minimal_php_version) == -1) {
            return [
                false,
                __('checking_php_version_is_not_suitable', [
                    '[version]' => PHP_VERSION,
                    '[min]'     => $this->minimal_php_version,
                    '[max]'     => '7.x',
                ]),
            ];
        }

        return [true, []];
    }

    /** @inheritdoc */
    public function getName()
    {
        return 'PHP Version';
    }
}
Scripts
Scripts can extend or alter how the Upgrade Center works with your upgrade package during the upgrade. There are 2 types of scripts:
Pre-upgrade script pre_script.php is included after all the checks from validators have been passed.
Post-upgrade script post_script.php is included after the upgrade package has been installed. The post-script is mainly used to set post-upgrade notifications. To do so, add new item into the
$upgrade_notesarray within your script:<?php $upgrade_notes[] = [ 'title' => 'Sample Add-on v1.1 Changes', 'message' => 'Sample Add-on v1.1 Changes Description', ];
These script are included in the context of the \Tygh\UpgradeCenter\App class and can use all the properties and methods of this class. You may also use any CS-Cart core functions and classes here.
Extra Files
Use the extra_files folder for the files that are used only during the upgrade and aren’t added to CS-Cart/Multi-Vendor installation.
Extending the Schema of Upgrade Package
To extend the schema, write a script in the extra.php file. The script must return an array. That array will be merged with package.json of the upgrade package.
You can use it to add any additional data into the upgrade package. That data can be used during the upgrade process in your pre- and post-scripts.
For example, here is how you can offer your clients to skip CS-Cart’s built-in backup process during upgrade package installation:
<?php

return [
    'backup' => [
        'is_skippable'    => true,
        'skip_by_default' => true,
    ],
];
How Do I Set Up My Own Upgrade Server?
Note
You don’t have to set up your own upgrade server—there is another way. But if your add-ons use a licensing mechanism, then your own upgrade server is the right choice.
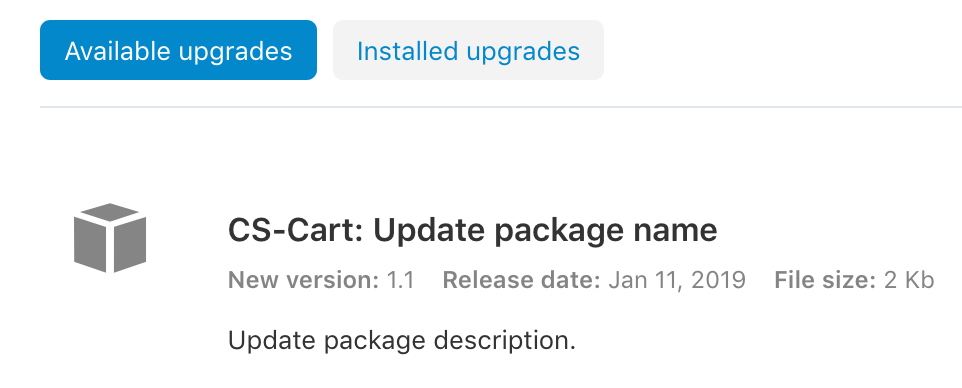
When CS-Cart sends a request about available upgrades, the upgrade server must respond in XML that looks like this:
<?xml version="1.0" encoding="utf-8" ?>
<update>
    <packages>
        <item id="unique_update_package_id">
            <file>update_package_name.zip</file>
            <name>Update package name</name>
            <description><![CDATA[Update package description.]]></description>
            <from_version>1.0</from_version>
            <to_version>1.1</to_version>
            <timestamp>1547199854</timestamp>
            <size>2048</size>
        </item>
    </packages>
</update>
update/packages/itemis a node that includes information about an upgrade.update/packages/item@idis the unique identifier of the upgrade package. When the connector passes this identifier to the upgrade server, the server must provide the archive with the upgrade package.update/packages/item/file—the name of the archive with the upgrade package.update/packages/item/name—the title of the upgrade package as it will appear in the Upgrade Center.update/packages/item/description—the description of the upgrade package. May contain HTML markup.update/packages/item/from_version—the current version of the add-on.update/packages/item/to_version—the version to which the add-on will be upgraded.update/packages/item/timestamp—the date of the upgrade package creation (UNIX timestamp).update/packages/item/size—the size of the upgrade package in bytes.Note
If there are no upgrades available, the server must return an empty response.
Here is how the package described above will look in the Upgrade Center:
Questions & Feedback
Have any questions that weren't answered here? Need help with solving a problem in your online store? Want to report a bug in our software? Find out how to contact us.