How To: Remove Demo Data
During CS-Cart installation, you may tick the Install demo data checkbox to fill your store with demo products, orders, and banners. This is useful if you want to see how your store will look like, or if you want to test CS-Cart, but eventually you’ll need an empty store to fill it with your products.
There is no way to remove all demo data (products, filters, orders, discounts, blog posts, tags, and banners) at once. Instead, it is possible to remove this data from individual pages such as Products, Filters, View orders, Promotions, Blog, Tags, and Banners.
To remove demo data, please follow these steps:
Step 1. Remove All Demo Products
Remove all the demo products using one of the following ways:
Way 1. Delete Whole Categories
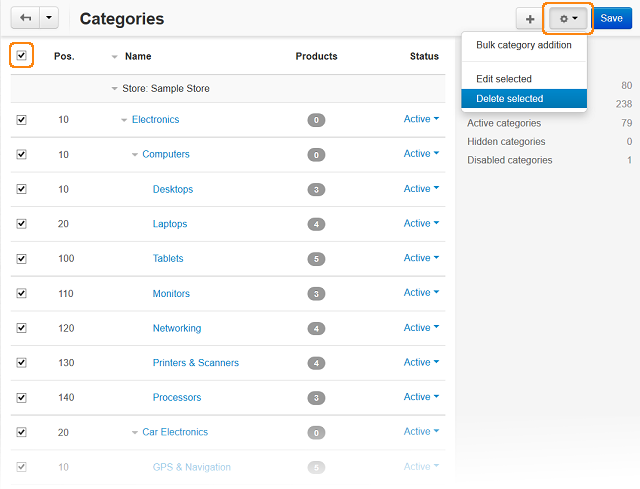
- In the administration panel, go to Products → Categories.
- Select all the demo categories.
- Click the gear button and choose the Delete selected action.
- Click the OK button in the confirmation dialog.
- Delete all categories.
Important
If you use CS-Cart 4.3.4 and earlier, all the demo products in the deleted categories will be deleted as well.
CS-Cart 4.3.5 introduced the Trash category, that stores products form the deleted categories. These products won’t show on the storefront, but their data, including images, is still stored on the server. To delete those products, simply delete the Trash category: when you delete some other category later, the Trash category will be created automatically.
Way 2. Delete Individual Products
- In the administration panel, go to Products → Products.
- Click on the number link to the right of the Total items label and select 100 from the list.
- Select all the products on the page by ticking the top left checkbox.
- Click the gear button and choose the Delete selected action.
- Click the OK button in the confirmation dialog.
- Repeat this step, if necessary.
Step 2. Delete All Orders
2.1. Go to Orders → View orders.
2.2. Click on the number link to the right of the Total items label and select 100 from the list.
2.3. Select all the orders on the page by ticking the top left checkbox.
2.4. Click the gear button and select the Delete selected action.
2.5. Click the OK button in the confirmation dialog.
Step 3. Delete All Product Filters
3.1. Go to Products → Filters.
3.2. Click the gear button and select the Delete action next to each product filter.
3.3. Click the OK button in the confirmation dialog.
Step 4. Delete All Discounts and Coupons
4.1. Go to Marketing → Promotions.
4.2. Select all the promotions, click the gear button and choose the Delete selected action.
4.3. Click the OK button in the confirmation dialog.
Step 5. Delete All Banners
5.1. Go to Marketing → Banners.
5.2. Select all the banners, click the gear button and choose the Delete selected action.
5.3. Click the OK button in the confirmation dialog.
Step 6. Delete All Blog Posts
6.1. Go to Website → Blog.
6.2. Select all the posts by ticking the top left checkbox.
6.3. Click the gear button and choose the Delete selected action.
6.4. Click the OK button in the confirmation dialog.
Step 7. Delete All Tags
7.1. Go to Website → Tags.
7.2. Select all the tags by ticking the top left checkbox.
7.3. Click the gear button and choose the Delete selected action.
7.4. Click the OK button in the confirmation dialog.
Questions & Feedback
Have any questions that weren't answered here? Need help with solving a problem in your online store? Want to report a bug in our software? Find out how to contact us.