How To: Upgrade Your Store with Store Import
Important
Before you attempt to upgrade your store, make sure you have enough space on your server hard drive.
Step 1. Install CS-Cart You’d Like to Upgrade To
1.1. Download a newer version of CS-Cart/Multi-Vendor that you’d like to upgrade to (let’s call it the new version). Check if this version of CS-Cart/Multi-Vendor supports the Store Import. Then make sure that Store Import can import data from your current version. You can find this information here.
1.2. Install the new CS-Cart/Multi-Vendor in a separate subdirectory of your old installation.
For example, if your original store is available at example.com, create the/storedirectory in the root of example.com. Then unpack the installation archive of your new store in that directory. You should then be able to install the new CS-Cart/Multi-Vendor by using this URL: example.com/store.
Important
Store Import can’t transfer data between CS-Cart and Multi-Vendor and can’t import CS-Cart Community stores directly.
Note
If your old store used several languages, you may want to choose the same languages for the newly installed CS-Cart. You can change the languages in the Administration → Languages → Manage languages section of the Administration panel.
Step 2. Install Store Import
Important
The Store Import add-on comes by default with CS-Cart/Multi-Vendor 4.3.1 and 4.3.2. If you’d like to import your data to a later version of CS-Cart, please get the free Store Import add-on from the CS-Cart Marketplace.
2.1. In your Administration panel, go to Add-ons → Manage add-ons and click the + button at the top right.
2.2. Upload the .zip archive containing the Store Import add-on.
2.3. Click Upload & install.
2.4. Switch to the Browse all available add-ons tab.
2.5. Find Store Import and click the Install button next to it.

Step 3. Import Data
3.1. Go to Add-ons → Store Import.
3.2. On the opened page enter the server path to the old store.
It is the path where your existing store is installed on the server. For example, on UNIX-based systems it should look something similar to /var/www/examplestore, and on Windows it will be something like C:/examplestore.
3.3. Click the Validate button. If the path you entered was correct, the button will take you to the next step called Validate and import.

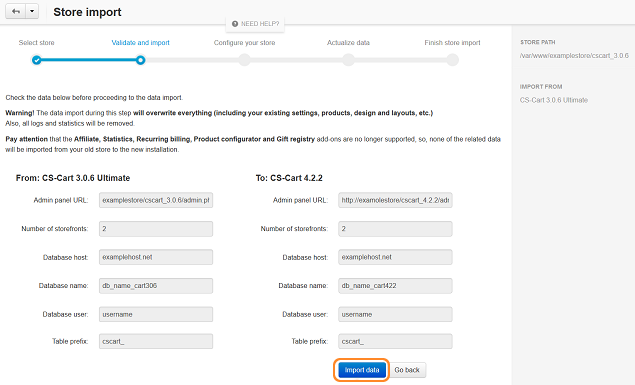
3.4. You will see two tables with the information about the imported store and the store where you want to import data. Press the Import data button to start the importing process.

3.5. You’ll see the import progress bar running. The time it takes to import the data depends on the size of your database: it can take a couple of minutes or a couple of hours.
Important
The add-on imports all data from 3.0.x, but doesn’t import some settings and most of the layouts from 2.2.4/2.2.5. Learn more about imported data.
Step 4. Configure Your New Store
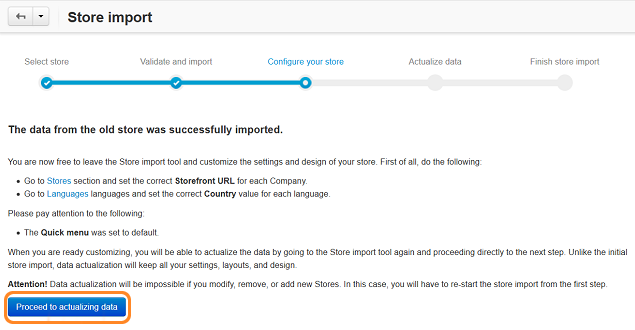
You’ve reached the Configure your store step. Now you can to leave the Store Import page and configure your new store. It can take you some time to modify the CSS styles, layouts, locations, etc. In the meantime your old CS-Cart store can continue working as usual.
Steps 5 and 6 are optional. You don’t have to keep your old store open while you configure your new store. Then there’s no need to import any more data, and you can go straight to Step 7.
Note
CS-Cart users should go to Administration → Stores, click the name of the storefront and set the correct Storefront URL.
Important
Don’t use both the old and the new store at the same time with one license. Keep the new store closed (Settings → General → Close storefront) while you configure it. Close the storefront of the old store right after you go live with your new store. Learn more about closing your storefront.

Step 5. Actualize Data (Optional)
When your new store is ready to go live, you can import the data that accumulated in your old store while you worked on the new one.
5.1. Go to Add-ons → Store Import.
5.2. Click Proceed to actualizing data. You will see the information about the latest store import.
5.3. Click the Actualize data button to import the data from the old store.
Important
This step overwrites all the data, but doesn’t import settings and layouts. If you want to exclude some other data from import, see the corresponding article.
To skip the actualization step, click the Complete store import button.
Step 6. Finish Store Import (Optional)
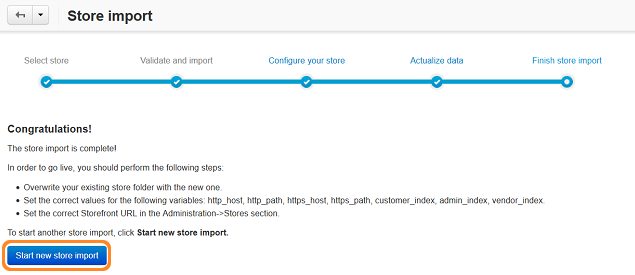
After the successful data import you proceed to the Finish store import step. Now you can go live with your new store. You can always return to the Configure your store and Actualize data steps by clicking the corresponding links.

If you want to launch the import process again, click the Start new store import button.
Step 7. Go Live
Once you’ve imported the data and configured your new store, you can replace your old store with it.
7.1. Back up the files and database of your old store. Learn more about backing up the database in older versions of CS-Cart/Multi-Vendor.
7.2. Delete every file in the root directory of your old store on the server. Keep only the folder with your new store (in our case it’s /examplestore).
7.3. Move your new store from the /examplestore folder to the root directory of your old store. Learn more about moving your store to a different folder.
Questions & Feedback
Have any questions that weren't answered here? Need help with solving a problem in your online store? Want to report a bug in our software? Find out how to contact us.