GA Pro
Overview
GA Pro is a professional solution for CS-Cart store owners which allows tracking some additional information about your customers, like when customers added items to cart, started the checkout process, completed a purchase, and many more. Besides, everything in reports is customizable, it meets your specific analysis needs. You can find what is important for your business.
By implementing Enhanced Ecommerce, you get more data and more insight, and that will give you more opportunity for improvements.
Implementing Enhanced Ecommerce is quite difficult and risky, especially on the production site with important data. It will definitely require technical skills. With our GA Pro add-on, you won’t need to worry about that. All you need to do is simply install the add-on, get a Tracking id from Google Analytics and enjoy using all the useful features of Enhanced Ecommerce.
Check out an overview of GA Pro:
To learn more about Enhanced Ecommerce, please visit Google Support.
What events does the add-on track?
Here is a list of events the add-on tracks in your store:
- product view (when coming from a category or home page)
- product quick view (when coming from a category or home page)
- add to cart
- remove from cart
- add to comparison list
- add to wishlist
- buy in one click
- call request

- product search
- page view
- block display (tracks which of the blocks are displayed when a customer views a page)
Compatibility
The add-on is compatible with CS-Cart and Multi-Vendor 4.10 and above, but only versions 4.12.x and above are supported. Minimum required PHP version is 7.1.
See more information about compatibility of our add-ons here.
Note
The GA Pro add-on is not compatible with the default Google Analytics add-on and retailCRM [beta] ad-on.
Support
You are guaranteed a quality add-on supported by the future versions. If you need help, please contact us via our help desk system.
Demo
Check out the GA Pro add-on in our demo store.
Note
Every half an hour the demo store is reset to the default state.
Managing in the admin panel
Installing the add-on
Install the “GA Pro” add-on on the add-ons list page (“Add-ons” → ”Manage add-ons”). Click the + button in the top right corner, select an archive and click Upload & install. You can now find the installed add-on in the list of installed add-ons, just make sure it is set to Active.
Available settings
To set up the add-on, configure the following settings:
General
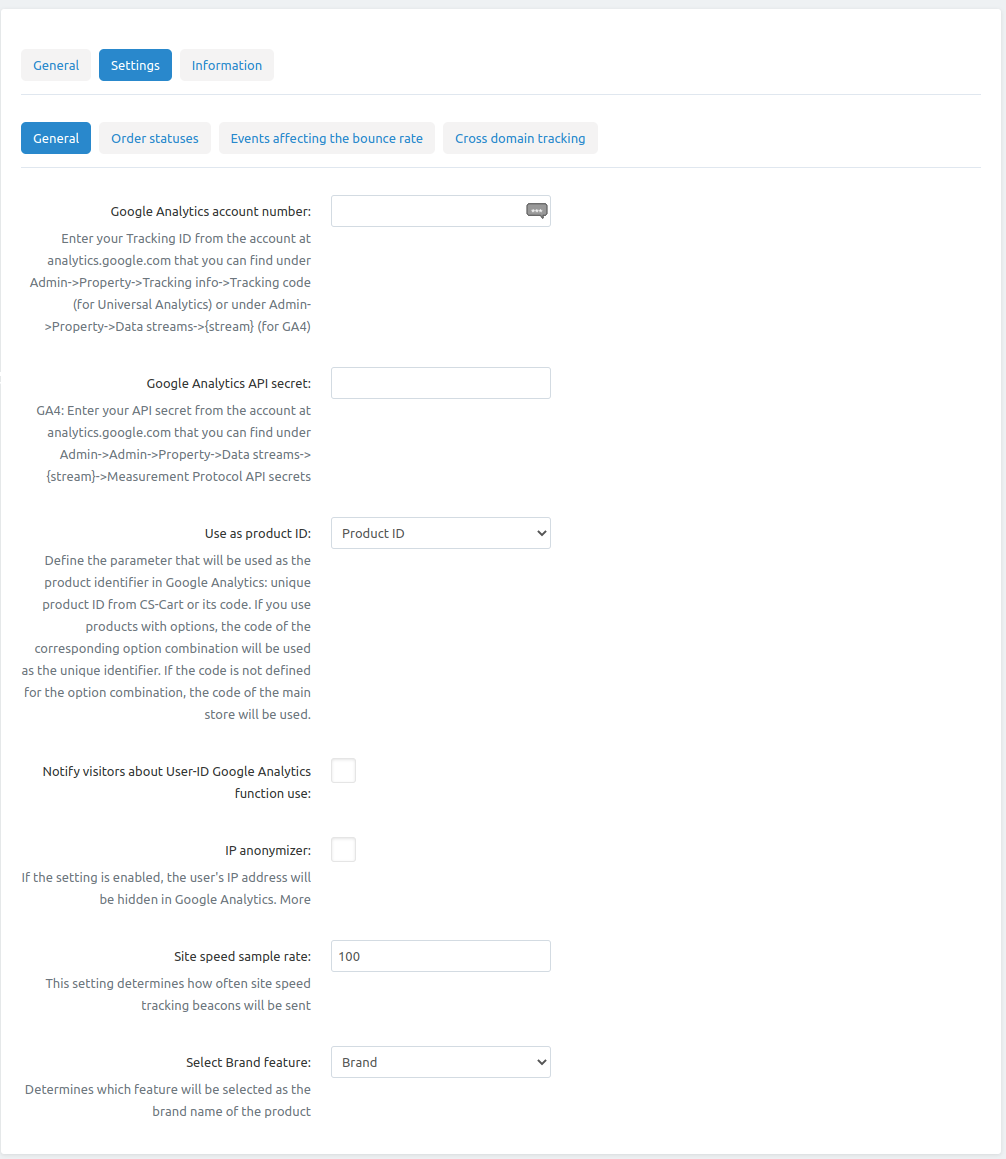
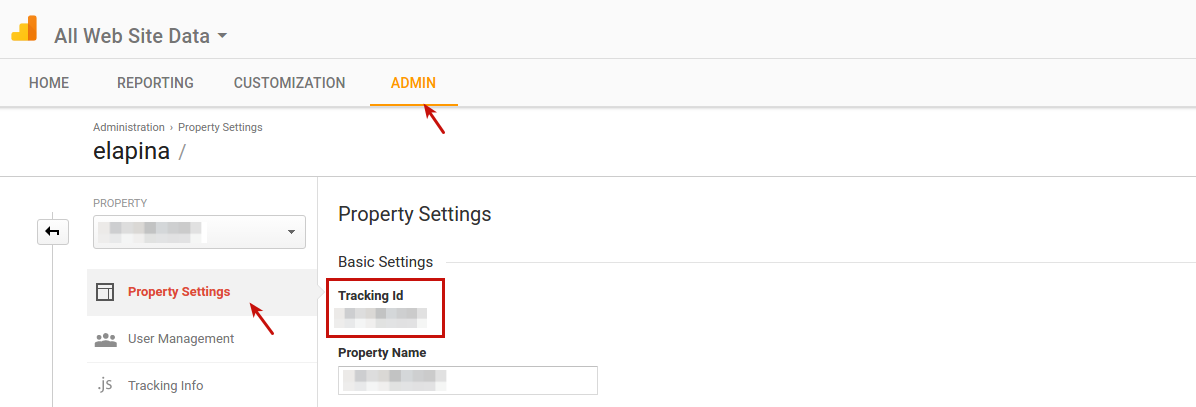
- Google Analytics account number—Enter your Tracking ID that you can find under Admin -> Property settings -> Tracking ID.
- Use as product ID—Define the parameter that will be used as the product identifier in Google Analytics: unique product ID from CS-Cart or its code (SKU). If you use products with options, the code of the corresponding option combination will be used as the unique identifier. If the code is not defined for the option combination, the code of the main store will be used.
- Notify visitors about User-ID Google Analytics function use—Check this box if you want to notify your customers that the User-ID function is used on the site. In this case a warning will be displayed when they enter the store:

- IP anonymizer—If the setting is enabled, the user’s IP address will be hidden in Google Analytics. Read for more details.
- Allow vendors to track page views—Allow vendors to track quantity of page views using their Google Analytics accounts. See Additional settings for vendors for more details.
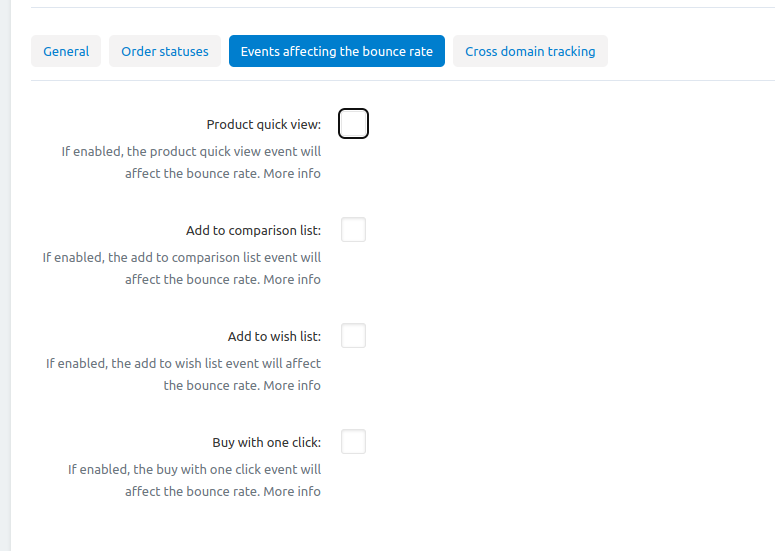
Non-interactive events
Enabling/Disabling non-interactive events helps you control the bounce rate. It allows you to determine how you want bounce rate defined for pages on your site that also include tracking of events, like “product quick view”, “add to comparsion list”, “add to wishlist”, and “buy with one click”. In other words, you can decide whether to consider sessions including only these events to be calculated as bounces or not.
Select the checkboxes of events that should not be calculated as bounces.
Note
Bounce rate is the percentage of visitors who come to your website and leave without viewing any other pages on your website. In other words, a user comes to a single page on your website and then exits without performing any actions, like product view, banner click, addition to cart, etc.
By default, the following events are excluded from bounce rate calculation:
- add to cart
- remove from cart
- call request
The event that is calculated as bounces by default is viewing products in blocks. It concerns the products displayed in the blocks, like “Hot deals”, “Sale”, “Similar products”, “At the same price”, etc. It means that if the customer visits a store page with such blocks and leaves right away, the bounce rate will be calculated. The product views can still be tracked in the Google Analytics account under Conversions > Ecommerce > Product List Perfomance.
For more information on non-interactive events, refer to this article.
Additional settings for vendors
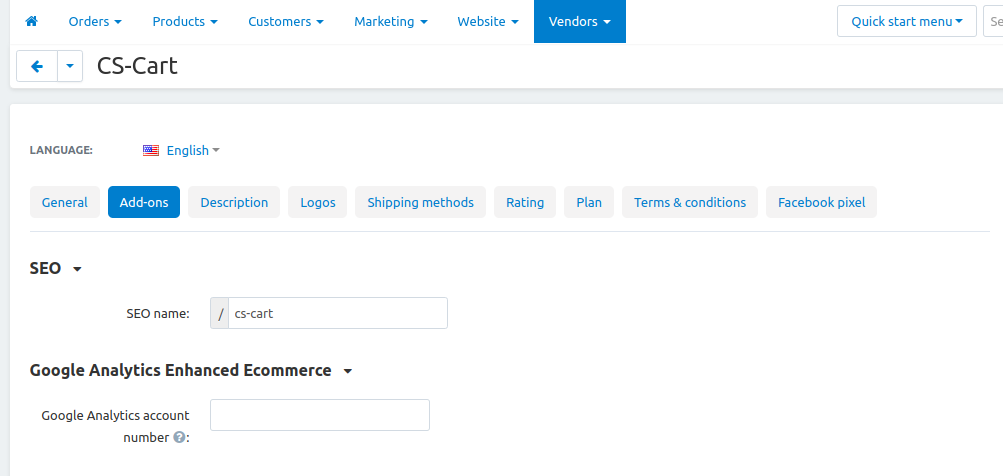
If you allow vendors to see statistics in Google Analytics, vendors will need to make some additional adjustments:
- Go to the account settings.
- Switch to the Add-ons tab.
- Enter tracking ID in the Google Analytics account number” field.
Note that each vendor will be able to track events related to their own orders and products in their Google Analytics account. For example, if the user adds a product from Vendor 1 to cart, only Vendor 1 and the root admin will see this event. If the user places an order with products from Vendor 1 and Vendor 2, the root admin will see statistics with products from both Vendor 1 and Vendor 2. In this case Vendor 1 will see statistics only with his products and Vendor 2 will see statistics with his.
Vendors can also be allowed to track the page visits by selecting the relative option in the vendor rate tab:
- Open vendor plan editing tab (vendors->Vendor Plan)
- Select the ‘Allow vendors to track the page views’ option on the Add-ons tab
- Open the settings of the vendor that uses the relevent plan (or change the present plan)
- Insert the valid analytic number into the ‘Google Analytics account number’ field of the Add-ons tab
After the settings above are complete the page views data will be displayed by ‘Google Analytics Debugger’ extension in the browser console.
Enhanced Ecommerce
Getting started with Enhanced Ecommerce
To begin using Enhanced Ecommerce, you need to enable Enhanced Ecommerce for a view and label your checkout steps:
- Sign in to your Google Analytics account.
- Select the Admin tab at the top of the page.
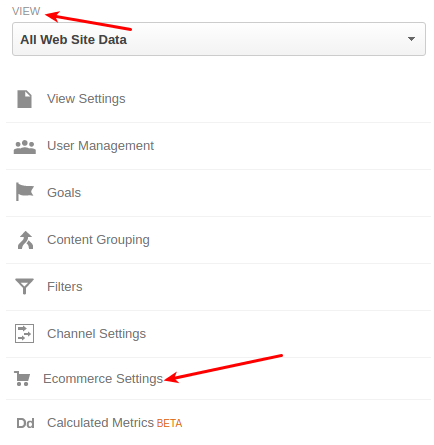
- In the VIEW column, select Ecommerce settings.
- At step 1, Enable Ecommerce, set the status to ON and click Next step.
- At step 2, Enhanced Ecommerce Settings, set the status to ON.
- Optionally, you can label the checkout steps. These labels are for display purposes only, so that Analytics can create a meaningful funnel visualization of your checkout path.
Click a funnel step, enter a label name, then click Done. Repeat for each step you defined in your tagging. For example like this:
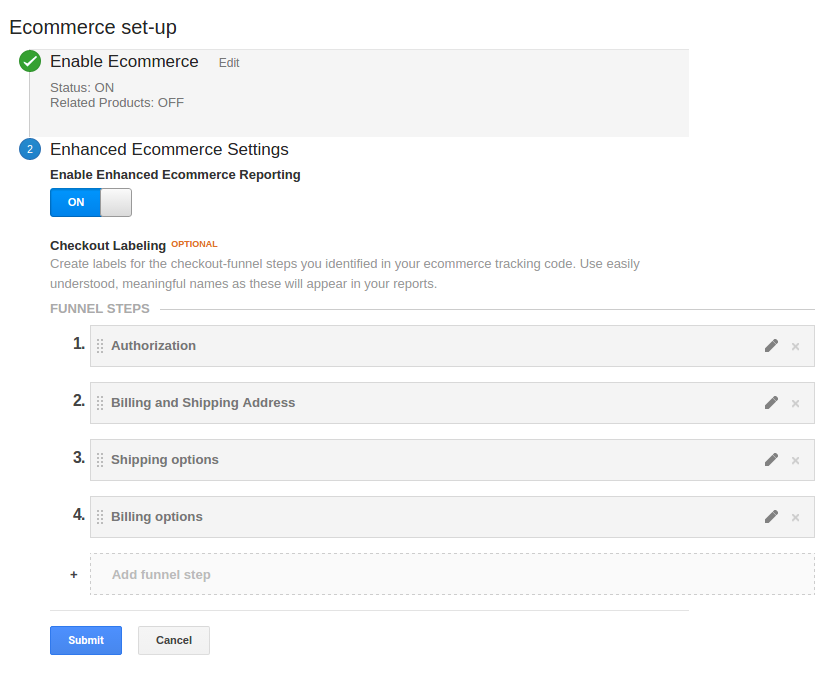
- Click Submit.
Enhanced Ecommerce reports
Note
Before you can access Enhanced Ecommerce reports, you need to enable Enhanced Ecommerce for a view (see the previous section).
Enhanced Ecommerce reports help you understand performance and activity for individual products or product categories. They also show your customers’ shopping and purchasing behaviors. Like how often they add or remove products from your online shopping carts.
Detailed reports about the shopping process can help you in many different ways.
To access Enhanced Ecommerce reports:
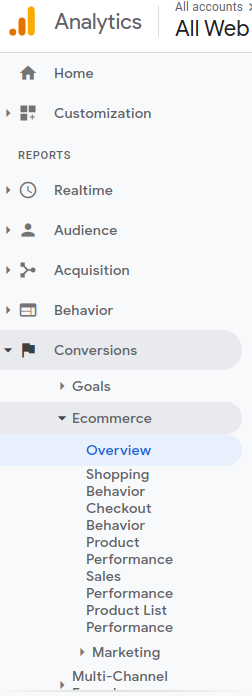
- Select the Reporting tab.
- Select Conversions - Ecommerce.
Overview
The Overview report lets you see the overall state of your business, and provides three categories of related metrics:
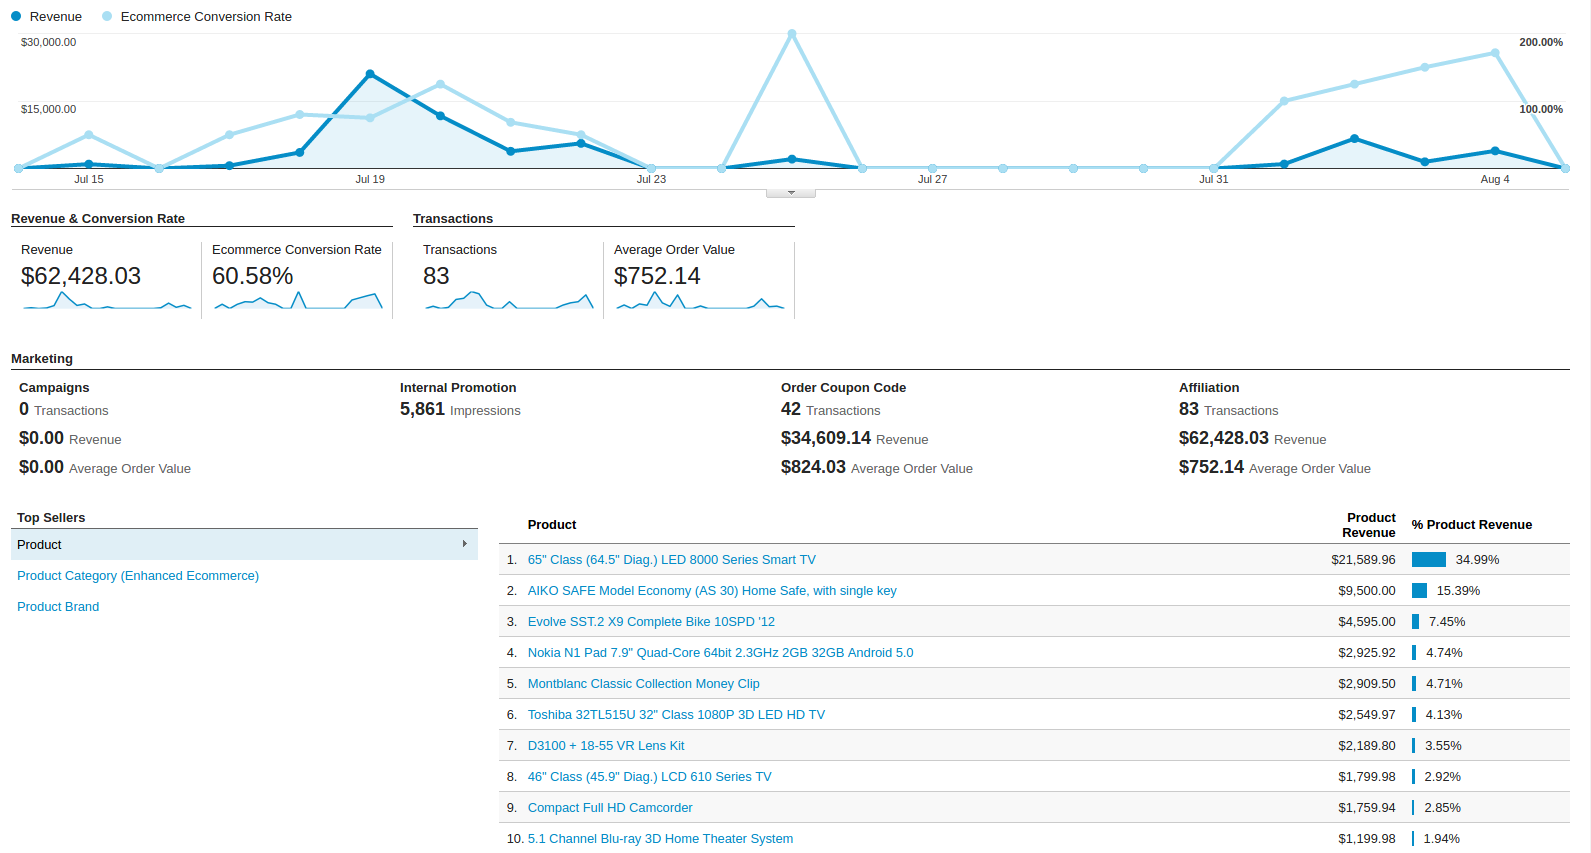
- Revenue and Conversion Rate: Revenue - the total revenue from web ecommerce or in-app transactions. Depending on your implementation, this can include tax and shipping; Ecommerce conversion rate - the percentage of visits that resulted in an e-commerce transaction.
- Transactions: Transactions - the total number of completed purchases on your site; Average Order Value - average value of transactions.
- Marketing: the total number of transactions, the total revenue, and the average order value for: Campaigns, Order Coupon Code, Affiliation.
Shopping Behavior Analysis
The Shopping Behavior Analysis report allows you to track customers as they walk through your entire sales process. It lets you see the number of sessions that included each stage of your purchase funnel, how many sessions continued from one step to the next, and how many abandoned the funnel at each stage. Where the funnel indicates abandonment (a red arrow at the bottom of a step), those users did not complete any additional steps of the funnel during the same session.
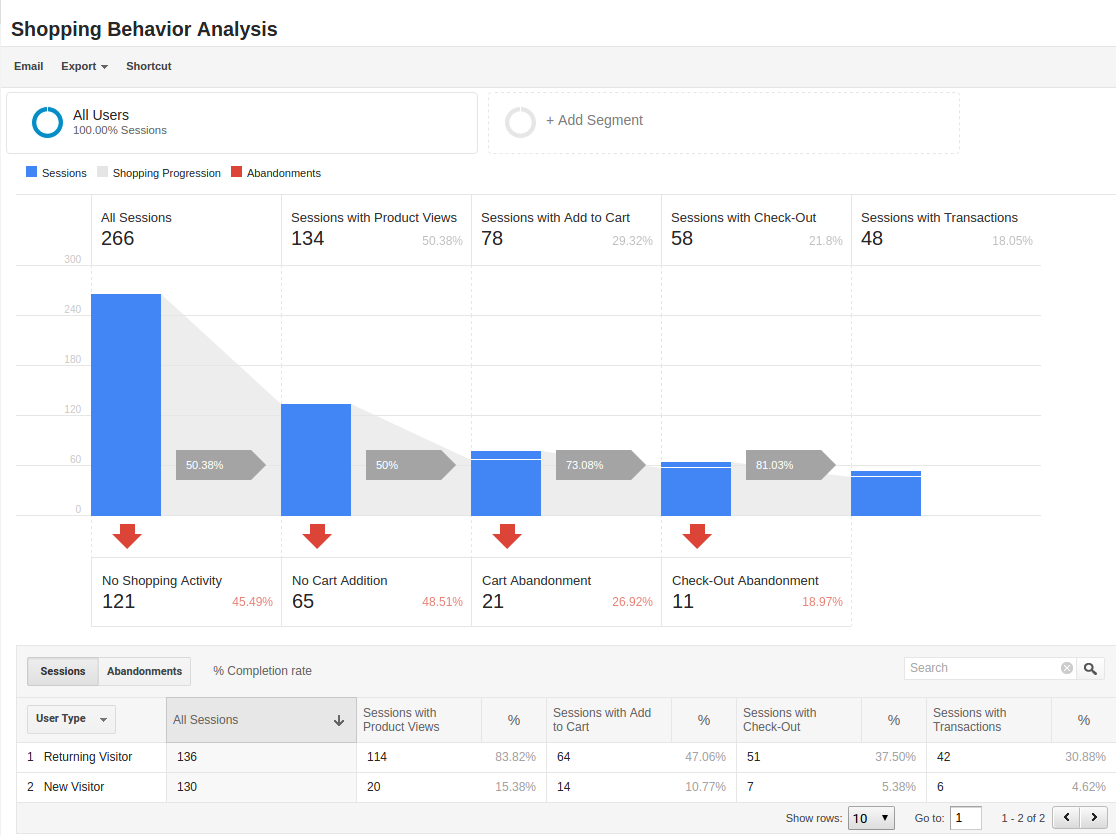
Use the funnel visualization to identify strengths and weaknesses in your purchase funnel. You can evaluate your users’ shopping experience from product impression to transaction.
This report allows you to analyse the steps in the sales funnel which generated the highest abandonment rates. Based on this information, you can identify the pages with the lowest conversion rates and take possible actions to reduce the friction.
Checkout Behavior Analysis
The Checkout Behavior Analysis report lets you see how successfully your users moved through your checkout process. The checkout-funnel visualization illustrates how many users moved on from one step to the next, how many abandoned the process at each step, and how many entered the process at each step.

The Checkout Behavior Analysis report gives you a clear overview as to exactly where in the checkout process most of your consumers are leaving.
Based on the data you obtain from the report, you get to realize which page is responsible for leaking you money.
Product Performance
The Product Performance report shows the sales performance and shopping behavior related to your products. This report offers multiple ways to view the data, such as Product, Product SKU, Product Category, Product Brand. The goal is to let you analyze product performance based on how your company organizes products.
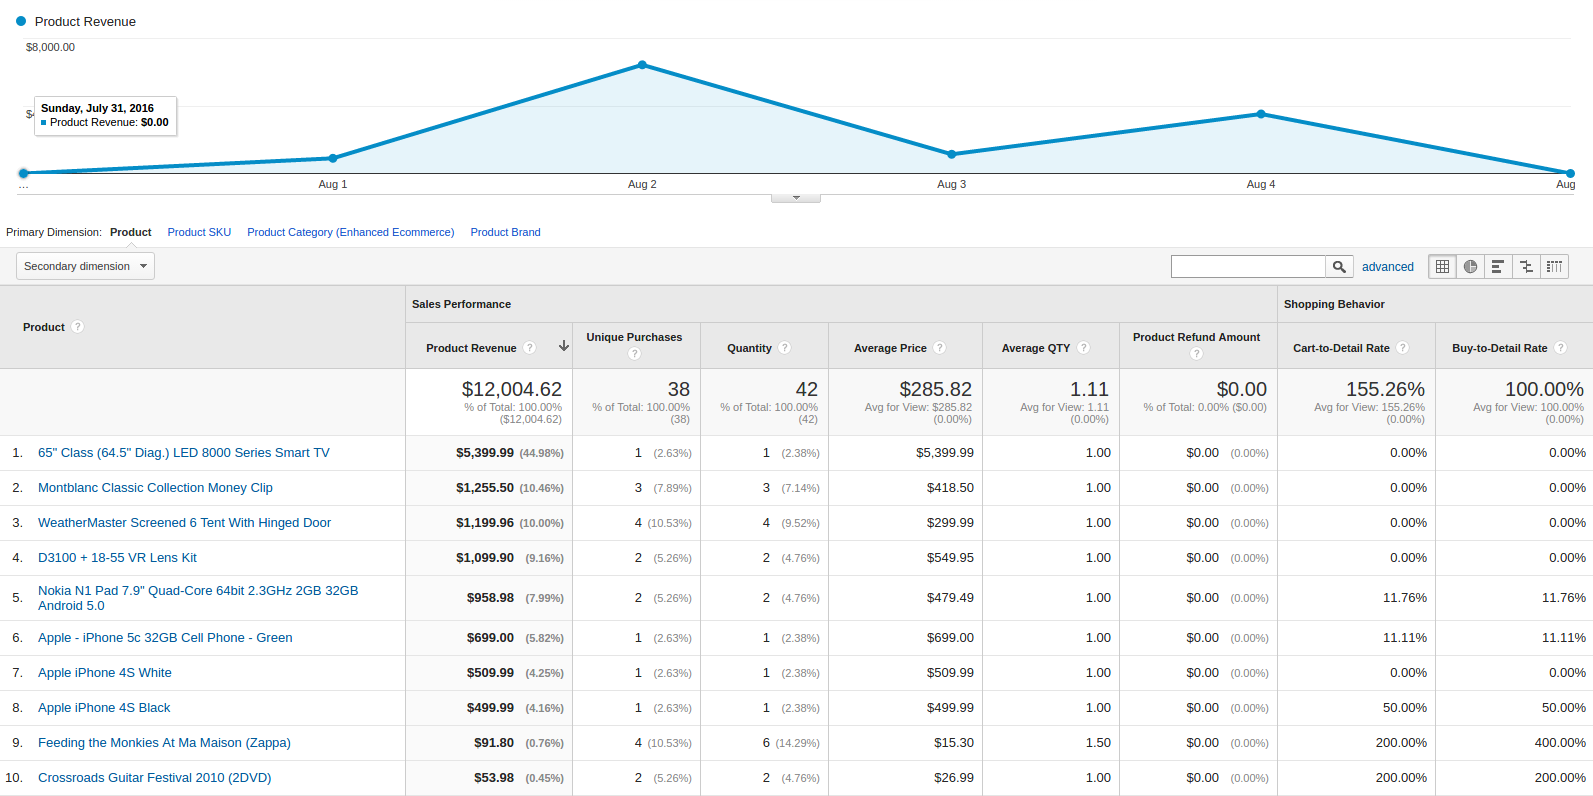
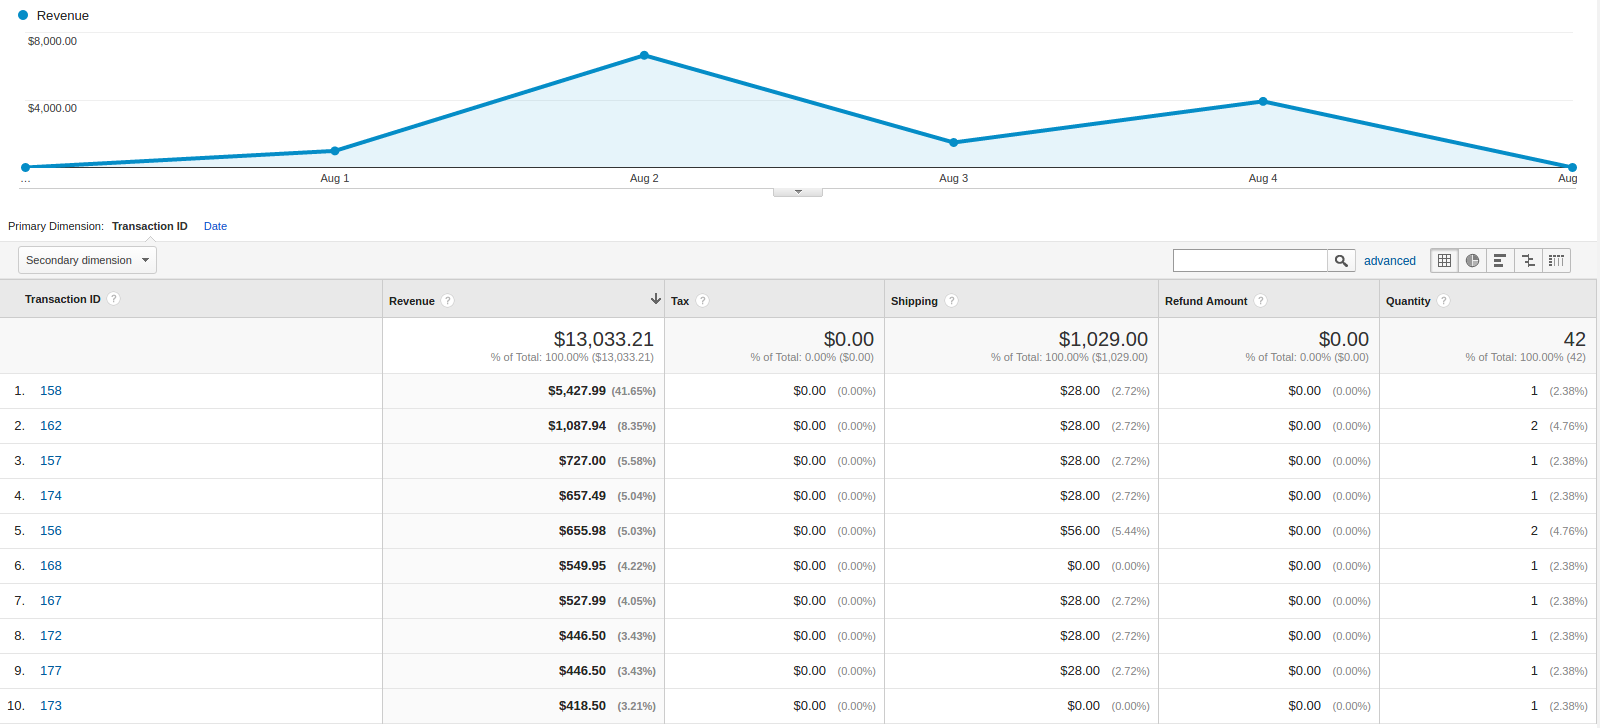
Sales Performance
The Sales Performance report lets you evaluate sales by either of two primary dimensions:
- Transaction (date, time, transaction ID)
- Date (cumulative transaction data by date)
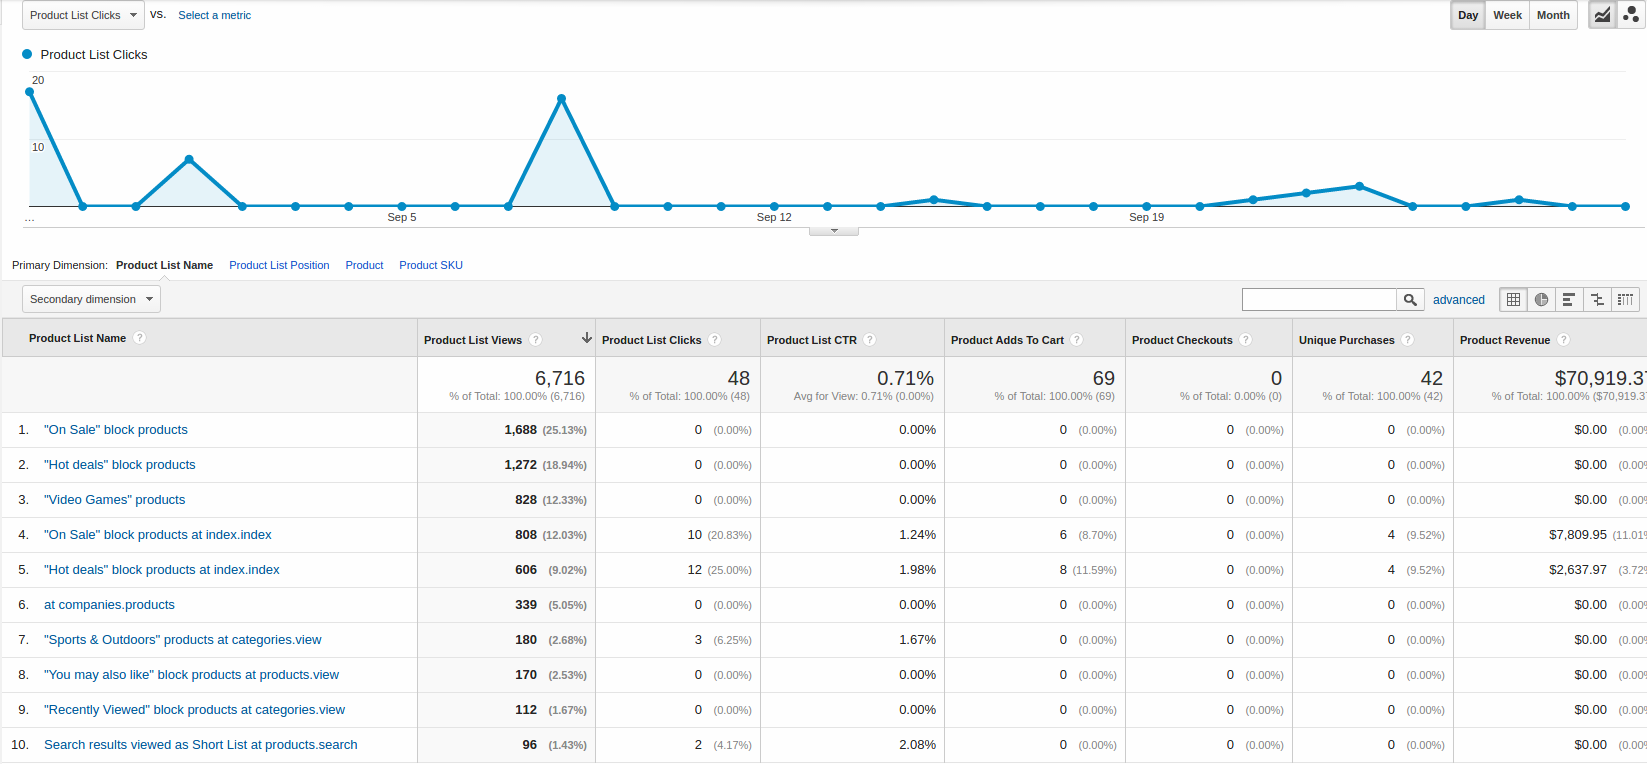
Product List Performance
The Product List Performance report helps you understand how merchandising blocks, category pages or search results drove product exposure and how often users clicked on specific products.
Internal Promotion
This section provides overview of the ecommerce performance of your internal promotions.
Tip
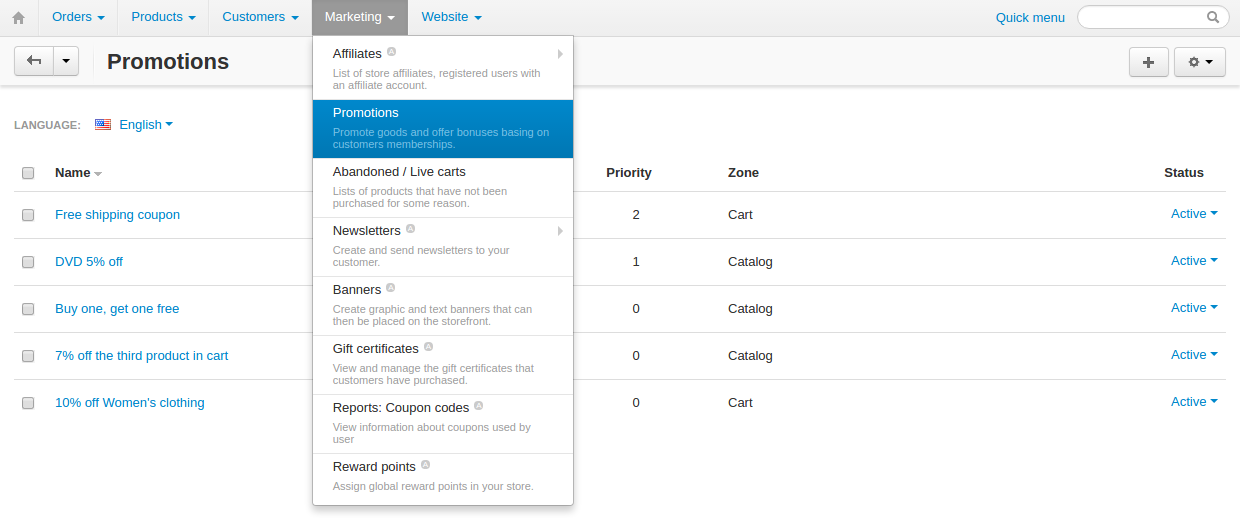
Internal promotions are the promotion of your products in your store (Marketing - Promotions in the admin panel).
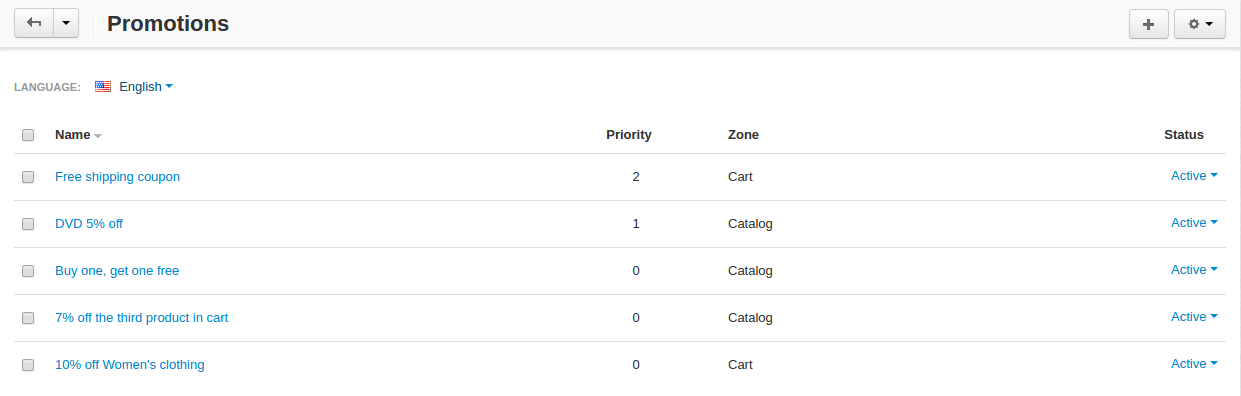
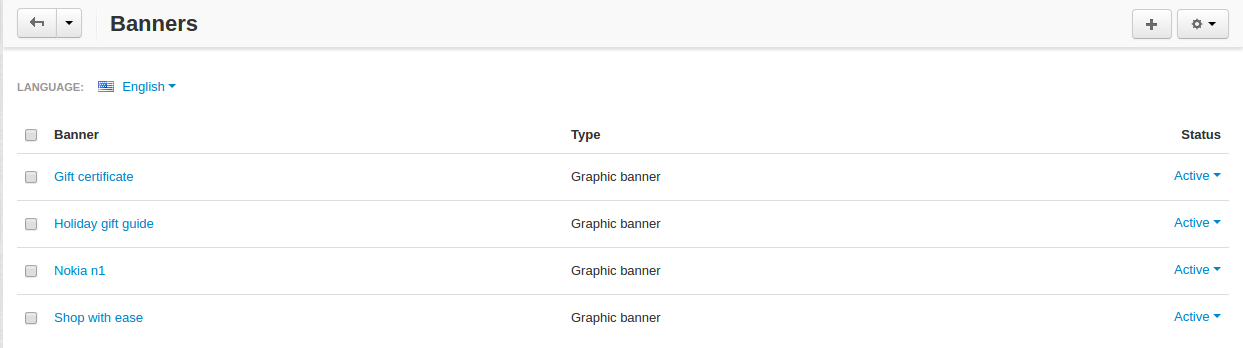
This also concerns ad banners in your store, for instance, an ad banner on your homepage to promote a particular product or a category of products (Marketing - Banners in the admin panel).
The Internal Promotion report lets you see how your internal promotions performed in terms of the following metrics:

- Internal Promotion Views - number of times users viewed internal promotions
- Internal Promotion Clicks - number of times users clicked internal promotions
- Internal Promotion CTR - the rate at which users click internal promotions (views/clicks)
- Internal Promotion Name is the primary dimension.
Order Coupon
This section provides overview of the ecommerce performance of your promotions via order-level coupons.
Tip
You can view or create new order coupons in the Marketing - Promotions section.
The order Coupon report provides the following metrics:
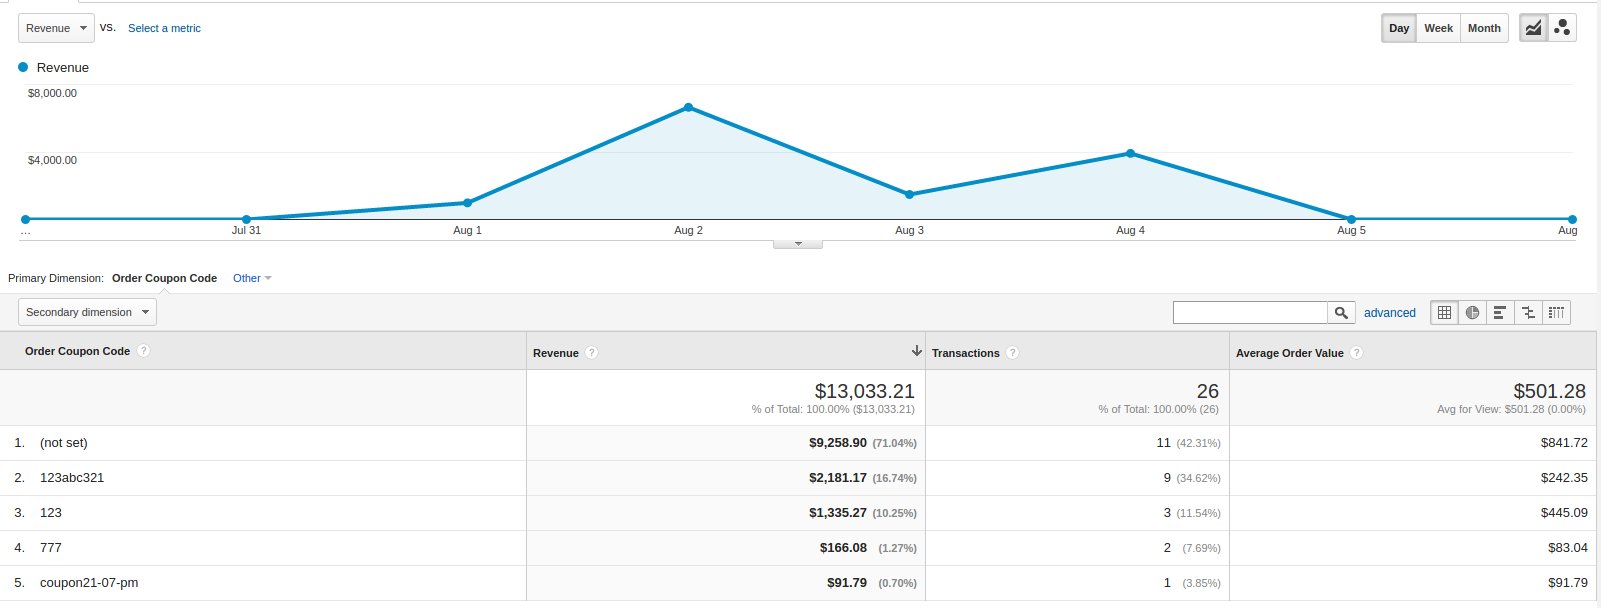
- Revenue - total revenue from ecommerce transactions; depending on your implementation, this can include tax and shipping
- Transactions - total number of completed purchases on your site
- Average Value - average value of e-commerce transactions
- Order Coupon Code is the primary dimension.
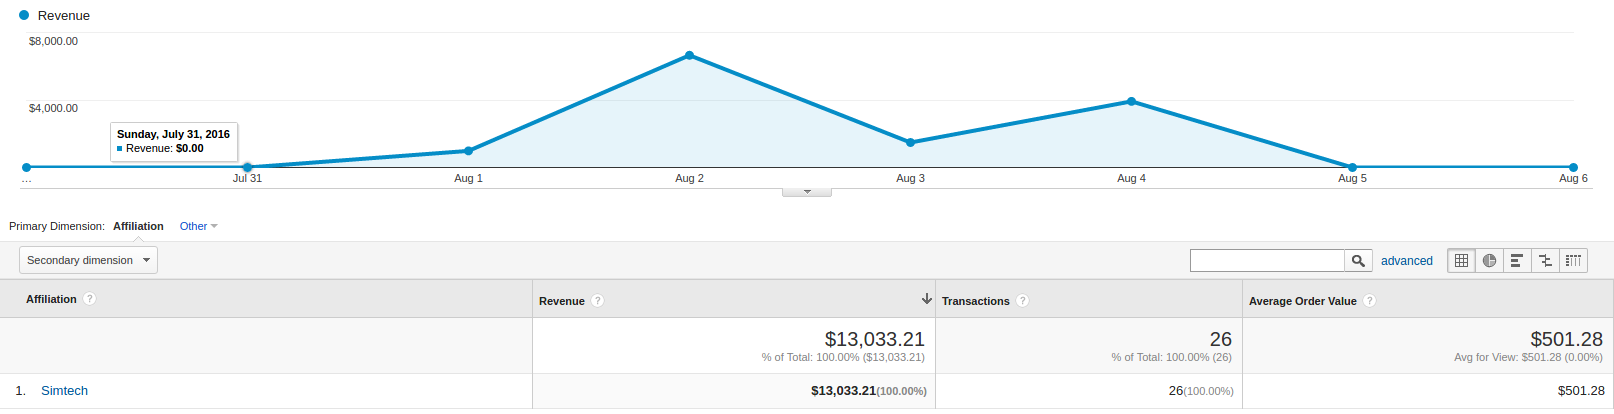
Affiliate Code
This section provides overview of the ecommerce performance of your external promotions via affiliate websites.
Google Analytics 4
The latest version of the add-on supports Google Analytics 4.
In order to structure GA4 into your marketplace follow the instruction below:
- Create GA4 property in Google Analytic system
- Create API key (Admin->Data Stream->{data stream}->Measurement Protocol API secrets)

- Place the Measurement ID (Admin->Property->Data Streams->{data stream}->Measurement ID) and API key in the add-on settings

- Move the customers order to Complete status (in the add-on settings)
- Make sure that transaction is displayed in the converesion list

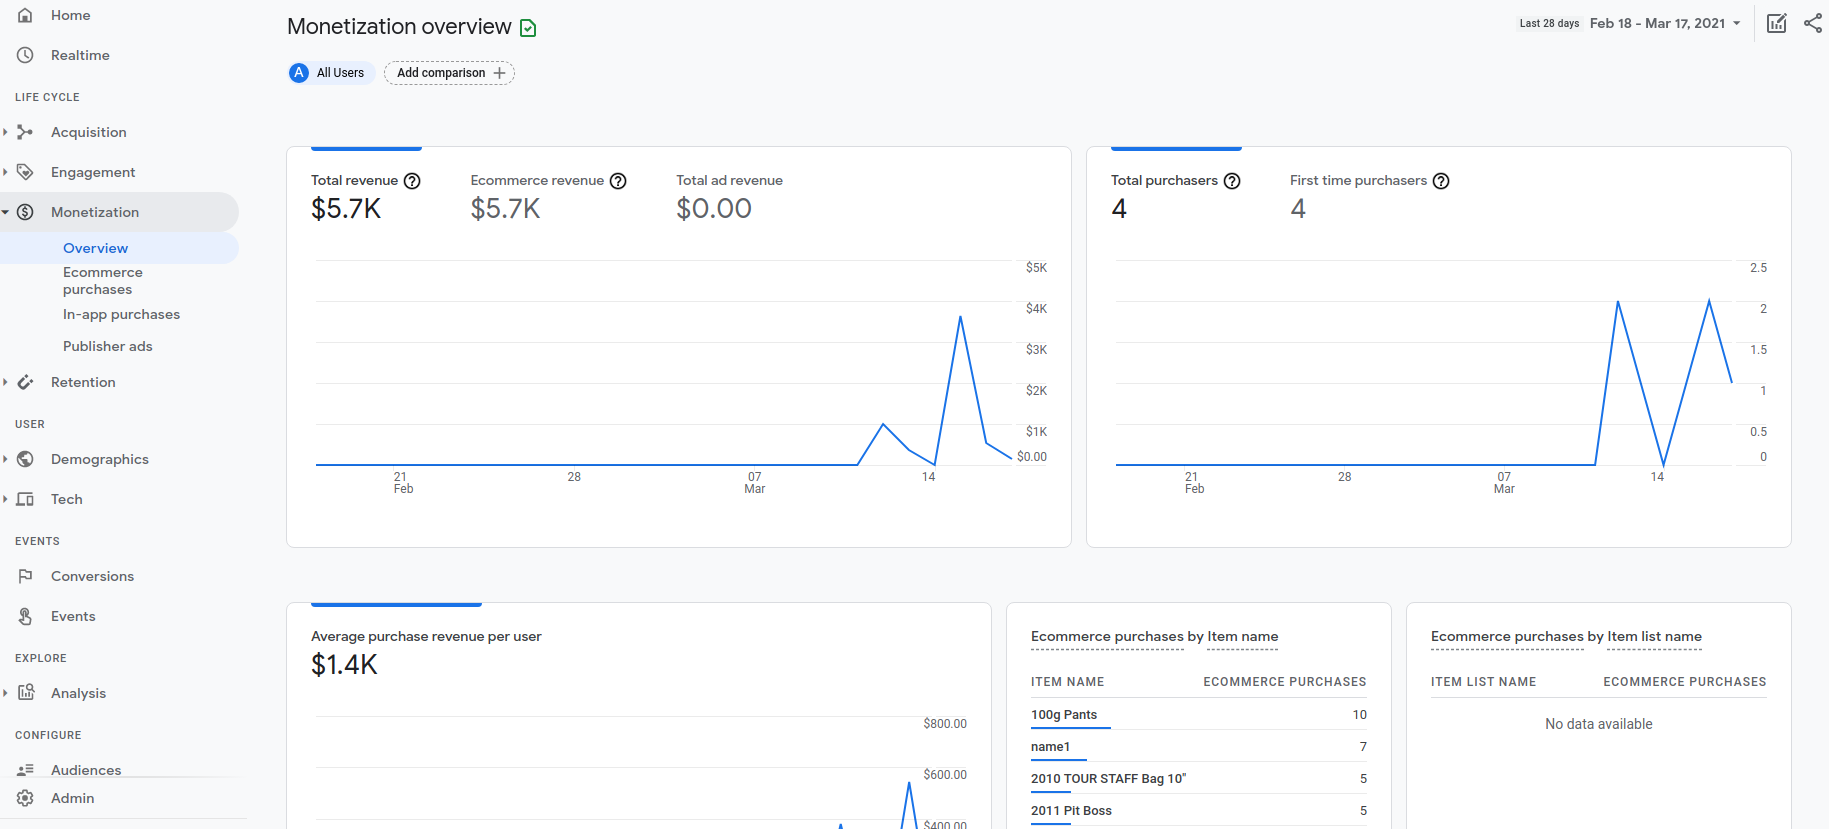
- Make sure that the data are transfered into GA Monetization reports (Overview and Ecommerce Purchases)
- Check the transactions from the Universal Analytics (Conversion->Ecommerce)
Questions & Feedback
Have any questions that weren't answered here? Need help with solving a problem in your online store? Want to report a bug in our software? Find out how to contact us.