MailChimp Light
- Overview
- Getting started with MailChimp
- Managing in the admin panel
- Installing the add-on
- Setting up the add-on
- Creating a sign-up form
- Creating a mailing list
- How to send information about customer’s reward points in your newsletters
- Creating a mailing list of customers with abandoned carts
- Subscribing customers to vendors (for Multi-Vendor stores)
- Creating a mailing list based on a user group
- Display Subscription Checkbox
Overview
MailChimp is a fantastic tool that allows you to set up a mailing list, create a newsletter, or send an automated email to your customers.

Our MailChimp Light add-on easily connects your shopping cart to your MailChimp account.
Besides, MailChimp is free if you have 2000 subscribers or less on your mailing list. This is great news for business owners who are fairly new to the industry and have limited funds. However, its paid plans offer plenty of helpful features.
Create beautiful, professional campaigns and start sending newsletters today!
Features
- Unlimited number of mailing lists
- Fast connection with your MailChimp account
- Eye-catching and user-friendly sign-up forms and pop-ups
- Blocks with the sign-up forms at any page of your store
- Sign-up forms customized to your liking
- Mobile optimized pop-ups
- Ability to show pop-up forms once per session
- Ability to send information about customer’s reward points
- Double opt-in option (when a customer receives an email with the request to verify the subscription)
- Ability to create a list of customers with abandoned carts.
- Ability to subscribe customers to vendors.
- Ability to synchronize user groups with MailChimp lists.
Compatibility
The add-on is compatible with CS-Cart and Multi-Vendor 4.10 and above, but only versions 4.12.x and above are supported. Minimum required PHP version is 5.6.
See more information about compatibility of our add-ons here.
Support
You are guaranteed a quality add-on supported by the future versions. If you need help, please contact us via our help desk system.
Demo
Check out the MailChimp Light add-on in our demo store.
Note
Every half an hour the demo store is reset to the default state.
Getting started with MailChimp
Creating an account
Account setup is very simple. Visit the MailChimp website and click Sign Up Free.
On the Get Started page, enter your Email, Username, and Password, and click Get Started!
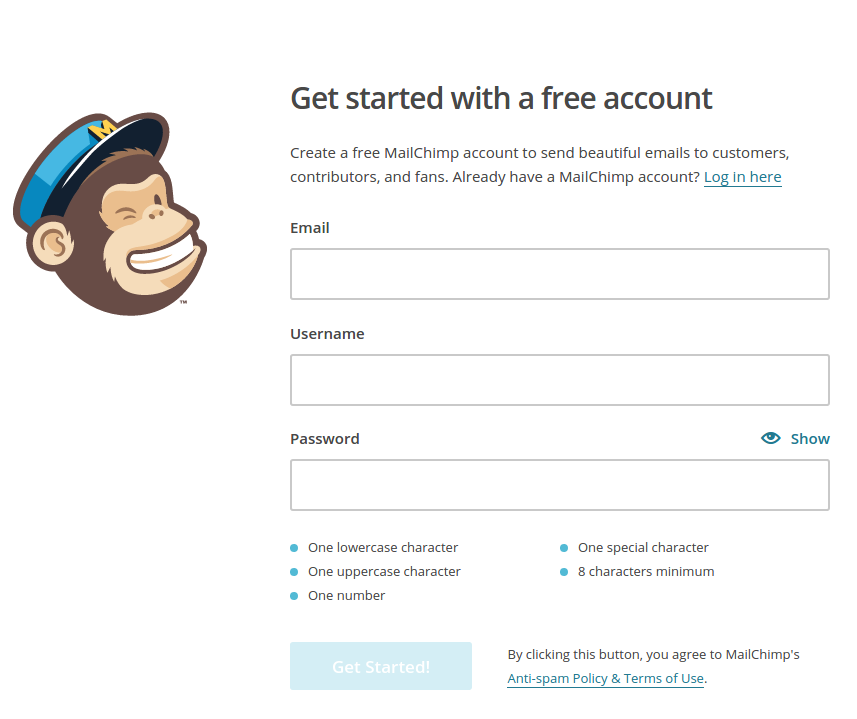
MailChimp will send you a confirmation email. Check your inbox for the account activation email to complete your account setup.
Getting API key
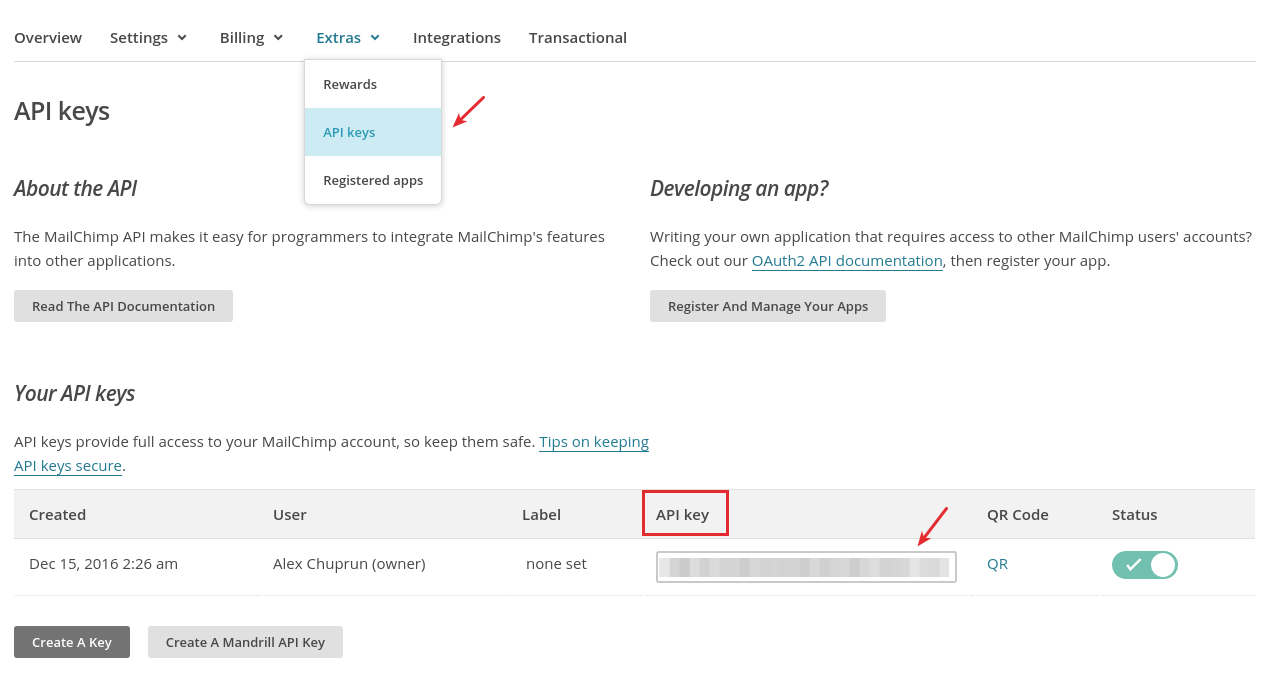
Once you’ve activated your account, you need to get the API key, which will be required to set up the add-on (see the Setting up the add-on section).
Under your account, navigate to Profile in the top right corner.

In your profile, switch to Extras and click API keys.
You can read more about creating a MailChimp account in the MailChimp Knowledge base.
Creating lists
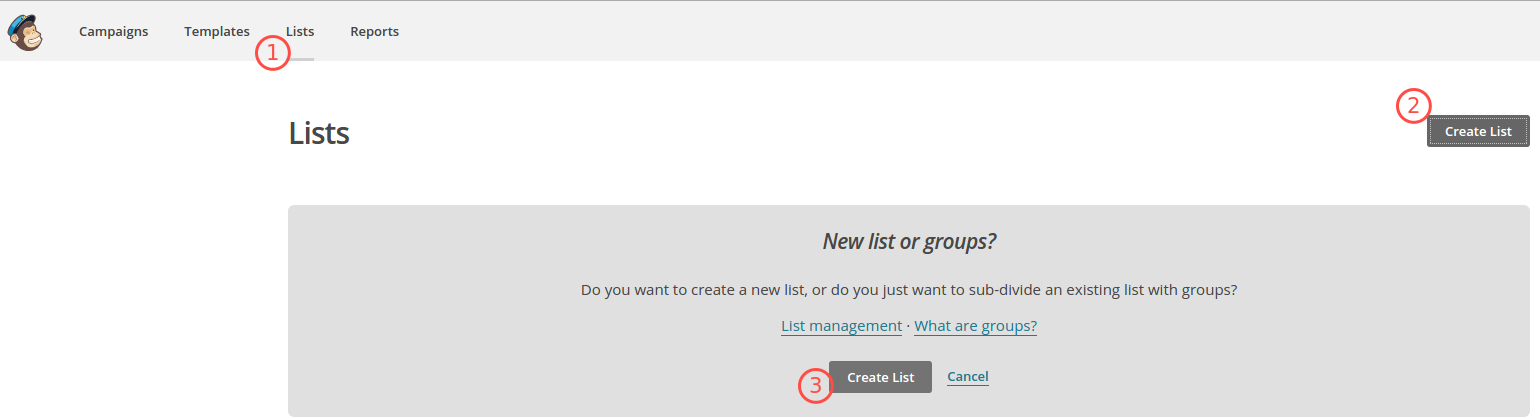
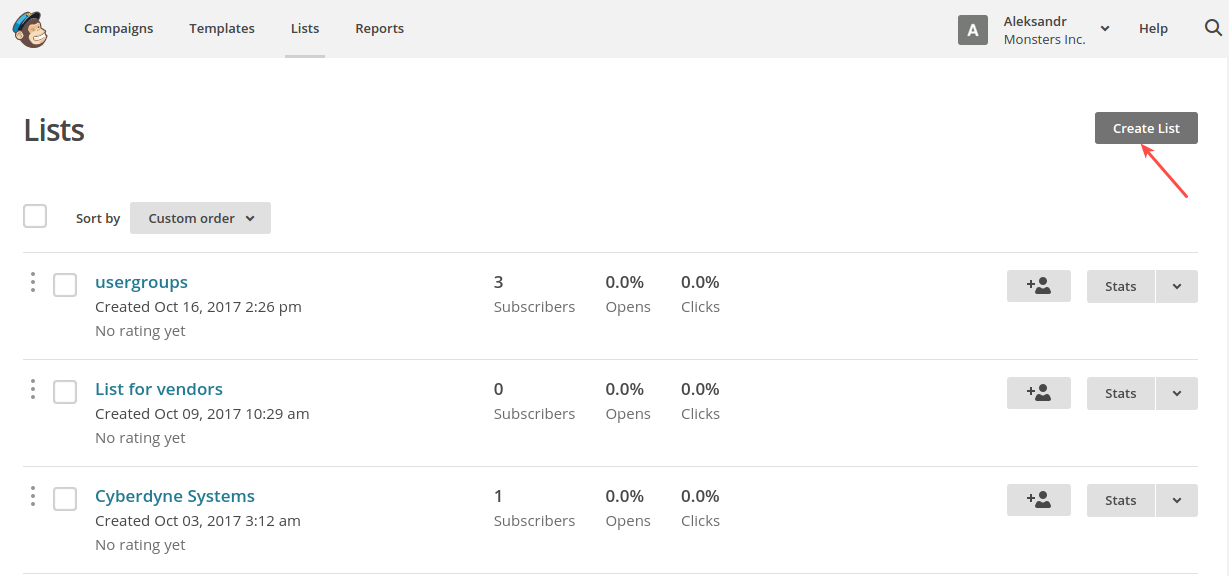
Navigate to the Lists section and click Create Lists.
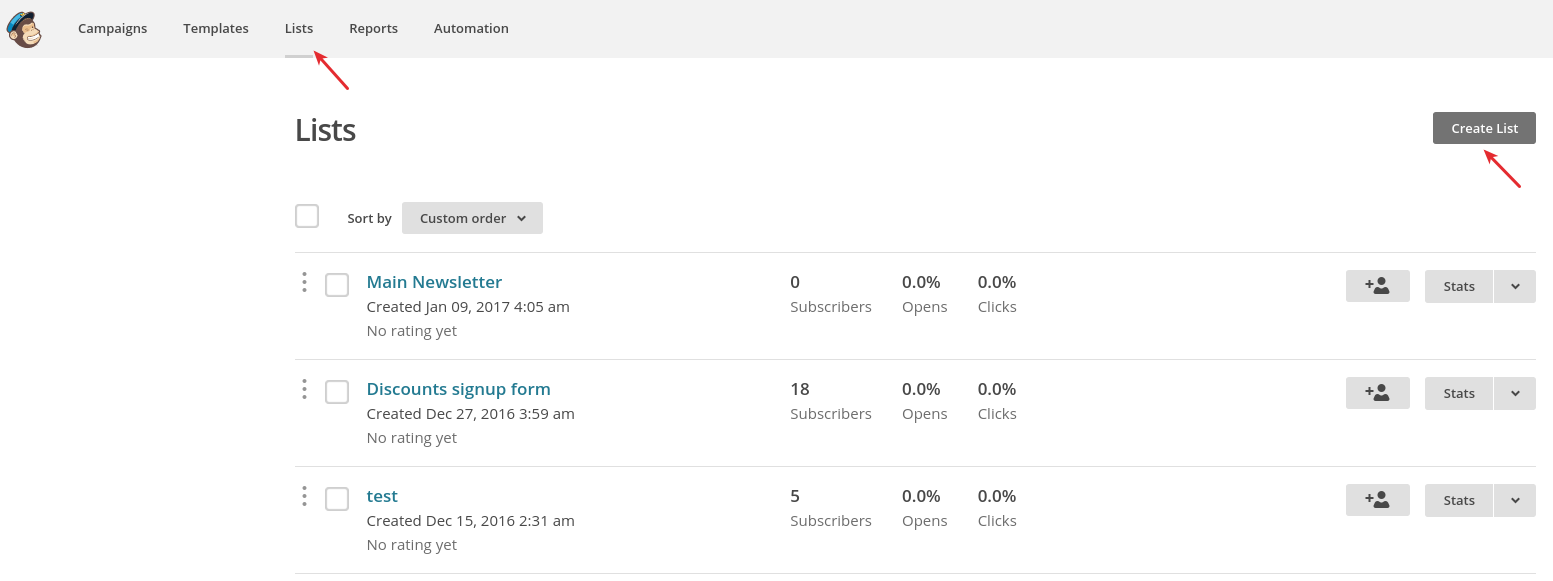
Again, click Create List.

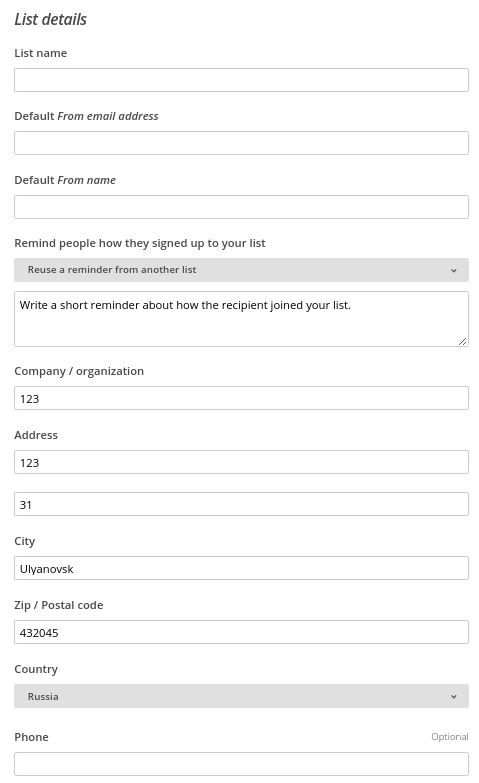
Enter List details in the provided fields.
All the created lists in your MailChimp account will be available in the MailChimp lists drop-down list when creating a new mailing list (Marketing - Advanced mailing lists).
To learn more about lists, please refer to the Lists section in the MailChimp Knowledge base.
Managing in the admin panel
This section walks you through the settings of the MailChimp Light add-on. For a quick start, all you’ll need to do is:
Installing the add-on
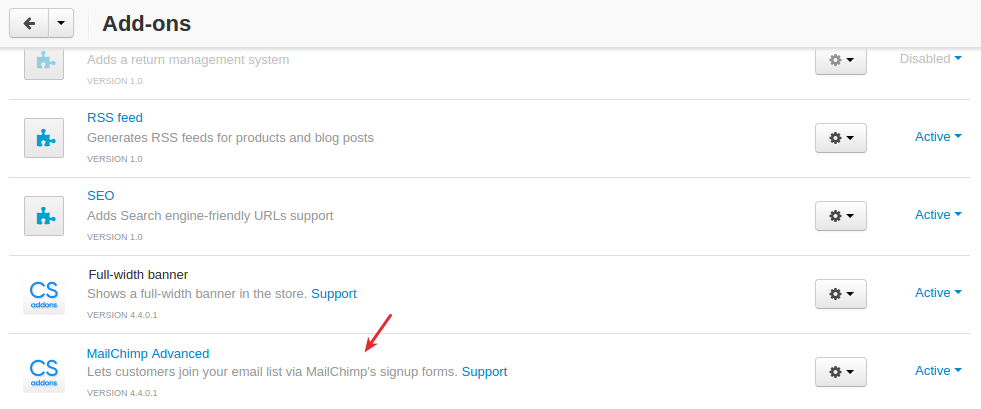
Install the MailChimp Light add-on on the add-ons list page (Add-ons → Manage add-ons). Click the + button in the top right corner, select an archive and click Upload & Install. You can now find the installed add-on in the list of installed add-ons, just make sure it is set to Active.
Setting up the add-on
Below you will find available settings of the MailChimp Light add-on.
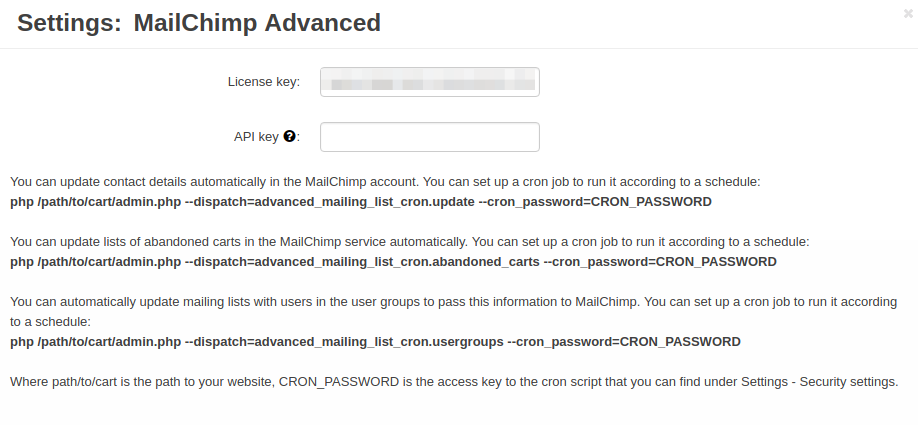
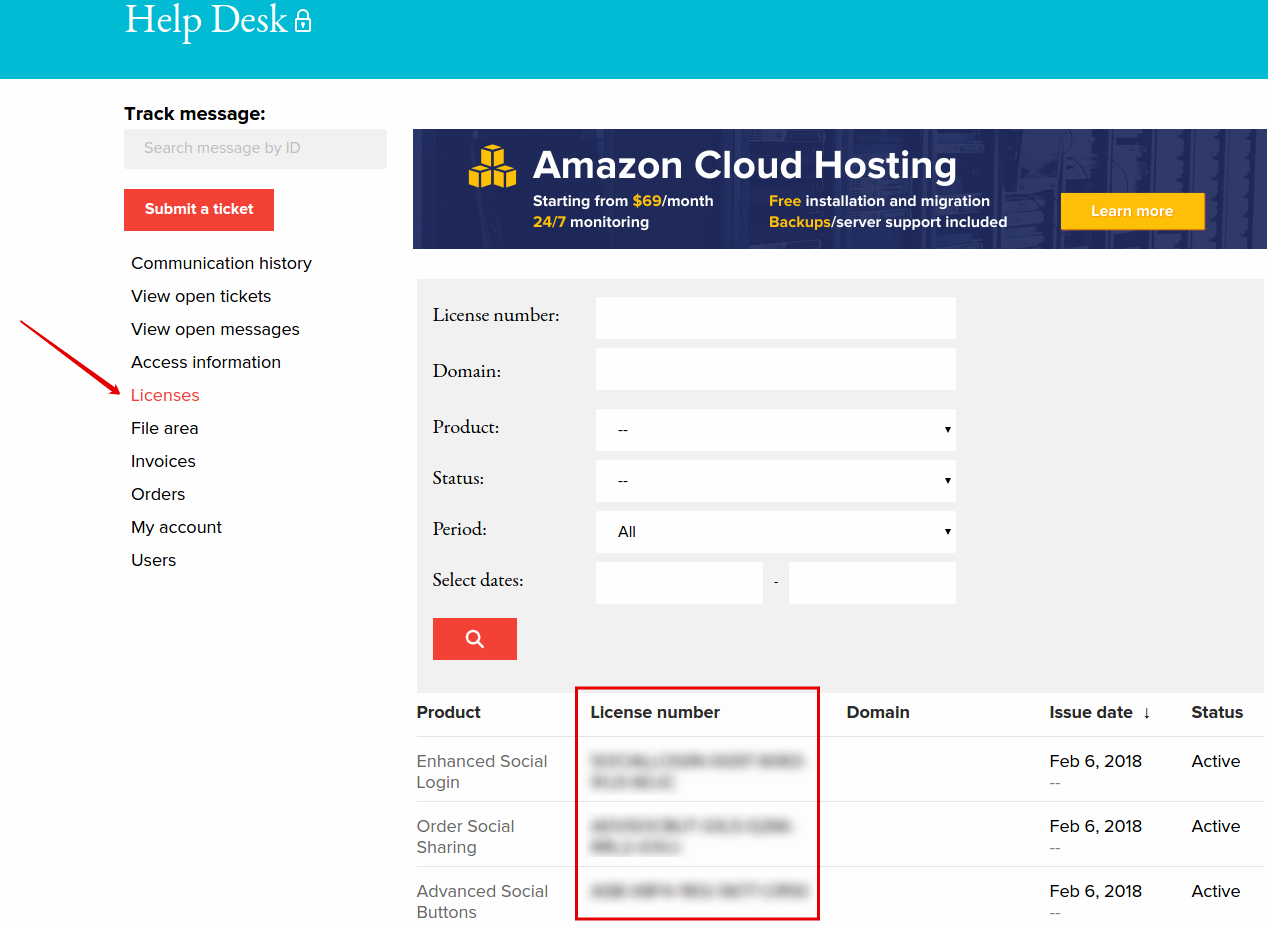
- License key—Enter the license key to activate the add-on. You will receive this key in the order confirmation email. You can also see license keys for all your purchased add-ons in your HelpDesk account. Log in to HelpDesk, and navigate to the Licenses section:
- API key—Enter the API key from your MailChimp account (see more details in the Getting API key section).
You will also find cron commands that you can run on your server to synchronize information (like contact details, number of reward points, users with abandoned carts) in your store and MailChimp account automatically. Cron jobs are used for scheduling tasks to run on the server so that you will not need to update this information manually in MailChimp.
Use the following commands:
- Update contact details:
php /path/to/cart/admin.php –dispatch=advanced_mailing_list_cron.update –cron_password=CRON_PASSWORD
- Update lists of abandoned carts:
php /path/to/cart/admin.php –dispatch=advanced_mailing_list_cron.abandoned_carts –cron_password=CRON_PASSWORD
- Update mailing lists with users in the user groups:
php /path/to/cart/admin.php –dispatch=advanced_mailing_list_cron.usergroups –cron_password=CRON_PASSWORD
where:
path/to/cart is the path to your website
CRON_PASSWORD is the access key to the cron script that you can find under Settings > Security settings.
Creating a sign-up form
There are two types of sign-up forms available:
Sign-up pop-up
A pop-up with a fixed position on a page (Left, Right, or Center).
To create it:
- Navigate to Design - Layouts.
- Switch to the page you want to add a block to.
- Click the + button to add a block.
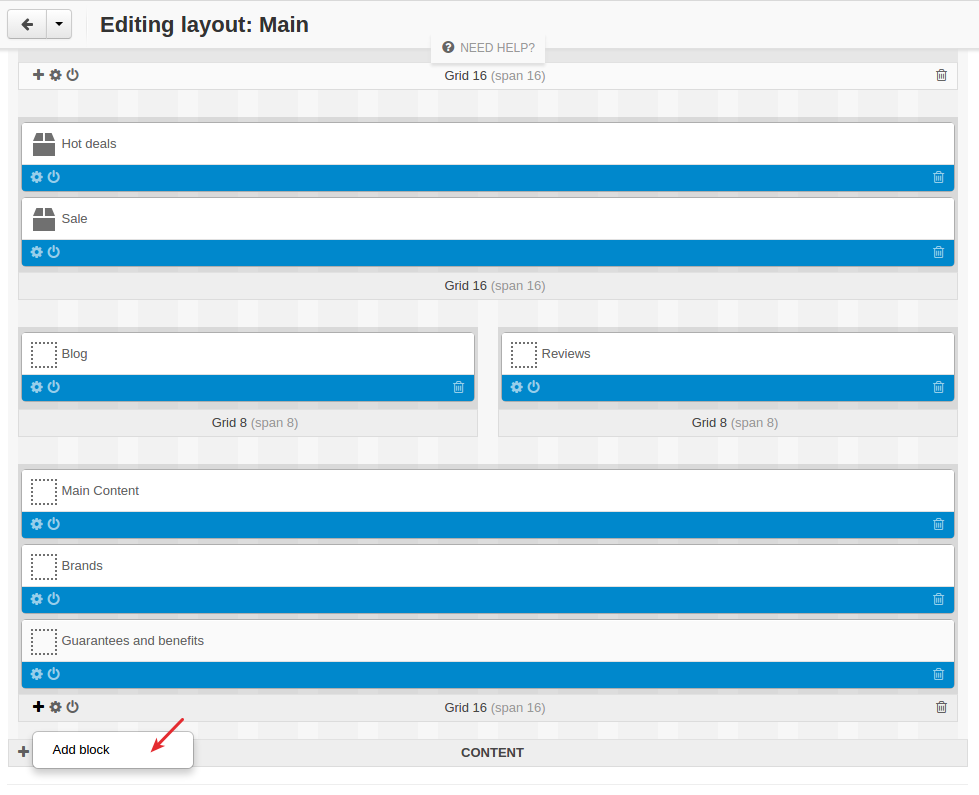
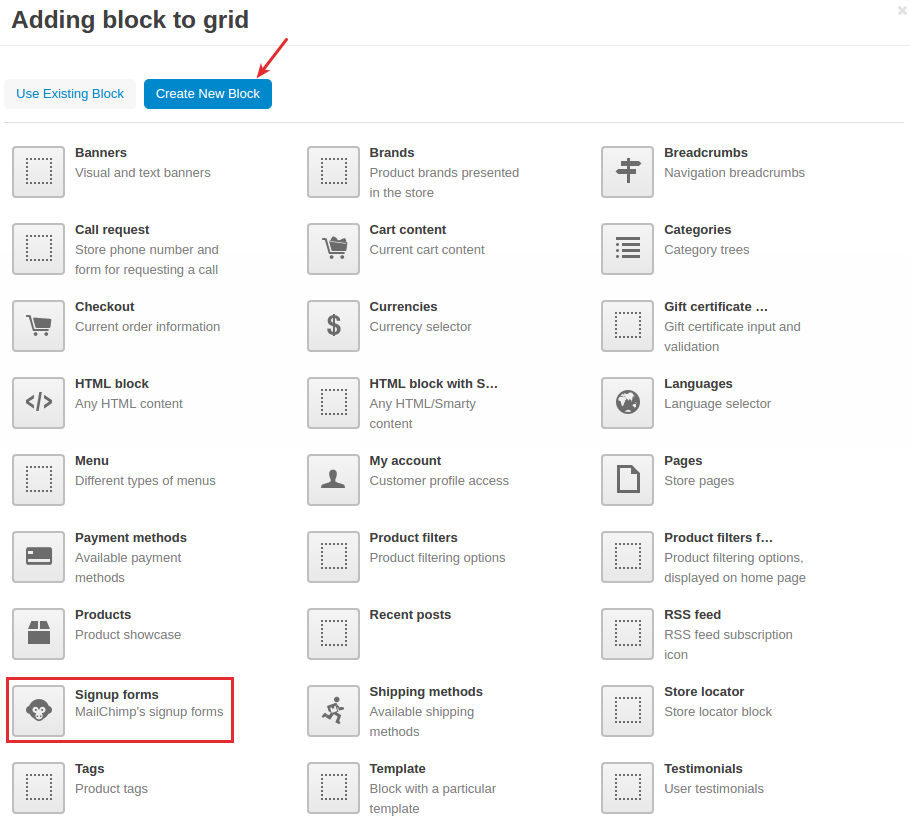
- In the Create new block tab, select the Signup forms block.
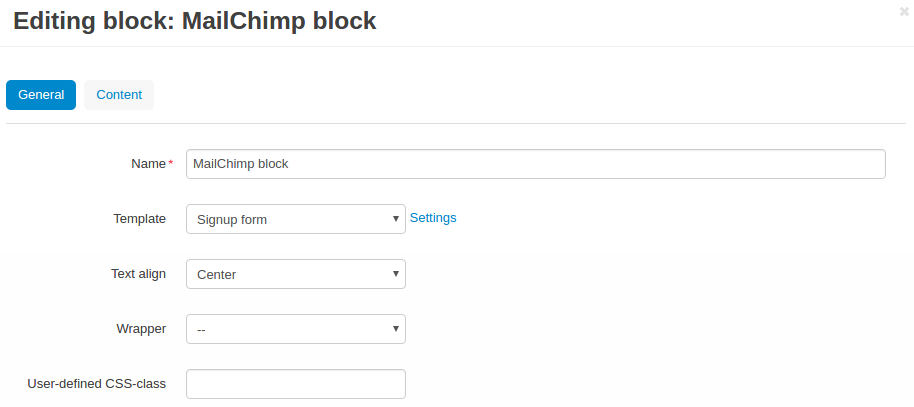
- In the General tab, type in a name for the block, select Signup popup from the Template list. Click Settings and configure the block up to your needs.

- Position on the page—Decide where the block should be displayed on a page: to the left, to the right, or in the center.
- Popup style—Pick the style for your pop-up: default or with rounded corners.
- Show on mobile devices—If enabled, the pop-up will be shown on mobile devices. Leave empty if you want the pop-up to appear only on the desktop version.
- Show in x seconds—You can set the delay in seconds when the pop-up will be shown. Enter 0 if you want the pop-up to be shown at page load. For example, if you enter ‘5’, the pop-up will appear in 5 seconds after the page loads.
- Hide in x% of page scrolling—The pop-up will be hidden after the user scrolls to a certain percentage of a page. Enter 0 if you want the pop-up to remain on the page until the user closes it.
- Show the window once per session—If enabled, the pop-up will be shown only once per browser session.
- Show once within time period (days)—The pop-up will be shown once per specified number of days. Leave the field empty or enter ‘0’ if you want the pop-up to be shown at each page load. Note that the ‘Show the window once per session’ setting above has a higher priority.
- In the Content tab, type in the text in the provided fields.

- Click Create.
Sign-up form
Can be placed as a block anywhere on a page.

To create it:
- Repeat points 1-4 described above.
- In the General tab, type in a name for the block, select Signup form from the Template list, and configure the settings of the template.
- In the Content tab, type in the text in the provided fields.
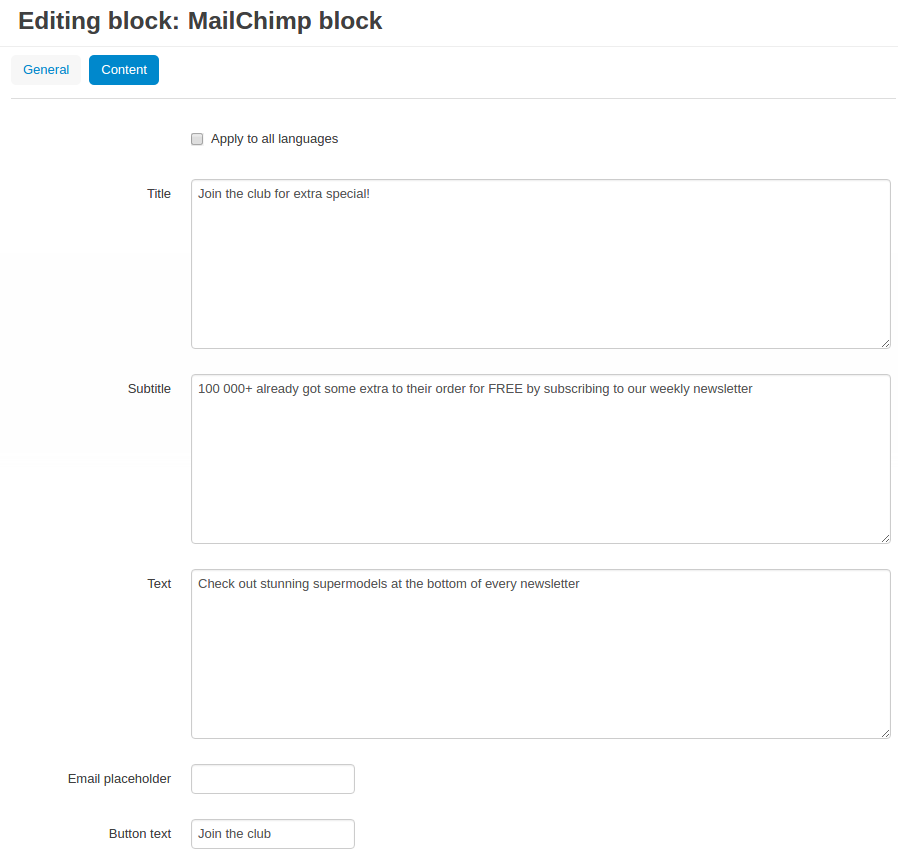
- Click Create.
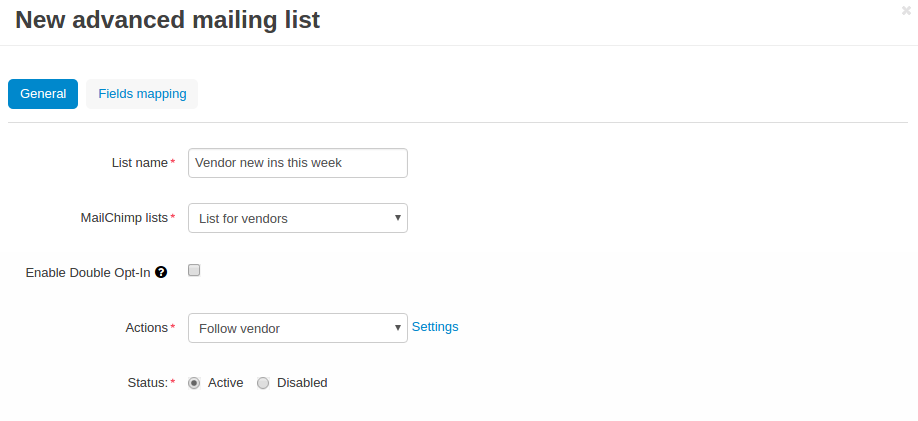
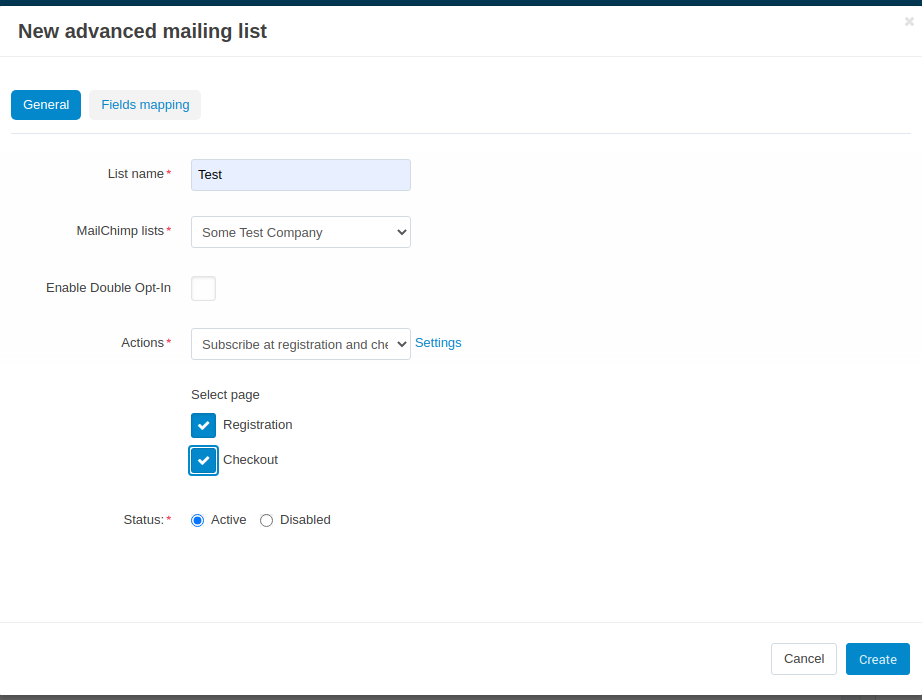
Creating a mailing list
Once you’ve created a sign-up form, you need to create a mailing list for it.
To do that:
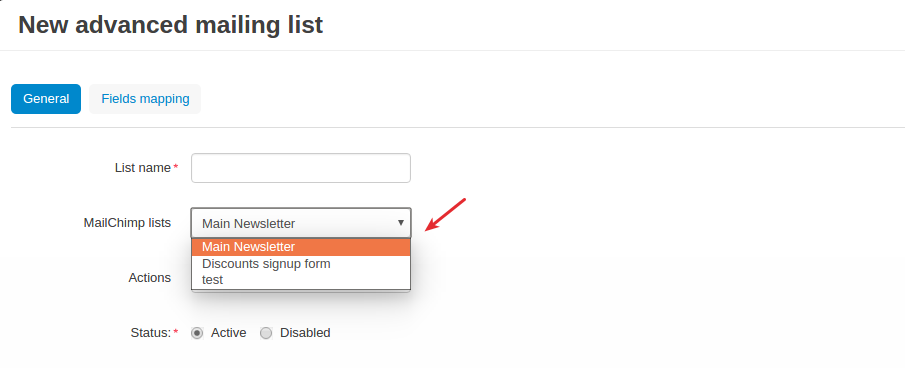
- Navigate to Marketing - Advanced mailing lists.
- Click the + button in the top right.
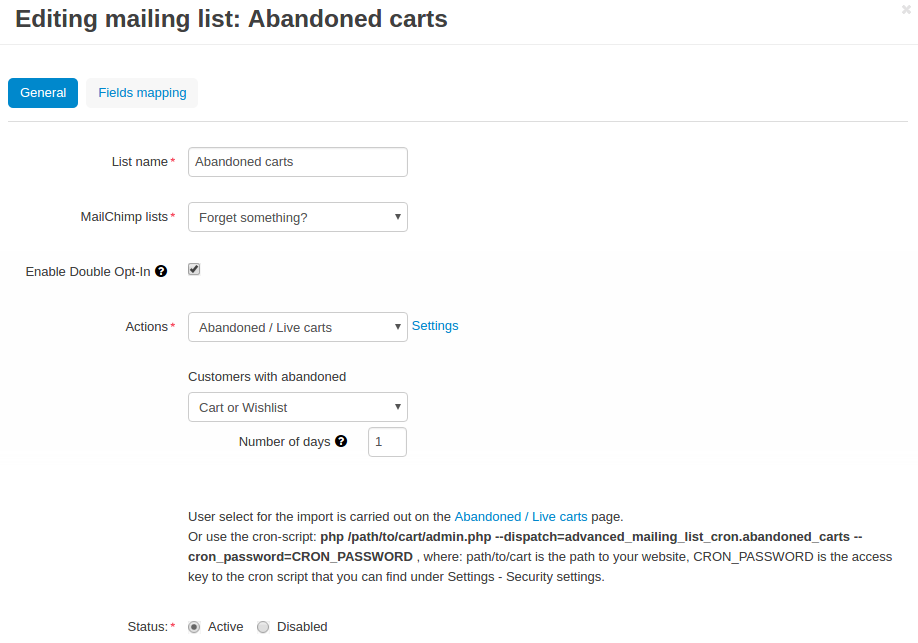
- Set up the mailing list in the General tab:
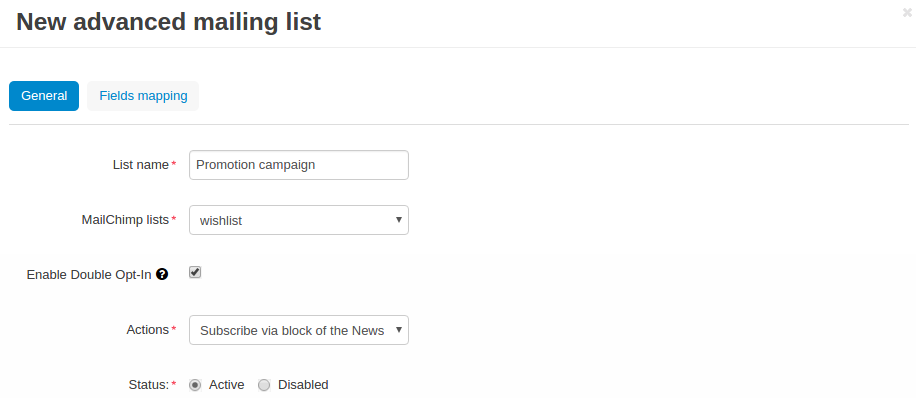
- List name—Enter a name for the mailing list.
- MailСhimp lists—Select a desired mailing list. These are the lists that you create in your MailChimp account (see more details in the Creating lists section).
- Enable Double Opt-In—If enabled, an email with the request to verify the subscription will be sent to the customer. Read here for more information.
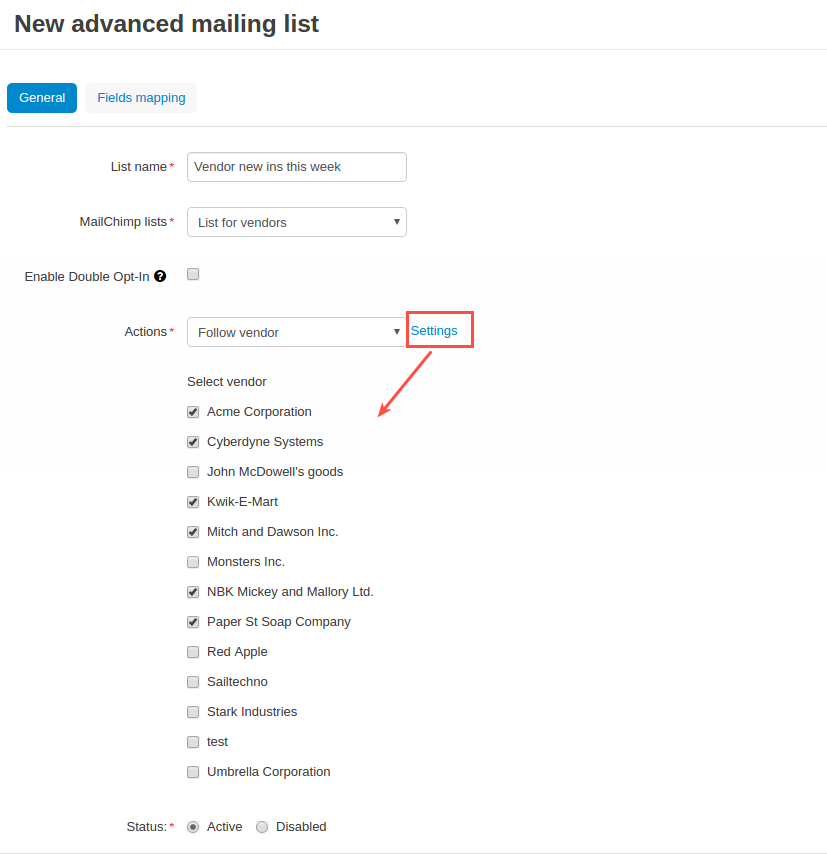
- Actions—Select the form via which users will sign up for newsletters.
Important
In the Settings of the Actions, select a form you’d like to use.
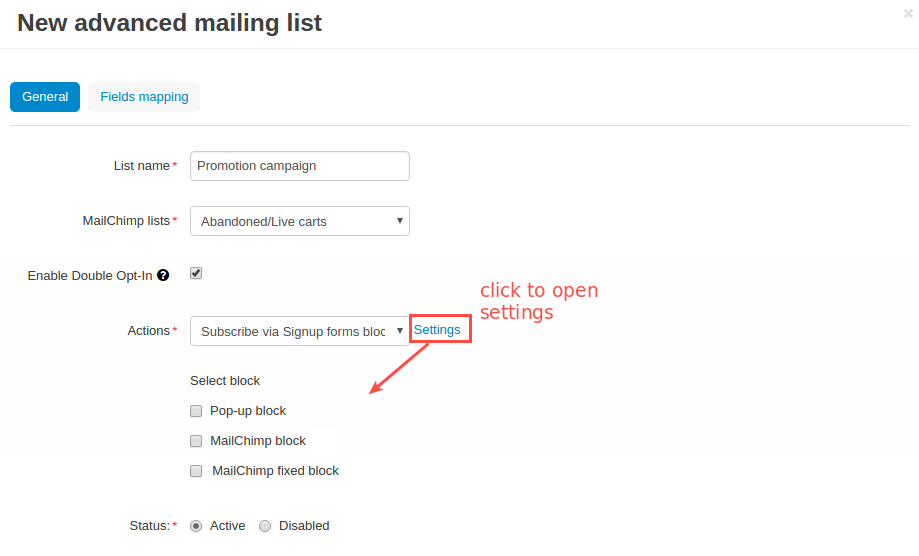
This setting has the following options:
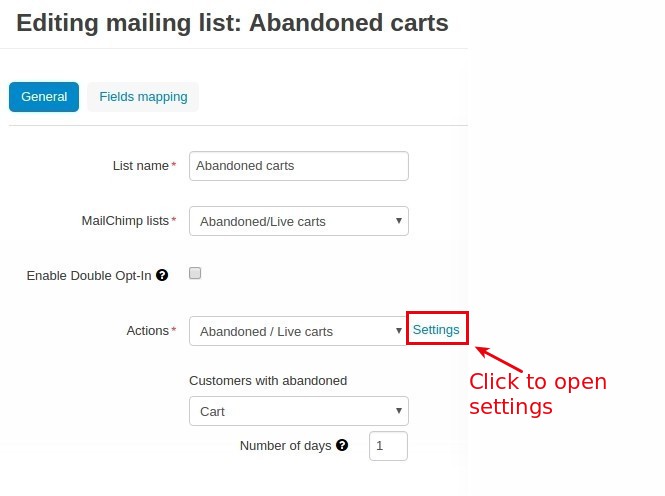
- Abandoned / Live carts
Note
If you are going to update a mailing list of customers with abandoned carts via cron, define which customers you want to add: customers with an abandoned cart or wishlist, only cart, or only wishlist. Define the number of days after which the cart is considered abandoned (the number of days is set to 1 by default).
Read further for Creating a mailing list of customers with abandoned carts.
- Subscribe via block of the Newsletters add-on:
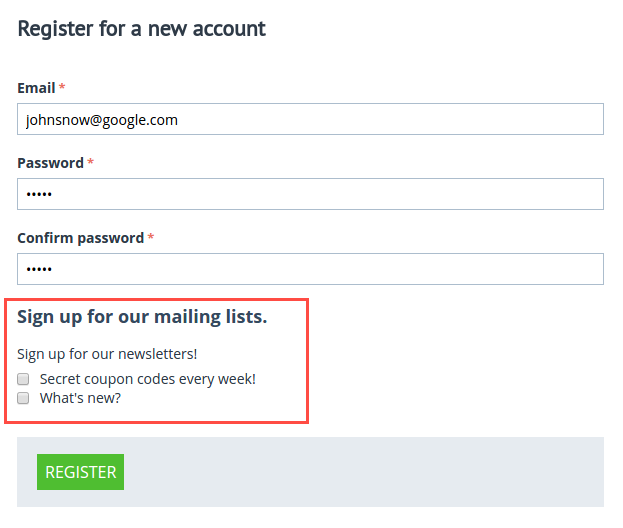
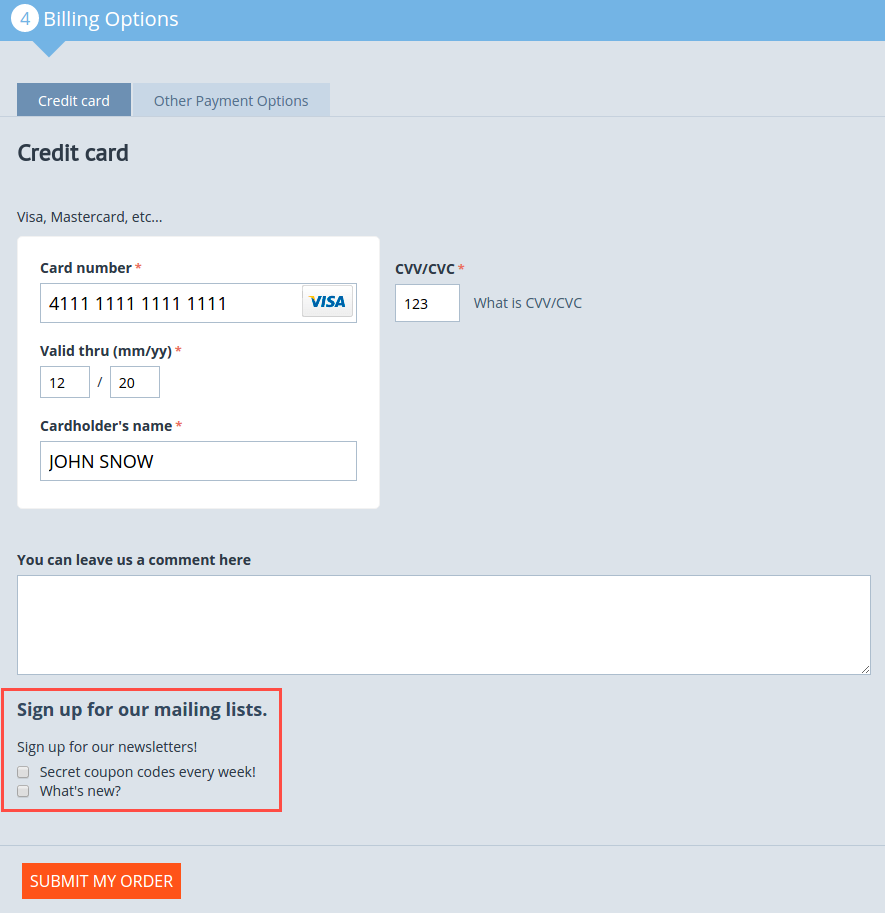
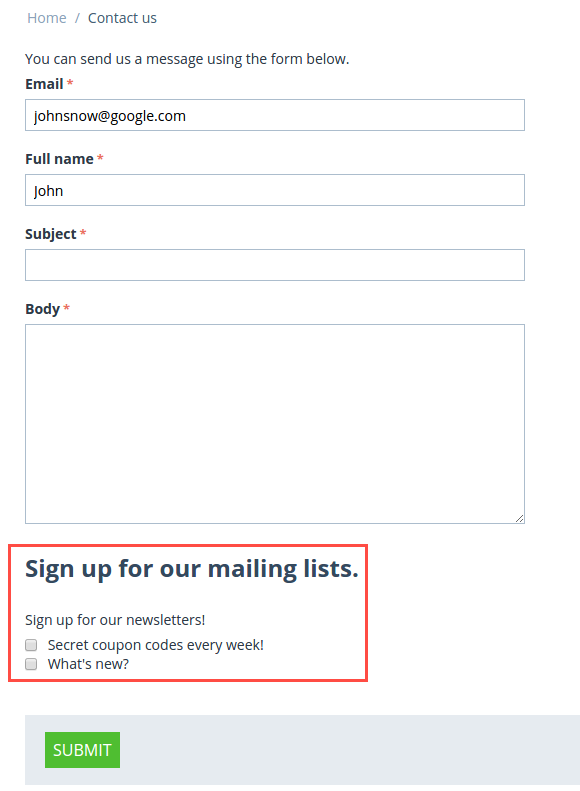
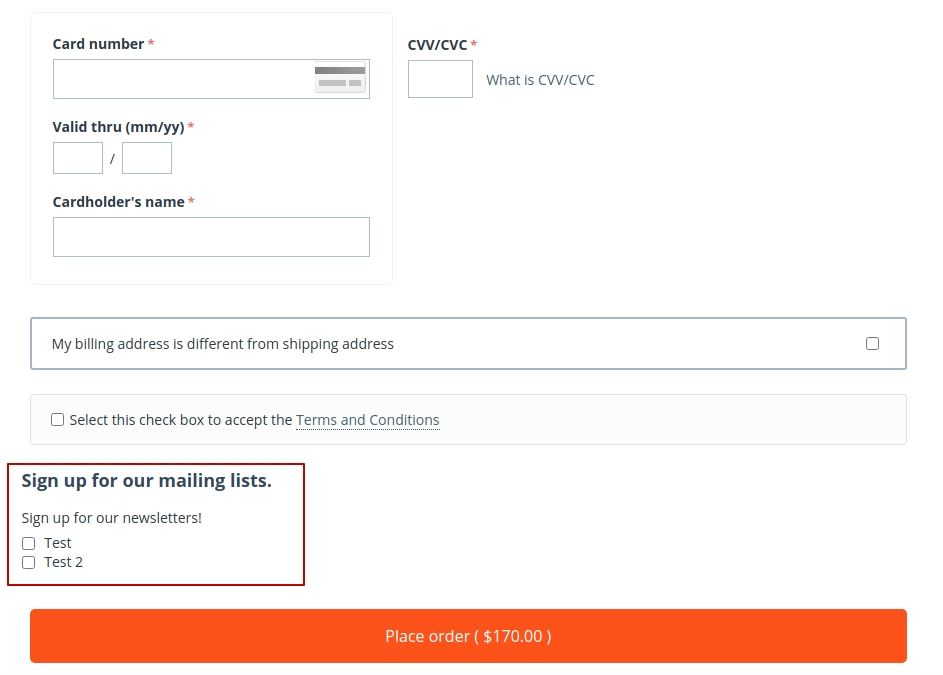
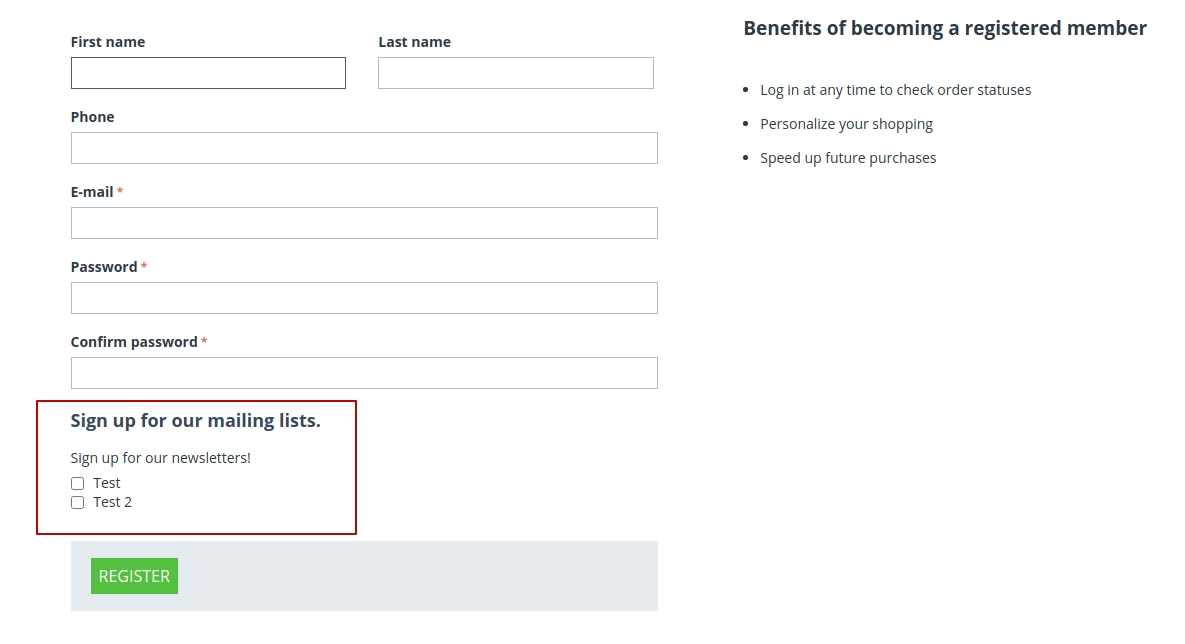
- Subscribe at registration and checkout
Note
The sign-up checkboxes can be shown in two ways:
if you have one mailing list, there will be one checkbox with the text. By default, the text says “Sign up for our newsletters!”. It can be changed via language variables (Administration > Languages > Translation).
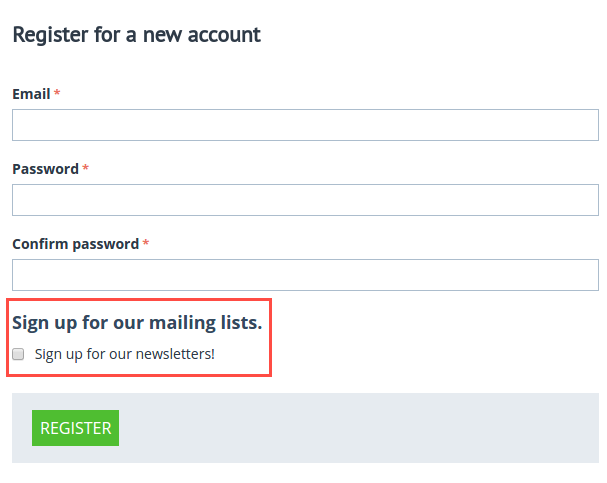
if you have more than one mailing list, there will be a corresponding number of checkboxes with the text matching the name of the list.
- Subscribe on page form
- Subscribe via Signup forms block (MailChimp forms)
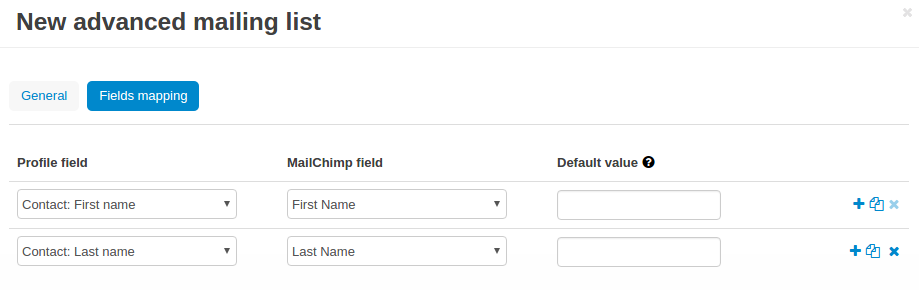
- In the Fields mapping tab, match the store fields and MailChimp fields.
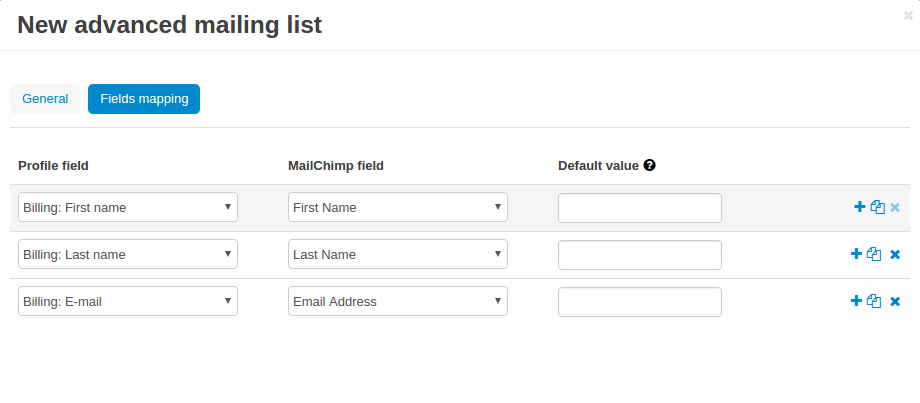
If you set this up, correct values will be passed to your MailChimp account:
Ta da! Your beautiful signup forms are ready!
How to send information about customer’s reward points in your newsletters
Step 1. Setting up your MailChimp account
In your MailChimp account,
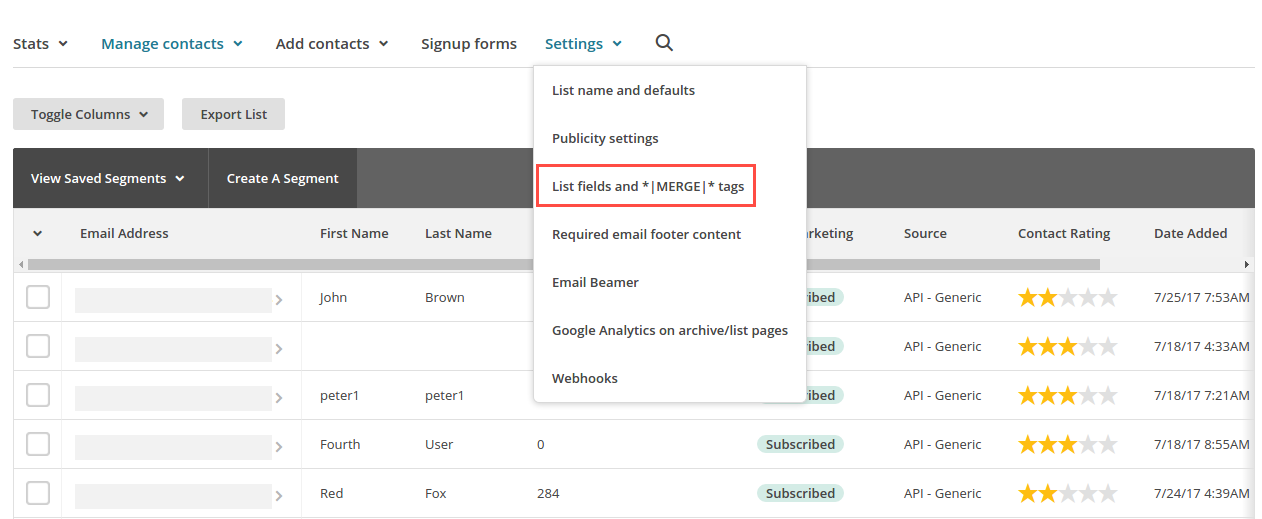
- Go to the Lists section. Select the list of users whom you want to send a newsletter with reward points.

- Under Settings select List fields and *|MERGE|* tags.
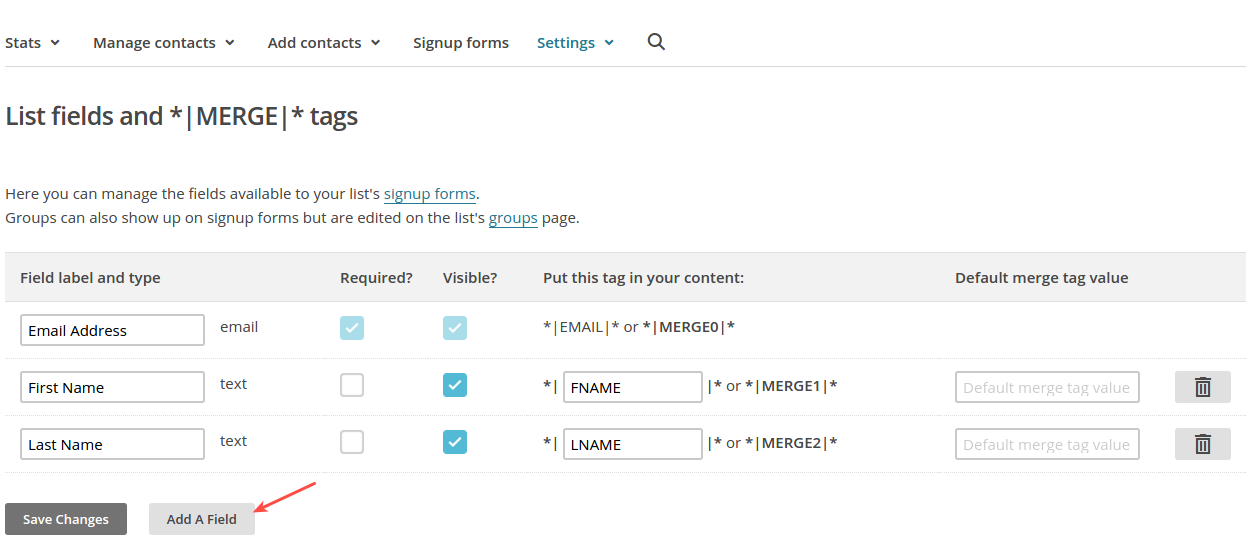
- Click the Add a Field button.
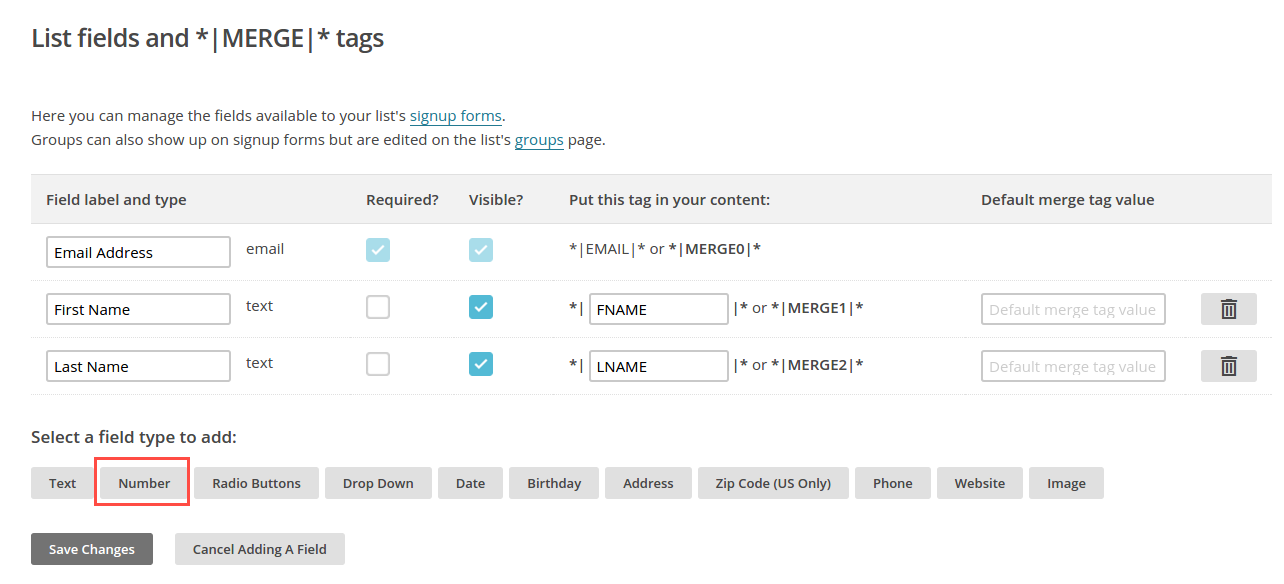
- Select Number for the field type.
- Name the field, for example Reward points.
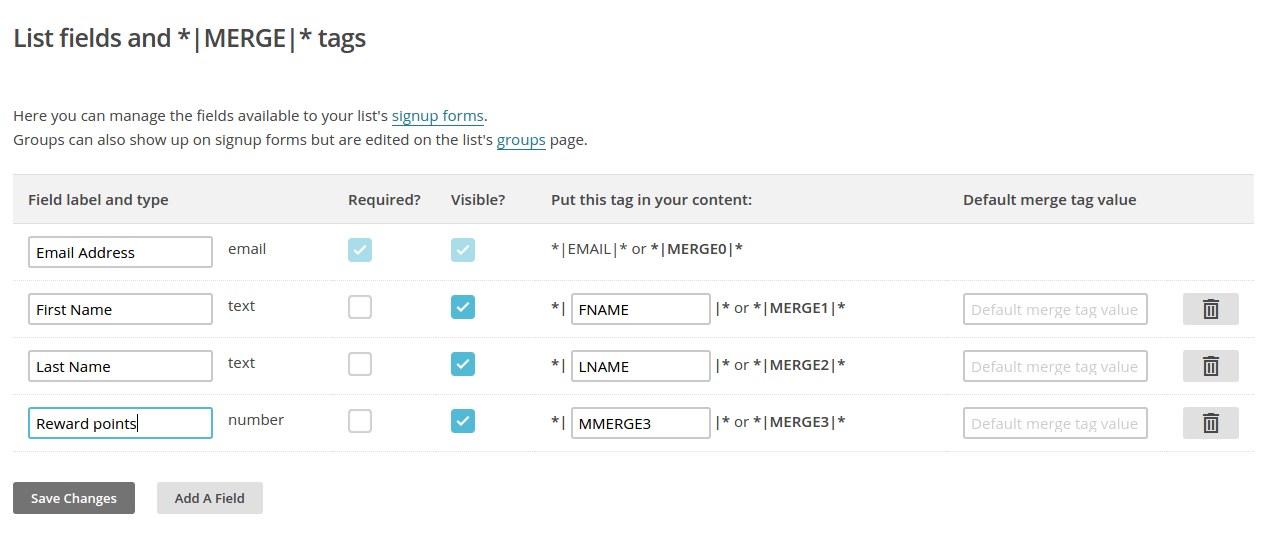
- Click Save changes.
Step 2. Setting up a mailing list
In the admin panel of your store,
- Go to Marketing > Advanced mailing lists.
- Select the list you set up in MailChimp at the previous step.
- Switch to the Fields mapping tab.
- Select the Others: Reward points field for the Profile field and Reward points for the MailChimp field.
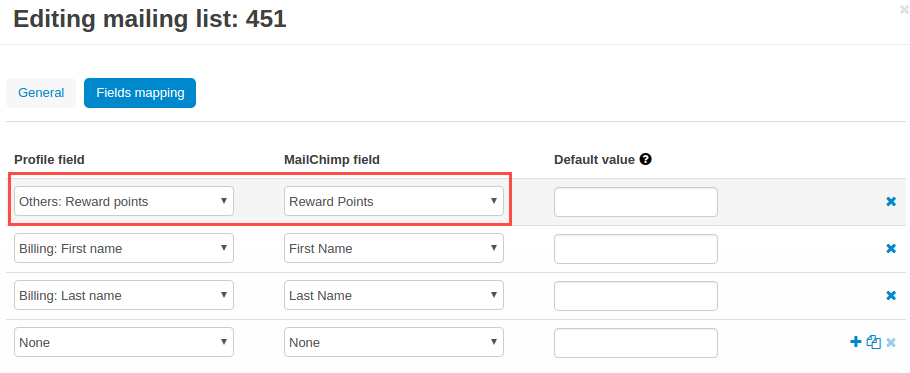
- Click Save.
Note
At this point you will not see values in the Reward points column in your MailChimp account. Proceed to the next step to know how to update information in MailChimp.
Step 3. Updating values in MailChimp
You’ll need to update information about the number of reward points your customers have in MailChimp. You can do this in two ways:
Option 1. Manually
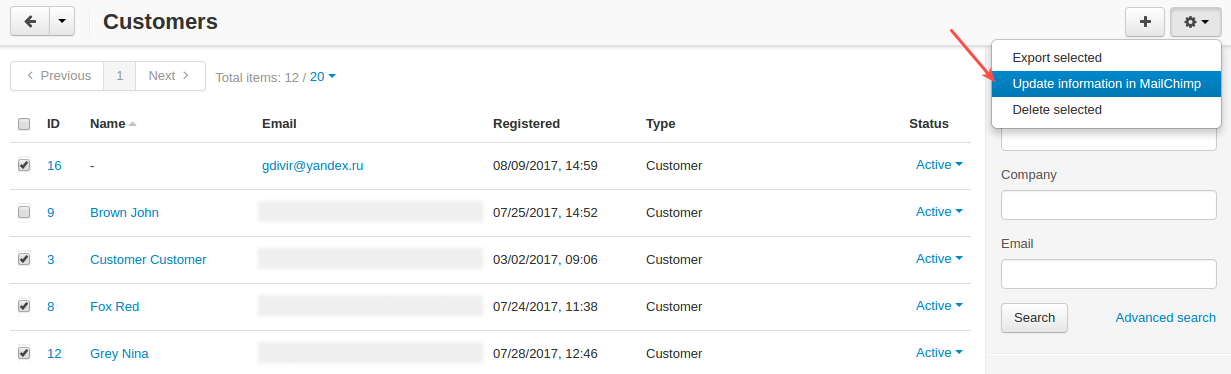
- Go to Customers > Customers.
- Select the necessary customers, then click the gear button in the top right corner and select Update information in MailChimp.
Option 2. By cron script
You can choose to update customer information, including the number of reward points customers have, automatically. To do so, you’ll need to set up a cron job on your server to run it according to a schedule. In this case you will not need to update customer information manually each time they receive reward points.
Use the following command:
php /path/to/cart/admin.php –dispatch=advanced_mailing_list_cron.update –cron_password=CRON_PASSWORD
where:
path/to/cart is the path to your website
CRON_PASSWORD is the access key to the cron script that you can find under Settings > Security settings.
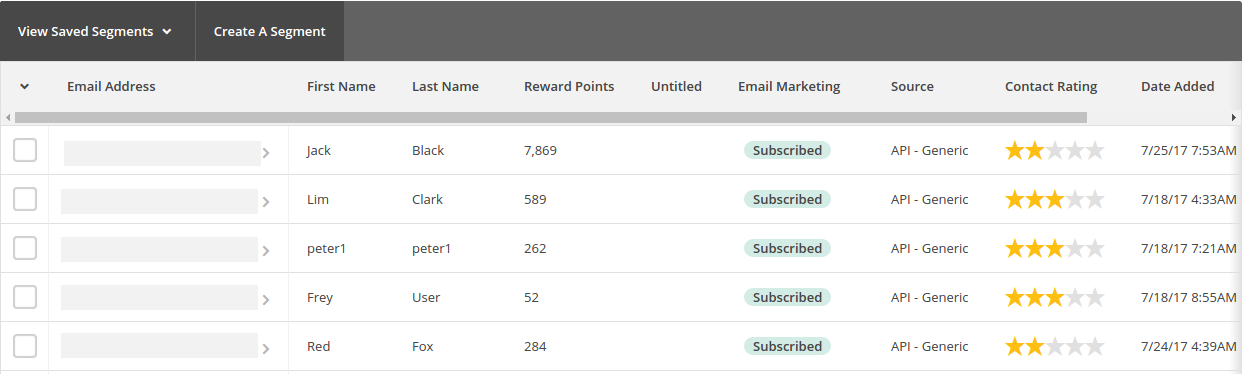
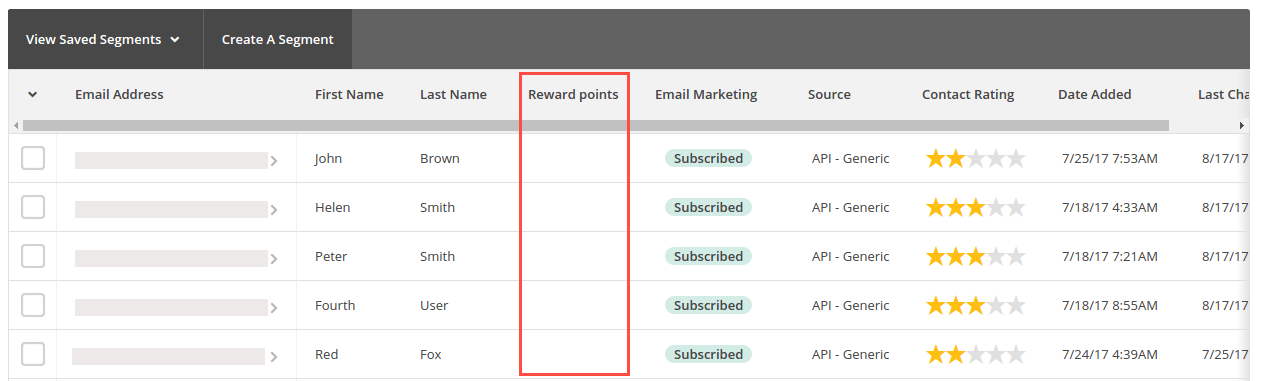
Once you update information in MailChimp, you will see values in the contacts list:

Creating a mailing list of customers with abandoned carts
Step 1. Setting up your MailChimp account
In your MailChimp account,
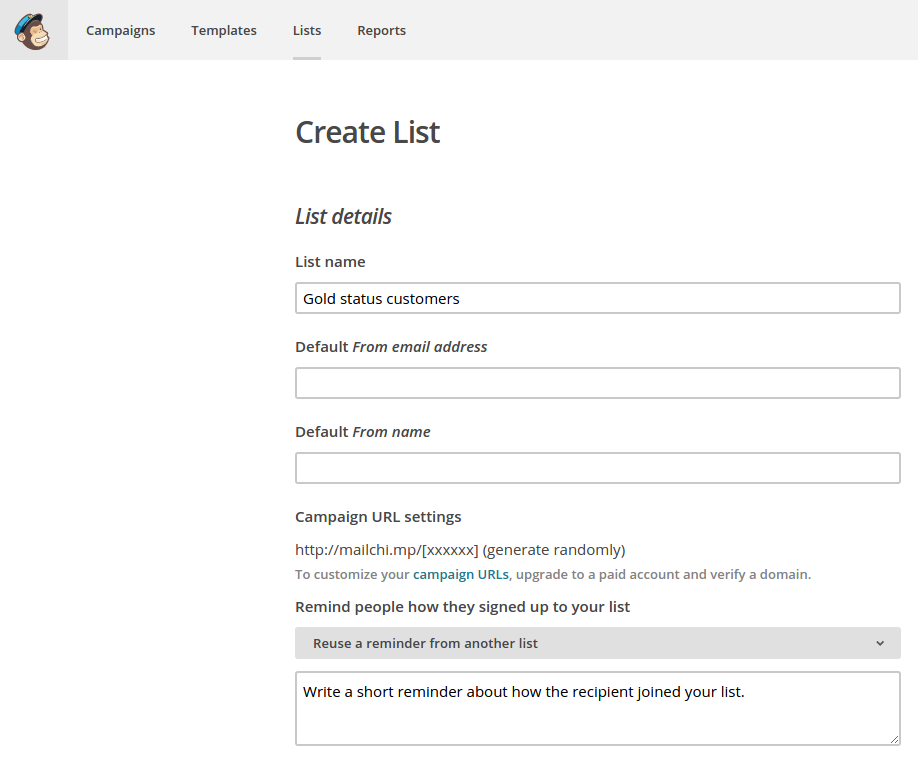
- Go to the Lists section and create a new list:
- Fill in the provided fields and click Save.

- You will see a created list with no contacts so far. To add them, proceed to the next steps.
Step 2. Creating a mailing list
In the admin panel of your store,
- Go to Marketing > Advanced mailing lists.
- Click the + button to add a new mailing list.
- In the General tab, give it a name, select the MailChimp list you’ve created at the previous step, and in the Actions drop-down select Abandoned/Live carts.
- In the Fields mapping tab, map the CS-Cart and MailChimp fields:
- Click Create.
Step 3. Adding users to the mailing list
You can do that in two ways: manually via the admin panel or automatically via a cron job on the server.
In the admin panel of your store,
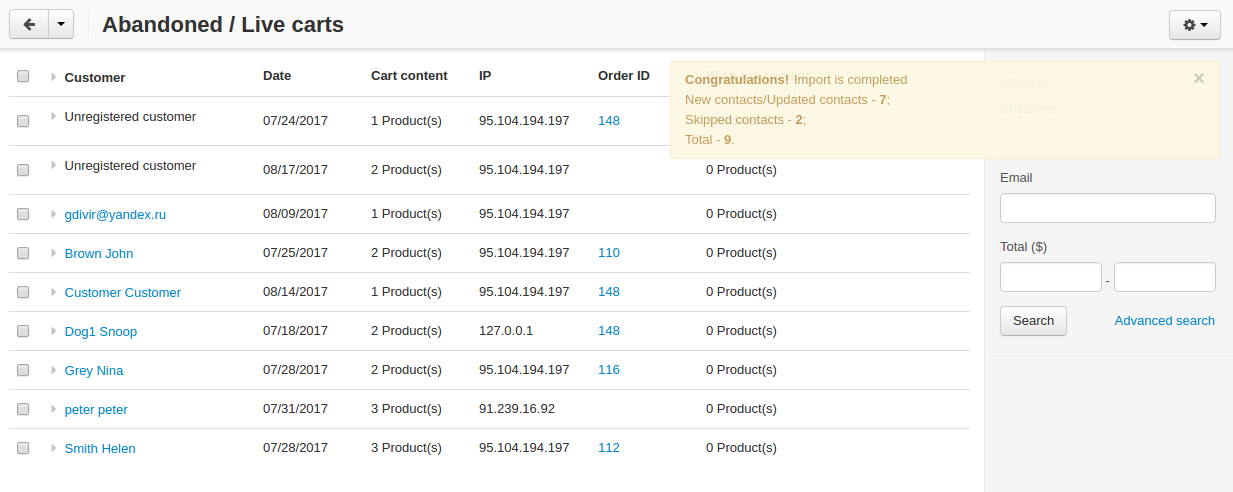
- Go to Marketing > Abandoned/Live carts.
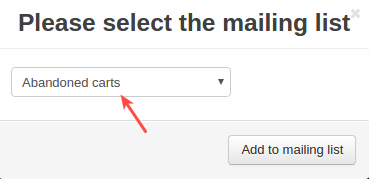
- Select the users whom you want to add to the mailing list, click the gear button in the top right corner, and select Add to mailing list.
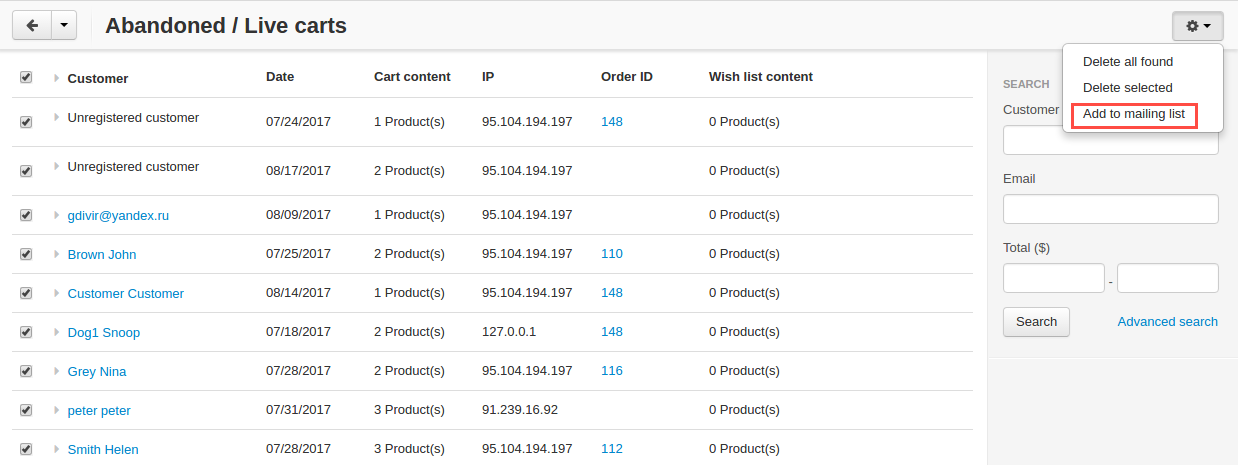
- In the pop-up, select the mailing list you’ve created at the previous step. Click Add to mailing list.
- You should see a notice showing the number of contacts that have been imported/updated or skipped.
Note
Unregistered users will not be imported to MailChimp.
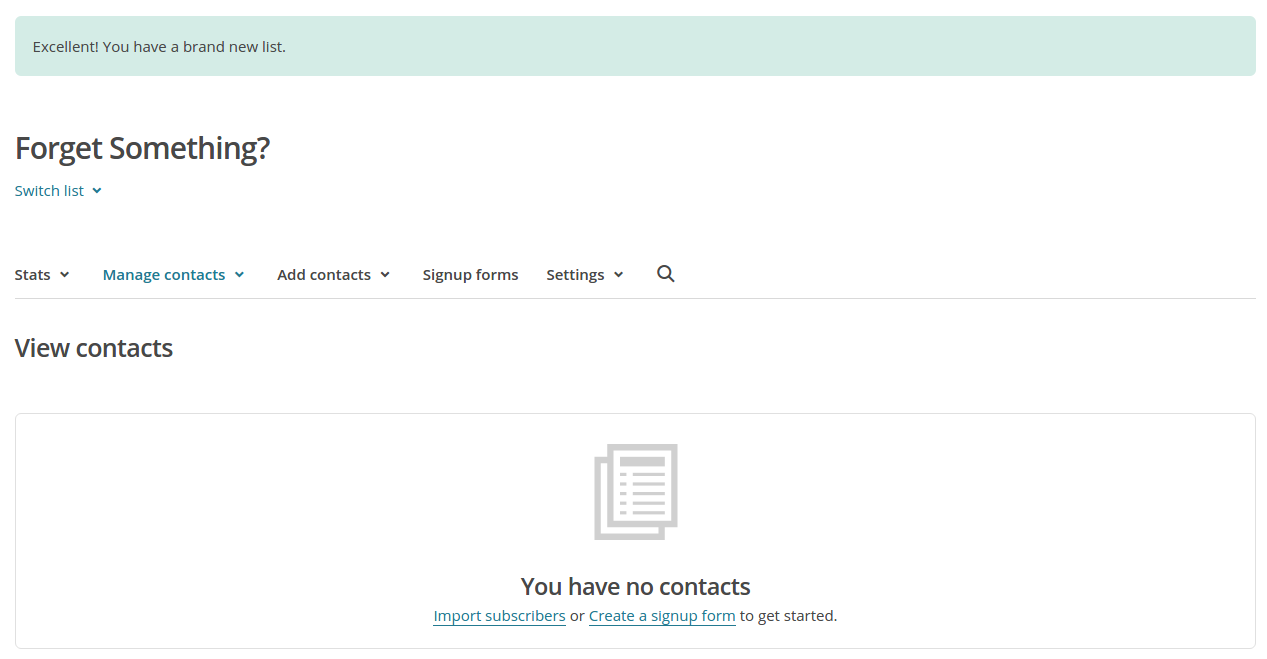
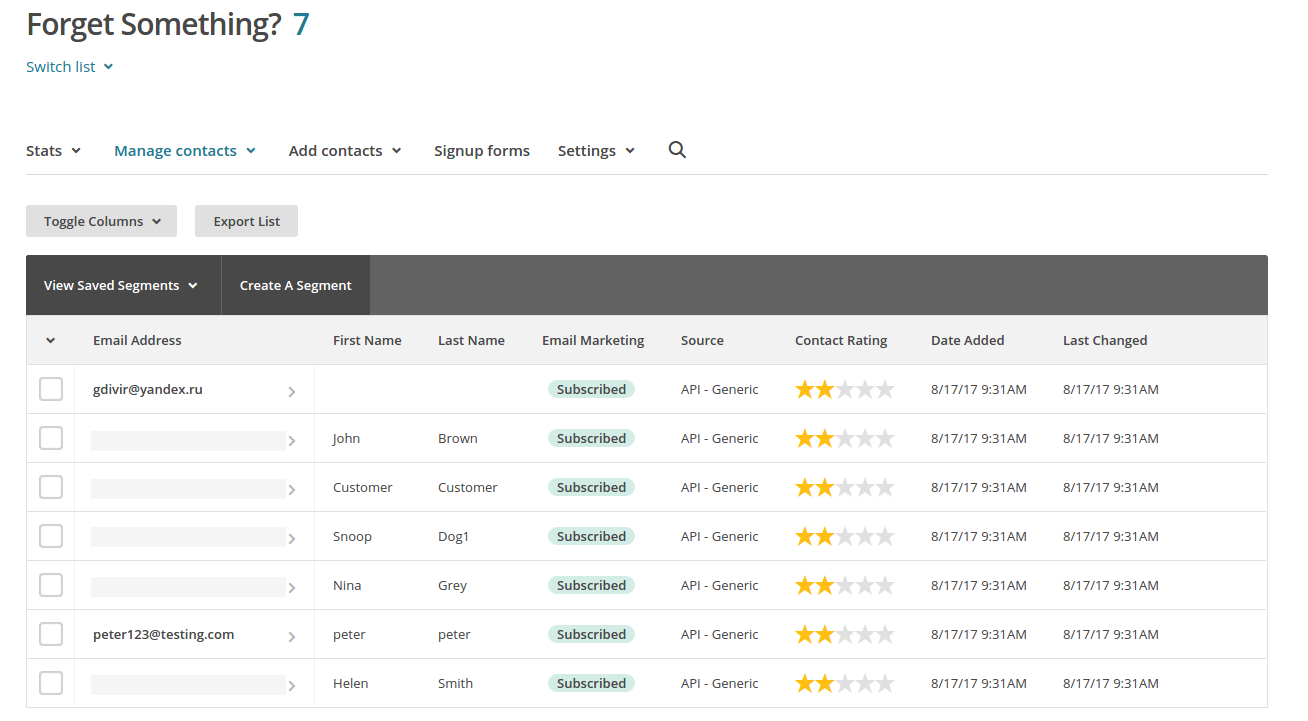
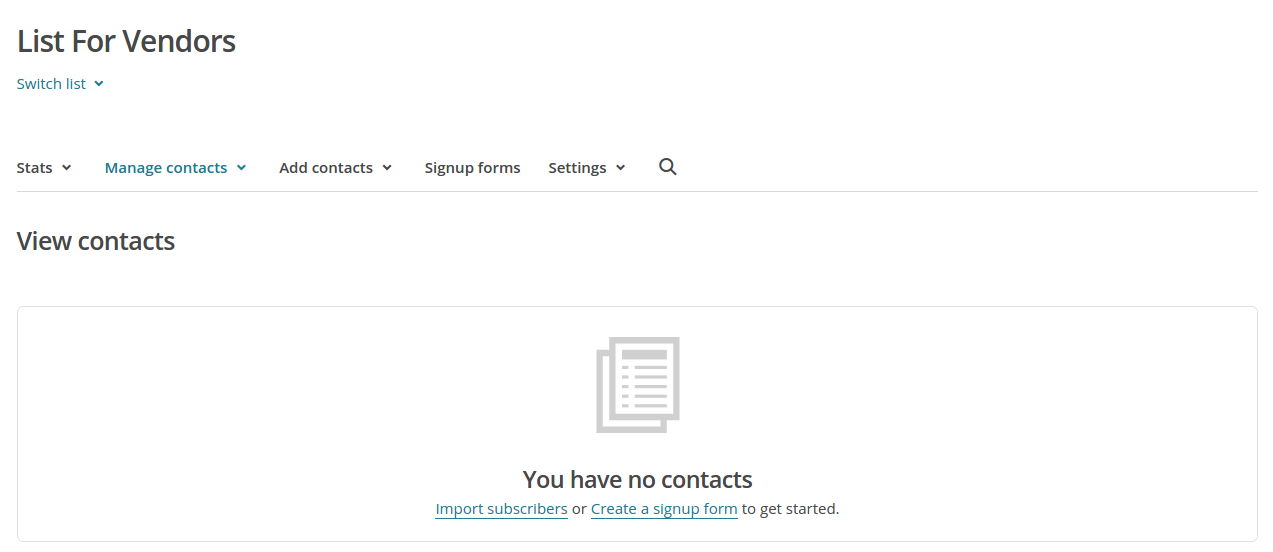
Done. Now you have a mailing list of customers with abandoned carts. Go back to the MailChimp list to see a list of contacts:
Alternatively, you can add users to the mailing list automatically. To do so, you will need to set up a cron job on the server where your store is installed.
Use the following command:
php /path/to/cart/admin.php –dispatch=advanced_mailing_list_cron.abandoned_carts –cron_password=CRON_PASSWORD
where:
path/to/cart is the path to your website
CRON_PASSWORD is the access key to the cron script that you can find under Settings > Security settings.
Now it’s time to create automated newsletters. Follow this guide to learn how.
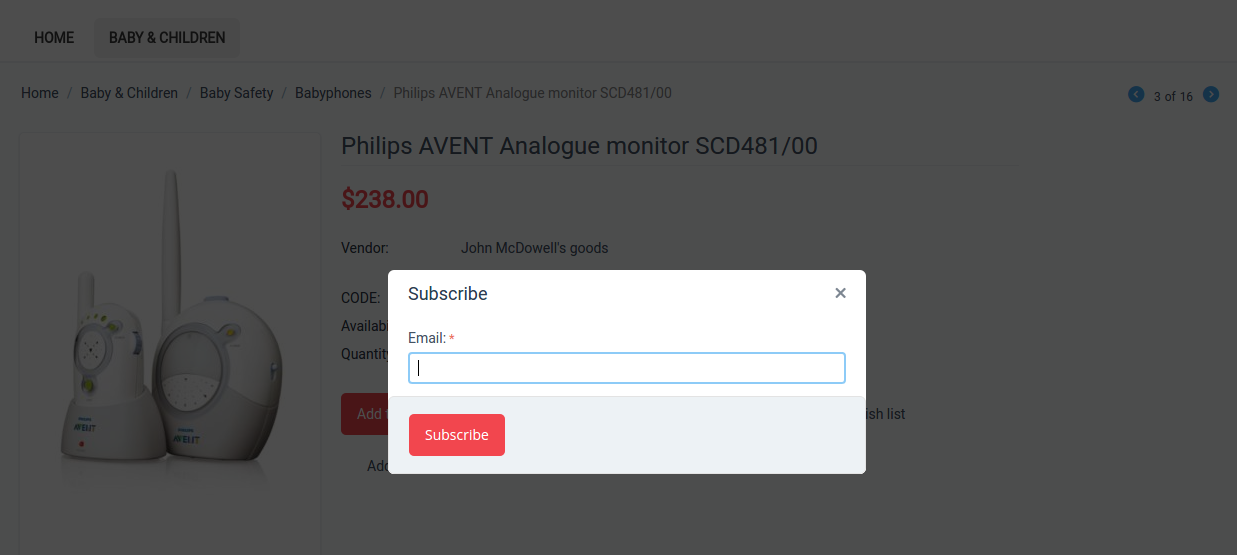
Subscribing customers to vendors (for Multi-Vendor stores)
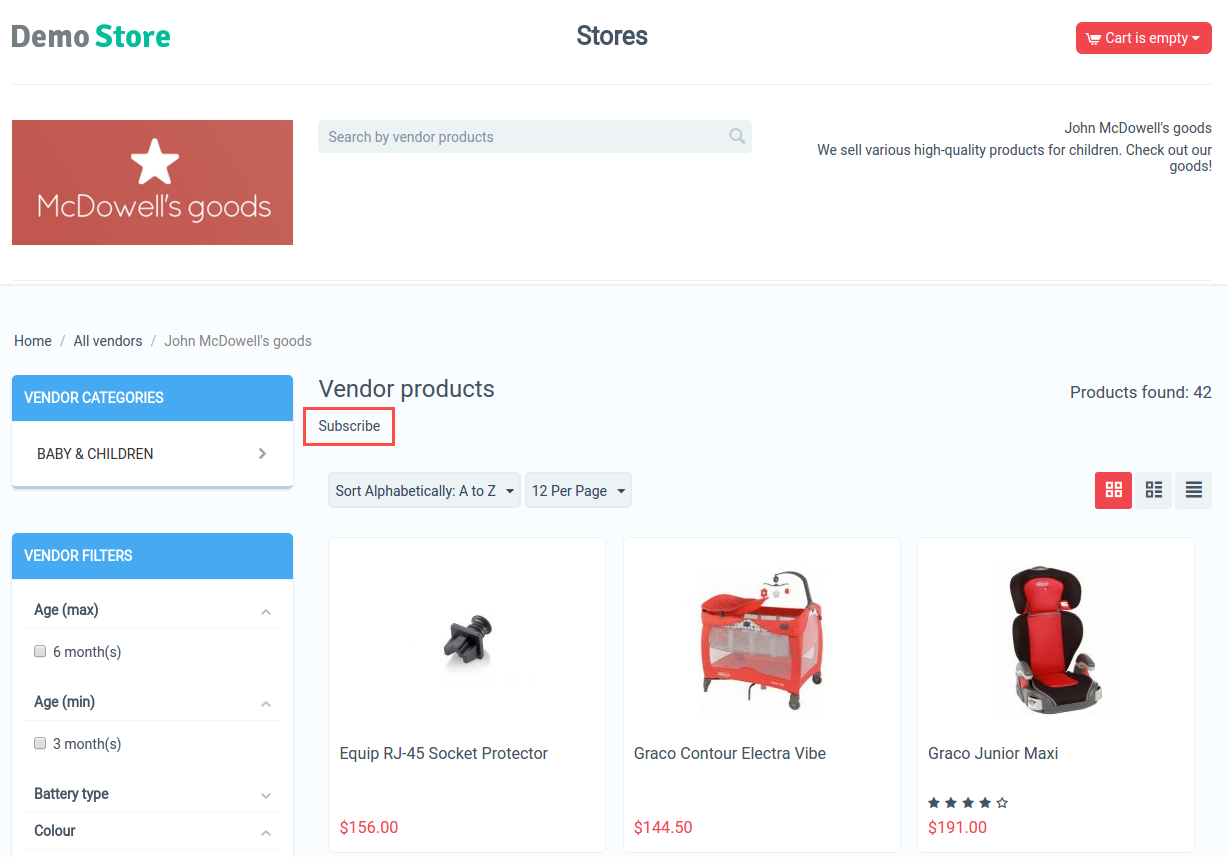
Customers can subscribe to vendors on the vendor products page:
and on the product details page:
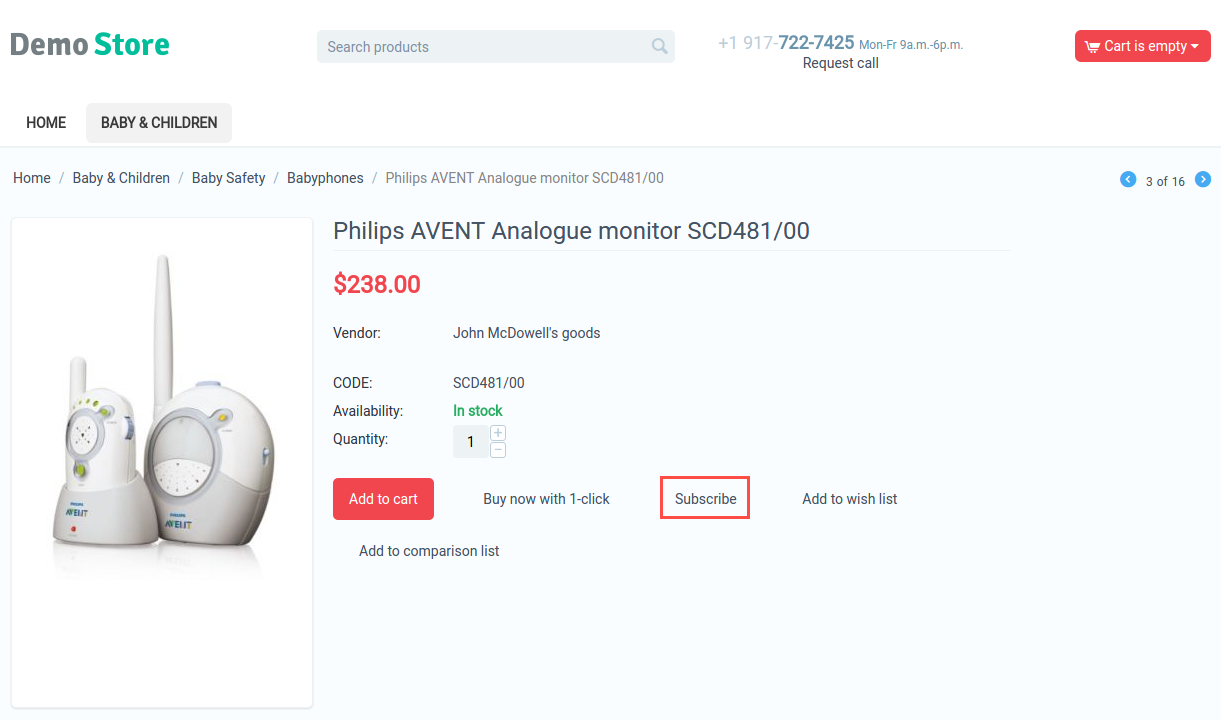
If the user is not authorized, the system will ask the customer to enter their email.
To learn how to set this up, follow the steps below.
Step 1. Setting up your MailChimp account
In your MailChimp account,
- Go to the Lists section and create a new list:
- Fill in the provided fields and click Save.
- You will see a created list with no contacts so far.
Step 2. Creating a mailing list
In the admin panel of your store,
- Go to Marketing > Advanced mailing lists.
- Click the + button to add a new mailing list.
- In the General tab, give it a name, select the MailChimp list you’ve created at the previous step, and in the Actions drop-down select Follow vendor.
- Click Settings and select vendors for this list. You can select one vendor, or you can select multiple ones.
- In the Fields mapping tab, map the CS-Cart and MailChimp fields:
- Click Create.
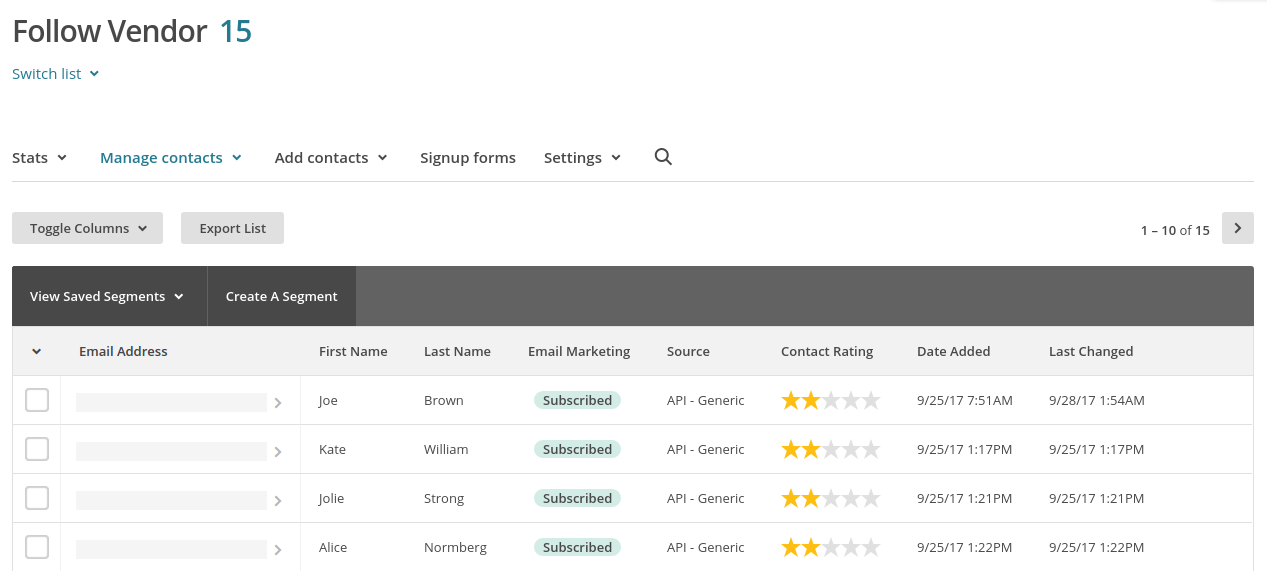
Now that you’ve created a mailing list in CS-Cart and a list in MailChimp, your customers can subscribe to vendors. Once they click “Follow vendor”, they will be automatically added to the list of contacts in the MailChimp list.
Creating a mailing list based on a user group
Step 1. Setting up your MailChimp account
In your MailChimp account,
- Go to the Lists section and create a new list:
- Fill in the provided fields and click Save.
- You will see a created list with no contacts so far. To add them, proceed to the next step.
Step 2. Creating a mailing list
In the admin panel of your store,
- Go to Marketing > Advanced mailing lists.
- Click the + button to add a new mailing list.
- In the General tab, give it a name, select the MailChimp list you’ve created at the previous step, and in the Actions drop-down select User groups. Click Settings and select the necessary user group.
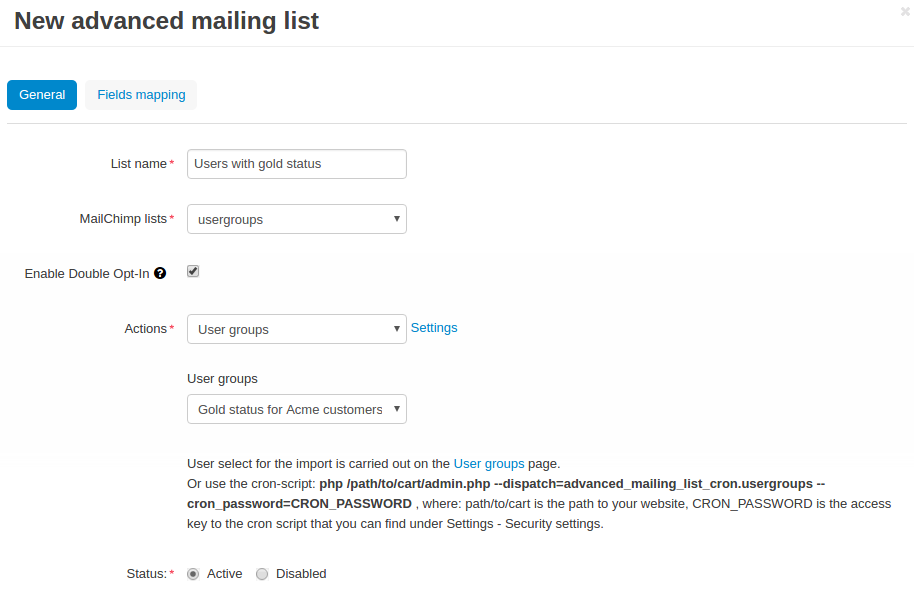
- In the Fields mapping tab, map the CS-Cart and MailChimp fields:
- Click Create.
Step 3. Adding users to the mailing list
You can do that in two ways: manually via the admin panel or automatically via a cron job on the server.
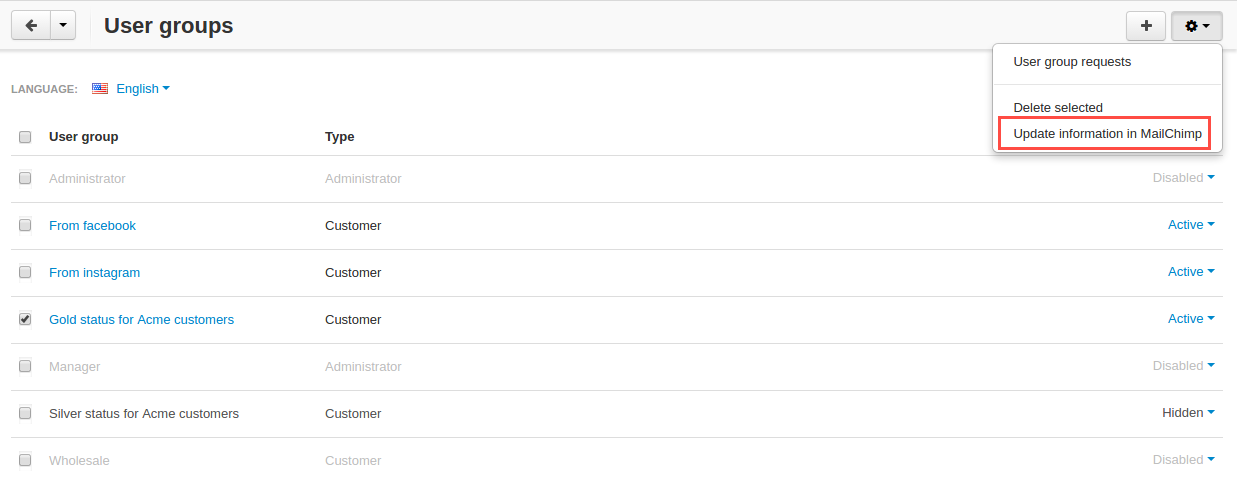
In the admin panel of your store,
- Go to Customers > User groups.
- Select the necessary user group which you want to synchronize with MailChimp, click the gear button in the top right corner, and select Update information in MailChimp.
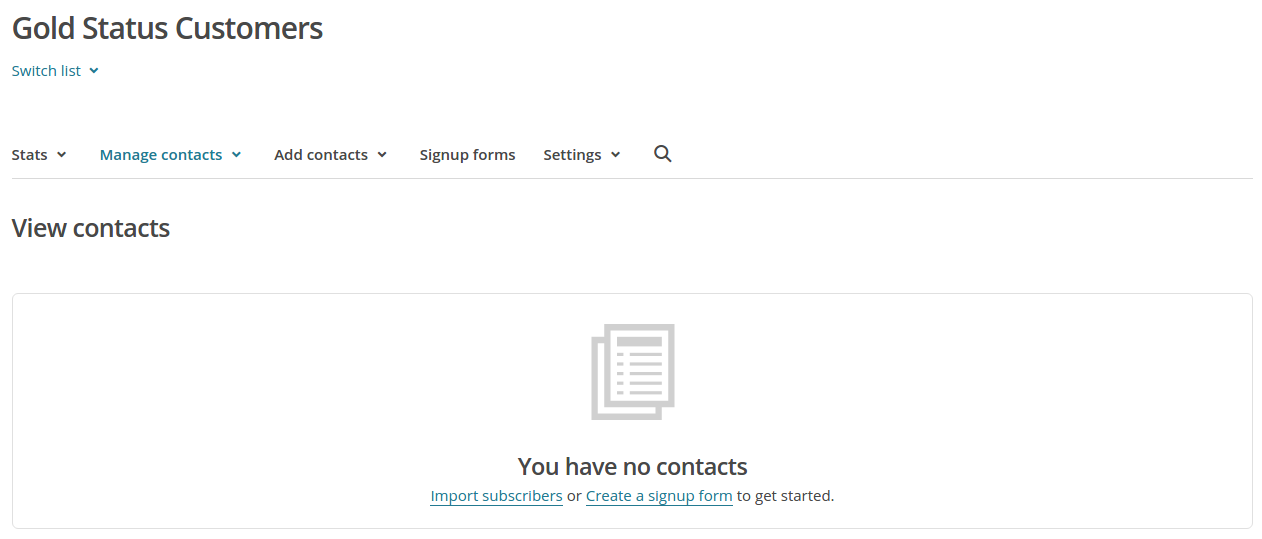
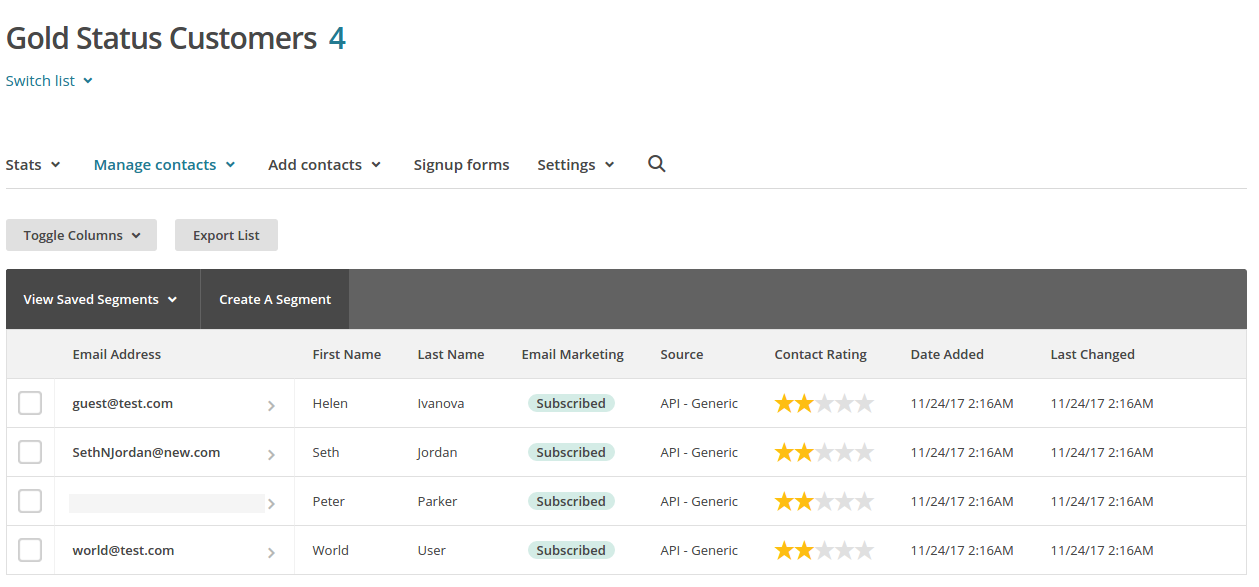
- The customers in the user group will be added to the corresponding list in MailChimp. Go back to the MailChimp list to see a list of contacts:
Alternatively, you can add users to the mailing list automatically. To do so, you will need to set up a cron job on the server where your store is installed.
Use the following command:
php /path/to/cart/admin.php –dispatch=advanced_mailing_list_cron.usergroups –cron_password=CRON_PASSWORD
where:
path/to/cart is the path to your website
CRON_PASSWORD is the access key to the cron script that you can find under Settings > Security settings.
Now it’s time to create automated newsletters. Follow this guide to learn how.
Display Subscription Checkbox
Display of subscription checkbox on a certain storefronts of MultiVendor Ultimate has been added to MailChimp Light add-on capability
In order to setup such display perform the following settings:
- Make sure that there more than one storefront
- Open the advanced mailing list page in the marketing submenu
- Create the newsletter campaign and select “Registration” and “Checkout” options
- Open the MailChimp Light add-on settings
- Select the storefronts to display the checkboxes on
Questions & Feedback
Have any questions that weren't answered here? Need help with solving a problem in your online store? Want to report a bug in our software? Find out how to contact us.