How To: Configure Multiple Storefronts in cPanel
Note
If you want to manage multiple stores, you’ll need to purchase additional storefront licenses or specify the desired number of storefronts when you buy a CS-Cart license.
This article describes how to create a storefront in CS-Cart and configure a hosting account with cPanel to support it.
Important
You only need one CS-Cart installation to manage all your storefronts.
CS-Cart supports additional storefronts
- in a web subdirectory (example.com/store2)
- on a subdomain (store2.example.com)
- on a different domain (store2.com)
Note
We assume that you have already installed CS-Cart on the example.com website, and its web root directory on the server is /home/account_name/public_html.
Create New Storefront in CS-Cart
- Open the administration panel of your store.
- Go to Administration → Stores.
- Click the + button.
Note
If you do not see the + button, make sure that the All stores value is selected to the right of the company name in the top left corner of the page.
- Fill in the following fields in the opened section:
- Store name—name of a storefront.
- Storefront URL—URL of the storefront (without the http:// prefix) via which the store will be available, like example.com/store2 (a subdirectory), store2.example.com (a subdomain), or store2.com (a different domain).
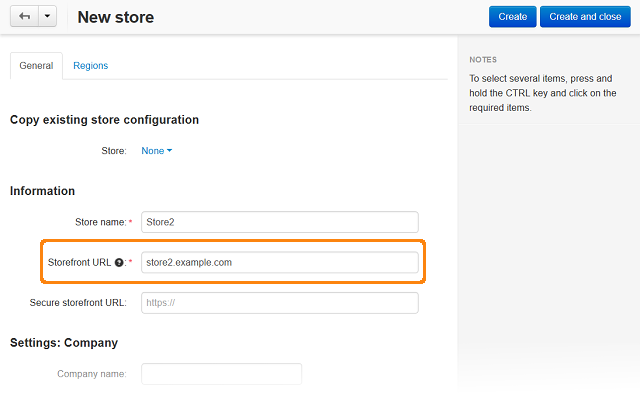
- Secure storefront URL (optional)—secure URL of the storefront (HTTP protocol protected by SSL).
- Settings: Company fields—company emails and company details that will be displayed to store customers in invoices, etc.
Hint
You can also select an existing store in the Copy existing store configuration section and tick the checkboxes of the entities (settings, layouts, languages, etc) that you want to copy to the new storefront.
- Click the Create and close button.
The storefront will be created. To make the storefront easier to distinguish from the other storefronts at this stage, select a unique theme for it on the Design → Themes page.
Important
The new storefront will be accessible by its URL only after you configure your hosting account.
Configure Your Hosting Account
It’s time to configure your hosting account in cPanel. Choose one of the following ways, depending on the Storefront URL you specified.
Way 1. Subdirectory (example.com/store2)
If CS-Cart is installed on a website (like example.com), and you want the additional storefront to be accessible via a web subdirectory (like example.com/store2), you only need to create that storefront in your CS-Cart administration panel. No other actions are required.
When you open http://example.com/store2 in your browser, you should see the appropriate storefront.
Way 2. Subdomain (store2.example.com)
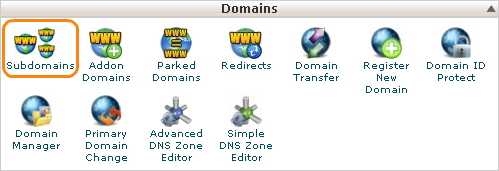
- Open the cPanel of the example.com website, if this is where CS-Cart is installed.
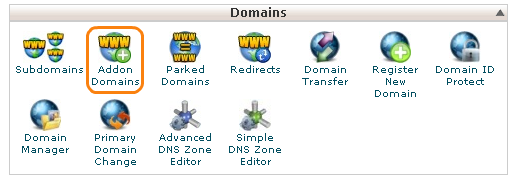
- Click on the Subdomains icon in the Domains section.
- Fill in the following fields in the opened section:
- Subdomain - type the name of the subdomain which you wish to create, for example, store2.
- Domain - select the desired domain you wish to create this subdomain for from the drop-down menu on the right of the Subdomain input field (in our case, example.com).
- Document Root - when you click on this field, it should be filled with a cPanel suggested location automatically. Change it to public_html (taking into account that the home directory is /home/account_name), so that the subdomain points to the directory, where CS-Cart is installed (/home/account_name/public_html).
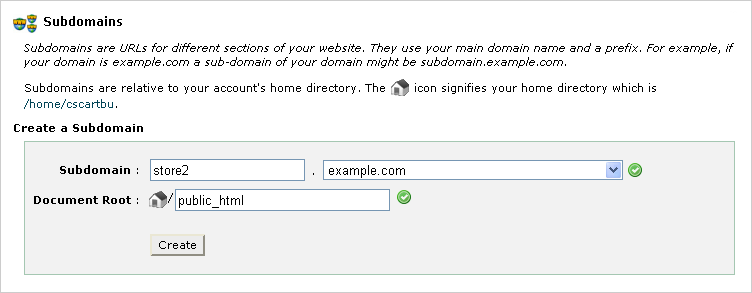
- Click the Create button. The new subdomain will be created and displayed in the subdomains table on the page.

- Open the store URL (http://store2.example.com in this example) in your browser. You should see the appropriate storefront.
Way 3. Different Domain (store2.com)
If CS-Cart is installed on one website (e.g., example.com) and its additional storefront should be accessible via a different domain name (e.g., store2.com), then the second domain name (store2.com) must point to nameservers of the first website (example.com). The second domain name (store2.com) must be added as an additional domain to the hosting account of the first website (example.com).
Follow the instructions below to set it up:
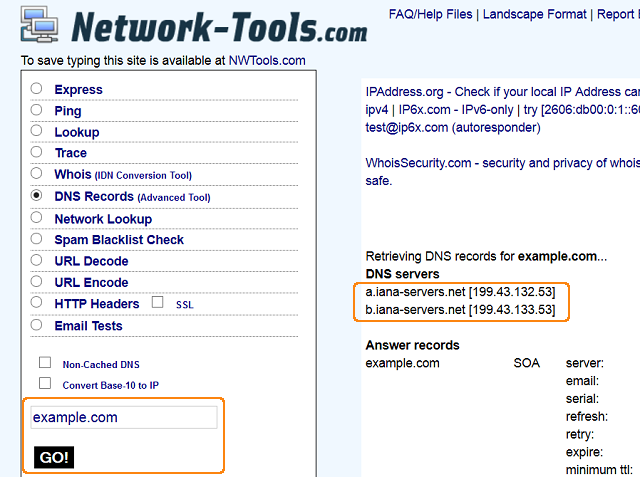
- Find out nameservers of the example.com domain name (change example.com to the domain name of your website, on which CS-Cart is installed). This information can be provided by the domain name registrar or it can be viewed via a network tool, for example, www.network-tools.com.
- Log in to the registrar account for the store2.com domain name and enter new nameservers. If you are unable to change your name server settings, contact your domain registrar’s customer service for further assistance.
Note
Once you have updated your nameservers, allow up to 48 hours for the new information to propagate through the Internet.
- Now open cPanel of the example.com website and click on the Addon Domains icon in the Domains section.
- Fill in the following fields in the opened section:
- New Domain Name - type the name of the domain which nameservers were changed at step 2, for example, store2.com (do not enter ‘www’ or ‘http://’ into the field).
- Document Root - when you click on this field, it should be filled with a cPanel suggested location automatically. Change it to public_html (taking into account that the home directory is /home/account_name), so that the different domain points to the directory with CS-Cart installed (/home/account_name/public_html).
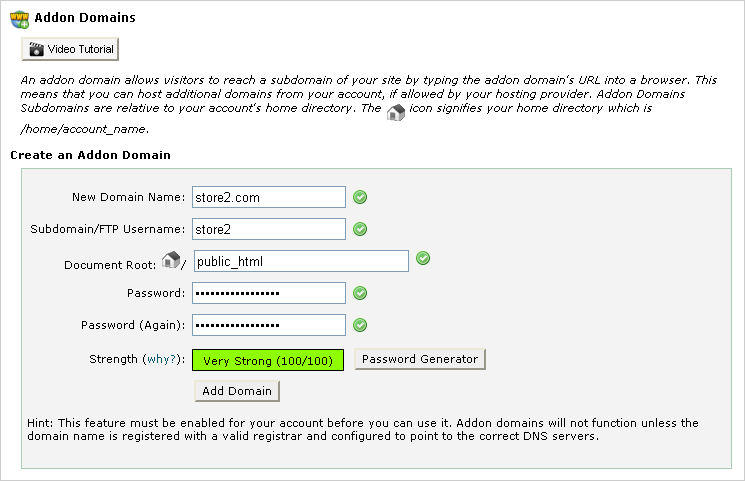
- Come up with a password and click the Add Domain button. The addon domain will be created and displayed in the table on the page.

Note
If you receive an error from park wrapper stating that “the domain is pointed to an IP address that does not appear to use DNS servers associated with this server”, it may mean that:
- you have not changed nameservers for store2.com properly, or
- the DNS propagation process is not finished yet. It can take up to 48 hours.
- Open the store URL (http://store2.com in this example) in your browser. You should see the appropriate storefront.
Questions & Feedback
Have any questions that weren't answered here? Need help with solving a problem in your online store? Want to report a bug in our software? Find out how to contact us.