Developing an Add-on in a Git Repository
Version control systems (VCS) have become a crucial part of collaborating on projects. A VCS keeps track of the changes to the project, allowing dozens or even hundreds of developers to work together. Services like GitHub can gather full-fledged developer communities around projects.
You can make the development and testing of an add-on with various CS-Cart versions easier by using a VCS and storing the add-on files in a separate directory. In this article we offer the best practices of developing an add-on in repository, separately from CS-Cart installation. We’ll be speaking about Git repositories, as Git is probably the most popular VCS.
The general idea of the workflow is as follows: create an add-on called sample_git_module in a separate directory, initialize a Git repository in that directory, and create symbolic links in the directory with CS-Cart installation. These links will contain the path to the files of the add-on in the repository. So, let’s begin.
Note
The examples provided here use Unix commands. You can run them on MacOS or Linux. We will also be using cscart-sdk—a console-based tool that facilitates routine tasks. We recommend installing the SDK before you read further. Check cscart-sdk repository for details.
1. Separate Add-on Files from CS-Cart Files
Due to CS-Cart’s architecture, the files of an add-on are stored in different directories:
- app/addons—PHP files
- design/backend/templates/addons—templates of the administration panel
- var/themes_repository/*/templates/addons—templates of the customer area
- var/langs/*/addons—translation files
Hint
Learn more about the structure of an add-on’s files and directories in CS-Cart Developer Guide.
We need to recreate this directory structure somewhere outside our CS-Cart installation. That way we’ll be able to store the add-on files separately.
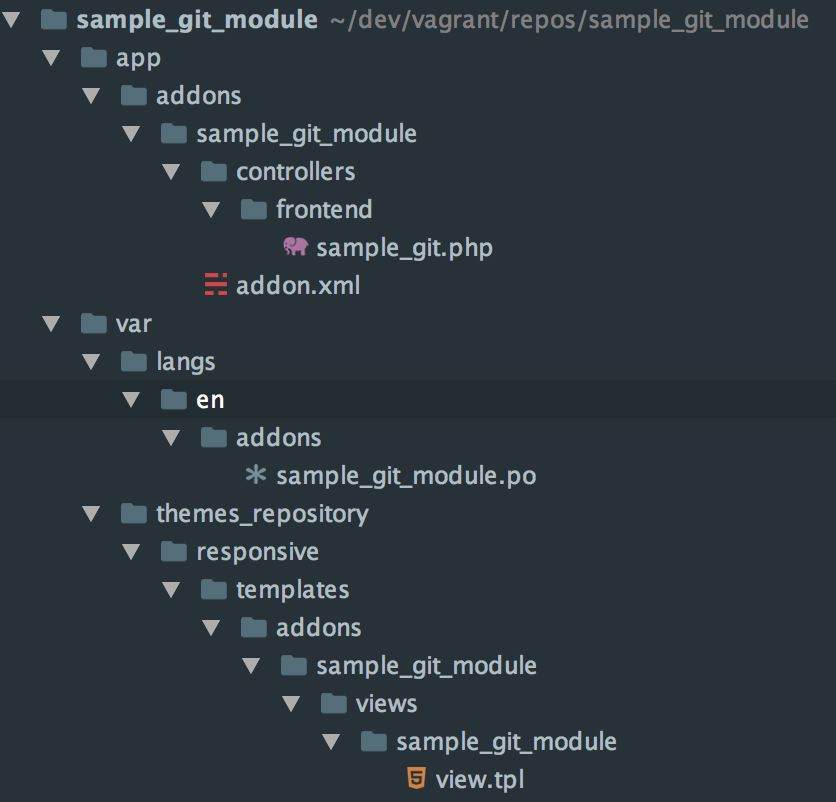
Let’s create a directory called sample_git_module and put all the files of our example add-on there:
- app/addons/sample_git_module/addon.xml—every add-on must have this file;
- var/langs/en/addons/sample_git_module.po—the translations of the add-on’s language variables;
- app/addons/sample_git_module/controllers/frontend/sample_git.php—a controller;
- var/themes_repository/responsive/templates/addons/sample_git_module/views/sample_git_module/view.tpl—the controller’s template.
In this example we’ve put sample_git_module into ~/dev/vagrant/repos, but you can store the directory with your add-on anywhere.

If you have already developed an add-on that is stored with the CS-Cart installation, you can easily copy or move all the files of the add-on to a separate directory with cscart-sdk. Run the addon:export command:
$ cscart-sdk addon:export addon_name /path/to/addon_directory /path/to/cscart
Important
This command will copy the add-on’s templates from the design directory to var/themes_repository.
Hint
Learn more about addon:export in the cscart-sdk documentation.
Now that we have the add-on files stored in a separate directory, we can initialize a Git repository there. But wouldn’t we have to create an archive with the add-on and install it in the Administration panel every time we want to test it? Luckily, there is a way to make development and debugging convenient and transparent.
2. Create Symbolic Links
Important
Symbolic links can contain absolute or relative paths to files. Examples below show how to create absolute symbolic links. They are only supported since CS-Cart & Multi-Vendor 4.3.6.
We recommend developing add-ons in the directory with the installed CS-Cart. But since the files of our add-on are now stored separately, we’ll put symbolic links to the add-on files in the corresponding CS-Cart directories.
In our case CS-Cart is installed in ~/dev/vagrant/vhosts/cs-cart. Let’s create a symbolic link to one of the directories of our add-on:
$ ln -s ~/dev/vagrant/repos/sample_git_module/app/addons/sample_git_module ~/dev/vagrant/vhosts/cs-cart/app/addons/sample_git_module
As a result, the app/addons/sample_git_module directory will appear in the CS-Cart installation. This directory includes the files we created earlier: addon.xml and controllers/frontend/sample_git.php. However, the new directory is just a symbolic link to the original directory, which is ~/dev/vagrant/repos/sample_git_module/app/addons/sample_git_module.
You can edit the files in this symlinked directory with a code editor of your choice, and those files will also change in the original directory. The add-on will also appear among the available add-ons in the Administration panel:

As you can see in the screenshot, the language variables of the add-on aren’t used. That’s because we created a symbolic link only for the app/addons/sample_git_module directory. Other files, including the files with the language variables, haven’t been synchronized with the CS-Cart installation directory.
We could use the ln -s command to create symbolic links for the required files and directories separately. However, cscart-sdk has the addon:symlink command, which creates symbolic links to all the files and directories of the add-on in the CS-Cart installation directory. The first argument of the command is the path to the files of the add-on, and the second argument is the path to the directory where CS-Cart is installed:
$ cscart-sdk addon:symlink ~/dev/vagrant/repos/sample_git_module ~/dev/vagrant/vhosts/cs-cart
Important
This command will create symbolic links to the add-on’s templates from var/themes_repository in the design directory.
Hint
If you work with CS-Cart or Multi-Vendor that is older than 4.3.6, use addon:symlink with the -r flag to create relative symbolic links. Learn more about addon:symlink in the cscart-sdk documentation.
3. Synchronize Files between Directories
Cscart-sdk has another useful command—addon:sync, which runs addon:export and then addon:symlink. The addon:sync command comes useful when you create a new file for your add-on in the CS-Cart installation directory. The command will move the file to the add-on’s repository and create a symbolic link in its place.
Hint
Learn more about addon:sync in the cscart-sdk documentation.
Questions & Feedback
Have any questions that weren't answered here? Need help with solving a problem in your online store? Want to report a bug in our software? Find out how to contact us.