How To: Make Your Store More Secure
Note
Tutorial Difficulty: 1 / 3
This article deals with some basic security concerns. Once you have installed CS-Cart a few more steps will ensure that your store is secure.
For all the steps below you can use an FTP client (like FileZilla), your hosting provider’s control panel, or connect to your server directly via SSH.
Step 1. Rename Admin.php
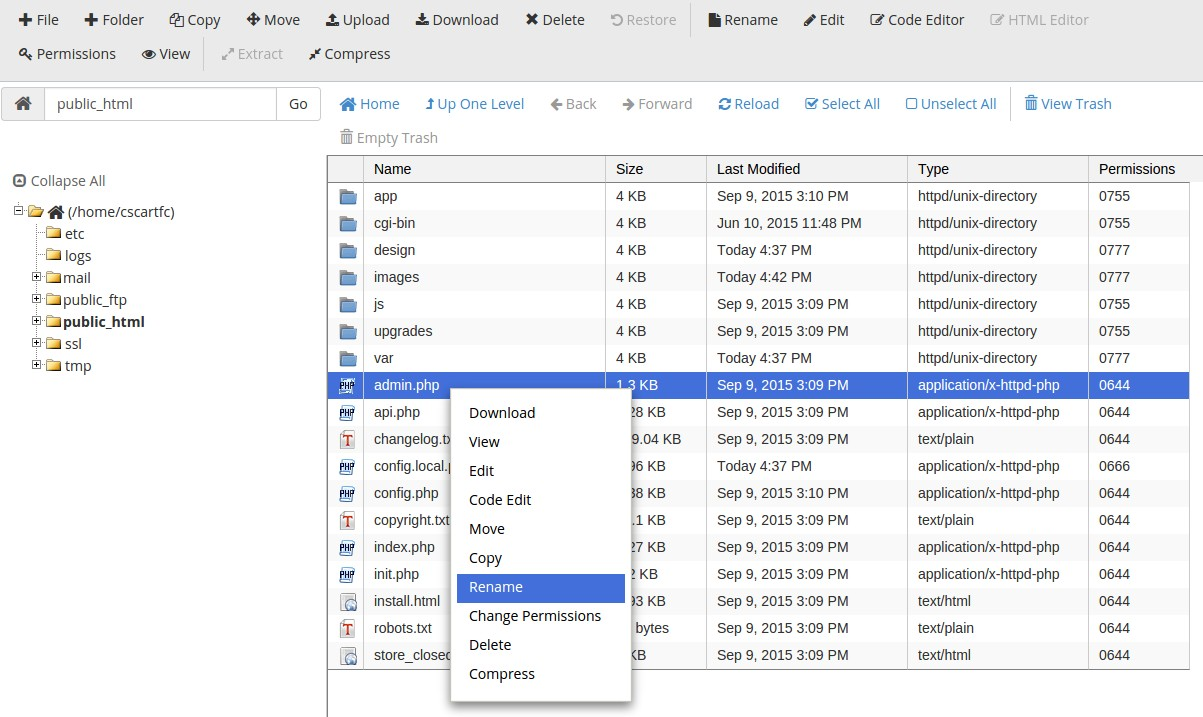
1.1. Rename the admin.php file to something different. Pick a name for it that only you would know.
In the example I went to cPanel → Files → File Manager, found admin.php, clicked on it with the right mouse button and chose Rename. Then I renamed it to my_admin_panel.php.
1.2. Modify the config.local.php to reflect the changes you’ve just made. Open it in an FTP client or the file manager of your host’s control panel.
| Find this line: | $config['admin_index'] = 'admin.php'; |
| Change the .php file name: | $config['admin_index'] = 'my_admin_panel.php'; |
Step 2. Delete the Install Folder
Usually CS-Cart deletes the Install folder once the installation is complete. But it’s better to be sure and remove it manually, if it’s still there. Look for the Install folder in the directory where you found the admin.php file.
Hint
In FileZilla or cPanel File Manager click on the folder with the right mouse button and choose Delete.
Step 3. Check the File Permissions
Make sure that these files and folders have the following permissions:
| config.local.php | 644 |
| design/.htaccess | 644 |
| images/.htaccess | 644 |
| var/.htaccess | 644 |
| var/themes_repository/.htaccess | 644 |
| design/index.php | 644 |
| images/index.php | 644 |
| var/index.php | 644 |
| var/themes_repository/index.php | 644 |
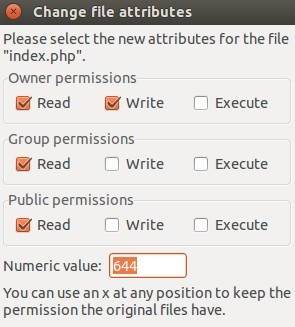
To change the permissions in FileZilla, click on the file or folder with the right mouse button, choose File Permissions and edit the Numeric value parameter. Or you can get 644 by ticking Read and Write for Owner permissions, and only Read for Group and Public permissions.
In cPanel FileManager select the file or folder and press the Permissions button, or right click on the file and select Change Permissions. To get 644, tick Read and Write for User, and only Read for Group and World.

Important
The .htaccess files may be hidden. To fix that in FileZilla go to Server → Force showing hidden files (or View → Show Hidden Files in older versions). In cPanel File Manager go to Settings (top right corner of the screen) and tick the Show hidden files (dotfiles) checkbox.
To change permissions via SSH run the following commands:
chmod 644 config.local.php
chmod 644 design/.htaccess images/.htaccess
chmod 644 var/.htaccess var/themes_repository/.htaccess
chmod 644 design/index.php images/index.php
chmod 644 var/index.php var/themes_repository/index.php
Step 4. Configure Security Settings
Important
Before you enable secure connection for the storefront or in the administration panel, make sure your web server supports a secure connection.
For more information on how to define the HTTPS host, please refer to step 2 of this article.
You can configure the security settings of your store in the administration panel under Settings → Security settings.
If your web server supports a secure connection, you can tick the corresponding checkbox to enable secure connection in the administration panel.
Note
Secure connection is available for the storefront: you can enable it for the profile, checkout, and order pages. To make the whole store work through HTTPS connection, choose Secure full site in the Enable secure connection for the storefront select box.
Step 5. Use Access Restrictions
The Access Restrictions add-on allows you to limit access to the administration panel and storefront based on IP addresses of the users. To learn how to restrict access to your administration panel with the Access Restrictions add-on, read this article.
Questions & Feedback
Have any questions that weren't answered here? Need help with solving a problem in your online store? Want to report a bug in our software? Find out how to contact us.